REAPER 7.66+ Stop Letting Your GPU Sleep on the Job
REAPER 7.66+ introduces hardware video decoding, which can significantly reduce CPU usage from video tracks in your project. Here is a summary of the configuration steps I put together, hoping it helps.
Windows
1. Environment Setup
Install FFmpeg. Here we'll use Microsoft's own winget to quickly install the Shared build of FFmpeg.
⚠️ Which FFmpeg version you need depends on your REAPER version. REAPER 7.80+ supports FFmpeg 9.x; REAPER 7.66–7.79 only works with FFmpeg 8.x and older — see the compatibility note below.
- Open PowerShell and run this command:
winget install Gyan.FFmpeg.Shared- On REAPER 7.80+, this is all you need — the current 9.x build works fine
- Still on REAPER 7.66–7.79? Install 8.x instead:
winget install Gyan.FFmpeg.Shared --version 8.1.2, then pin it so a laterwinget upgrade --allcan't push you onto 9.x:winget pin add Gyan.FFmpeg.Shared
- winget will automatically add FFmpeg to your system environment variables — this is the easiest approach
- Update your graphics driver to the latest version
- Make sure your REAPER version is greater than 7.66 (7.80+ recommended)
FFmpeg version compatibility
Short version: REAPER v7.80 (September 13, 2026) added FFmpeg 9.x support (Video: add FFmpeg 9.x support). If you're on 7.80 or newer, just install the latest FFmpeg.
If you're on REAPER 7.66–7.79, FFmpeg 9.x will not load. Here's what I found digging into this on my own machine with REAPER 7.79:
REAPER doesn't link against FFmpeg — it probes your PATH at runtime for avcodec-<N>.dll, avformat-<N>.dll and friends, trying a hardcoded list of major versions. In REAPER 7.79's Plugins\reaper_video.dll, that list is:
51, 52, 54, 55, 56, 57, 58, 59, 60, 61, 62
62 is the ceiling there — there is no 63.
| FFmpeg | Ships | REAPER 7.66–7.79 | REAPER 7.80+ |
|---|---|---|---|
| 8.x (e.g. 8.1.2) | avcodec-62.dll | ✅ works | ✅ works |
| 9.x (e.g. 9.0.1) | avcodec-63.dll | ❌ not found | ✅ works |
The nasty part is that on 7.79 and earlier, installing 9.x looks completely fine: the install succeeds, PATH gets updated, and ffmpeg -version works in your terminal. But REAPER just reports FFmpeg/libav not found and quietly falls back to CPU decoding — the DLLs are simply named one major version higher than anything it knows to look for. If you hit this, either update REAPER to 7.80+ (the easy fix) or roll FFmpeg back to 8.1.2, the newest 8.x build (it reports libavcodec 62.28.102).
💡 There are also some interdependencies between FFmpeg and your graphics driver, so keeping the driver up to date is still the right move.
2. How to Configure
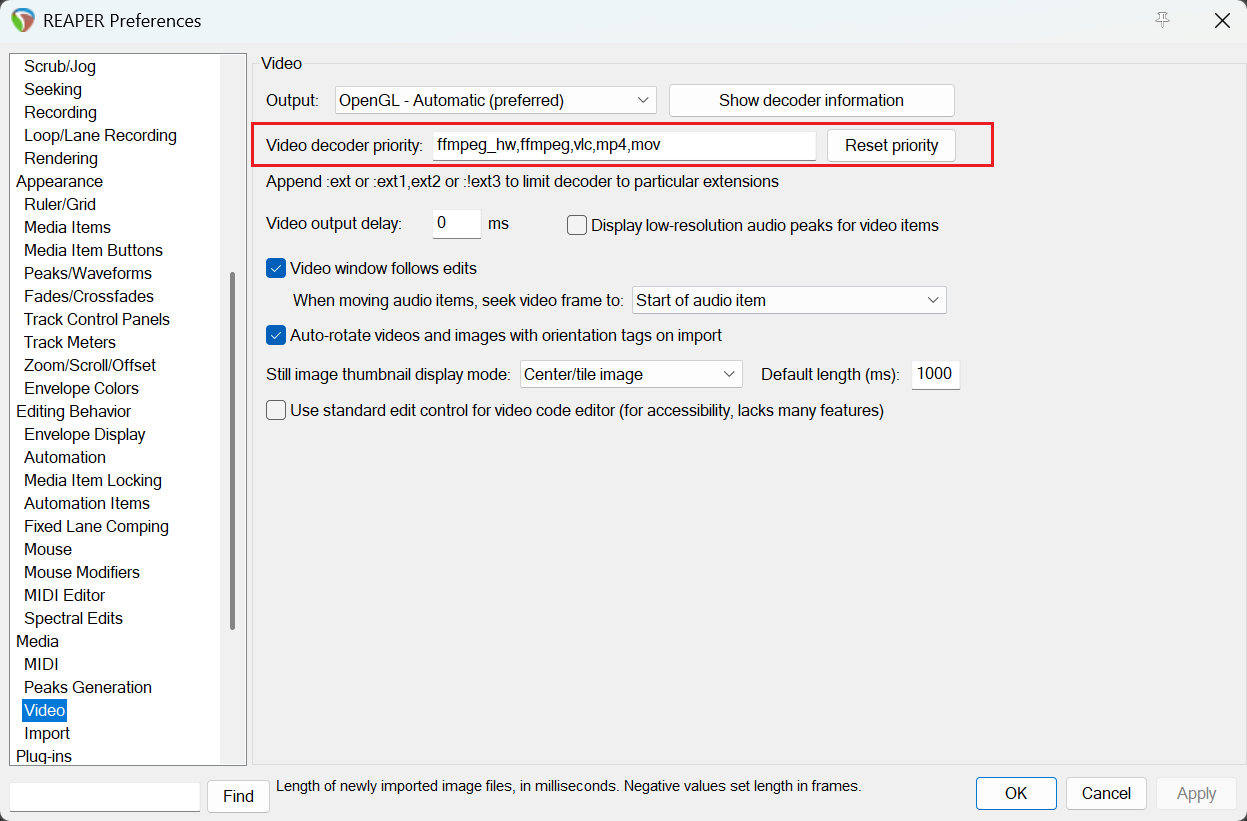
- Open REAPER, Options -> Preferences -> Media -> Video
- At the beginning of Video decoder priority, add:
ffmpeg_hw,ffmpeg, - You may want to keep
vlcas well — it's useful for all kinds of odd formats
3. How to Verify
- Import a video
- Ctrl + F2 (or right-click -> Source Properties)
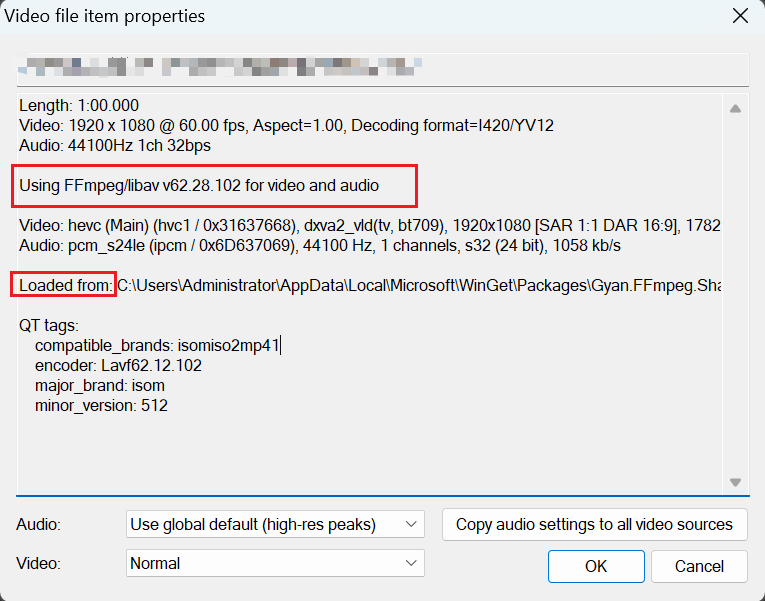
- In the panel that opens, verify that you see something like:
Using FFmpeg/libav ... for video and audio(the leading number is the libavcodec major version:63for FFmpeg 9.x,62for FFmpeg 8.x — e.g. 8.1.2 readsv62.28.102; the minor numbers don't matter, see the compatibility note above) andLoaded from..., which should point to a path on your C: drive
4. Done!
Your gaming GPU is now pulling its weight. If you want to double-check, open Windows Task Manager -> Performance.
As you scrub and click rapidly in REAPER (anything that causes rapid scrubbing), your GPU usage should move along with it, which will save you a lot of CPU power.
Mac
⚠️ I haven't fully verified this section on my own Mac yet; these are the expected steps based on the Mac toolchain (Homebrew + VideoToolbox). I'll update this note once I've confirmed them. If you get it working first, feedback is welcome.
Mac doesn't have NVIDIA/AMD branding in the same way; hardware decoding goes through Apple's own VideoToolbox (the Media Engine on Apple Silicon, or the integrated GPU on Intel machines). The setup idea is the same as on Windows; the differences are mainly how FFmpeg is installed and where to verify it.
1. Environment Setup
- If you haven't installed Homebrew yet, go to brew.sh and follow the instructions
- Open Terminal and run:
brew install ffmpeg - Update macOS to a relatively recent version (VideoToolbox depends on the system media frameworks)
- Make sure your REAPER version is greater than 7.66
💡 Homebrew installs FFmpeg to
/opt/homebrew(Apple Silicon) or/usr/local(Intel). The version compatibility described in the Windows section applies here too — REAPER probes forlibavcodec.<N>.dylibthe same way. On REAPER 7.80+, Homebrew's current FFmpeg 9.x is fine; on 7.66–7.79 you'll need to either update REAPER or pin FFmpeg back to 8.x (brew install ffmpeg@8, if available on your setup).
2. How to Configure
- Open REAPER, REAPER -> Settings (Preferences) -> Media -> Video
- At the beginning of Video decoder priority, add:
ffmpeg_hw,ffmpeg, - You can likewise keep
vlc; it's handy for odd formats
💡 If videos won't open after the change, or you don't see FFmpeg in the verification step, REAPER probably isn't finding the Homebrew dynamic libraries (
libav*.dylib). Check that/opt/homebrew/lib(or/usr/local/lib) actually contains these libraries, and restart REAPER if needed to force a rescan.
3. How to Verify
- Import a video
- Right-click -> Source Properties (the shortcut may differ from Windows' Ctrl + F2, so use the context menu to be safe)
- In the panel that opens, verify that you see
Using FFmpeg/libav ...;Loaded from...should point to a Homebrew path (e.g./opt/homebrew/...or/usr/local/...), not a system path
4. Done!
- Open Activity Monitor -> Window -> GPU History (or look at the GPU column)
- Scrub and click rapidly in REAPER to trigger rapid scrubbing; GPU usage should fluctuate, indicating hardware decoding is active
📌 The rendering (encoding) section is below under "GPU-Accelerated Rendering?" — but as noted, on Mac via VideoToolbox the real-world benefit and stability are not as good as on Windows, so rendering is recommended on Windows; on Mac the main gain is smoother playback/editing from hardware decoding.
GPU-Accelerated Rendering?
As we all know, videos exported from REAPER are either clear but huge, or very blurry. Once the environment is set up, it means you can use FFmpeg to encode and transcode the video you want to render.
Based on my tests on an NVIDIA GPU, a 1-minute, 1080p, 60fps video ends up around 16 MB after rendering. But this depends on scene complexity, because FFmpeg's encoding is variable bitrate.
However, due to system differences, GPU-accelerated rendering is not recommended on Mac — Mac's hardware encoder goes through VideoToolbox (h264_videotoolbox / hevc_videotoolbox), and in practice the benefit and stability are not as good as on Windows. Windows gives the best results.
1. Specific Steps
- Open REAPER's Render... dialog
- Format -> FFmpeg/libav encoder (video, compressed audio)
- File: MPEG-4
- Video: H.264 or H.265 both work. Because we'll use constant quality mode (constqp/cqp), the bitrate (kbps) field is ignored, so whatever you enter there won't affect the result
- In the Video row's options, click the + button to select your GPU and quality details
- Start rendering~
2. Another Approach
The text in options determines how FFmpeg is used, which gives us more flexibility.
Here are the parameter strings I tested:
| GPU | Encoder | String | Quality Parameter |
|---|---|---|---|
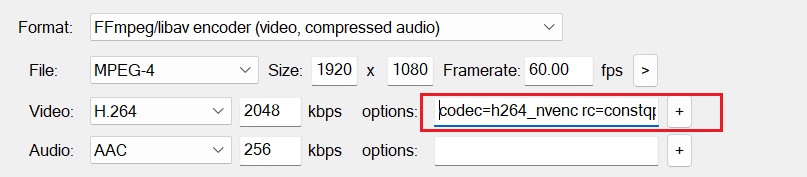
| NVIDIA H.264 | h264_nvenc | codec=h264_nvenc rc=constqp qp={Q} | qp |
| NVIDIA H.265 | hevc_nvenc | codec=hevc_nvenc rc=constqp qp={Q} | qp |
| AMD H.264 | h264_amf | codec=h264_amf usage=transcoding quality=balanced rc=cqp qp_i={Q} qp_p={Q} | qp_i + qp_p |
| AMD H.265 | hevc_amf | codec=hevc_amf usage=transcoding quality=balanced rc=cqp qp_i={Q} qp_p={Q} | qp_i + qp_p |
{Q}means a number goes here; this value determines render quality. The smaller the number, the higher the quality and the larger the file size; conversely, the image becomes blurrier and the file size shrinks.
Use it as shown in the screenshot: copy the configuration string you need into REAPER.
Based on my tests:
Starting point for NVIDIA: qp = 25, i.e.
codec=h264_nvenc rc=constqp qp=25Starting point for AMD: qp = 28, i.e.
codec=h264_amf usage=transcoding quality=balanced rc=cqp qp_i=28 qp_p=28
But I personally recommend H.265 (HEVC), because compared to H.264 it gives smaller file sizes at the same quality (better compression efficiency). The trade-off is that encoding speed is usually about the same as H.264 or slightly slower; another downside is whether it will play depends on the player — generally VLC and similar players have no problem.
Recommended QP range is 22–30; lower bound 15, upper bound 40.
15–0 is near-lossless, file size balloons, the gain probably isn't worth it, and you may hit encoder anomalies at extremely low QP.
40+ gives severe banding and blocking artifacts — not usable as reference. 40 is the boundary of "still watchable."
About Mantrika Tools
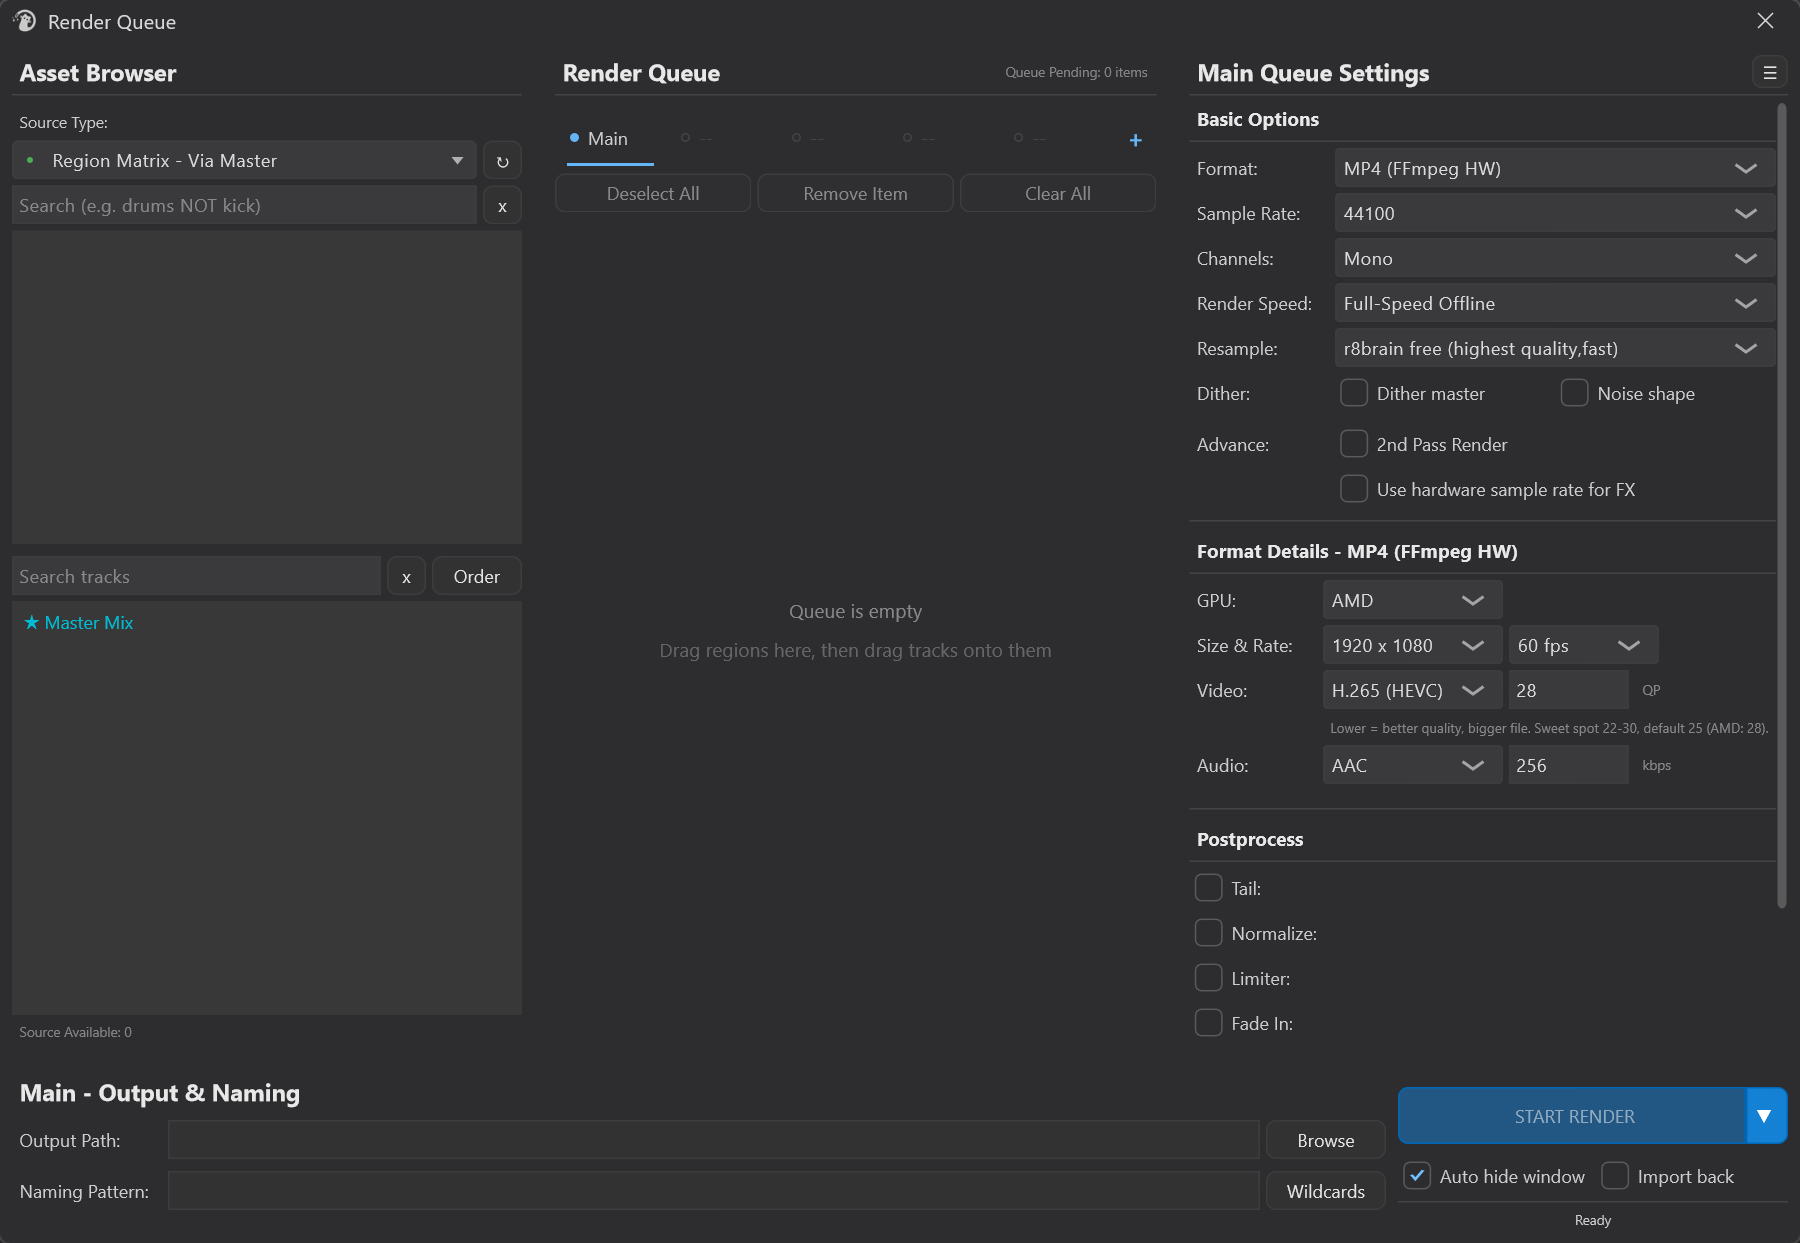
I've also integrated this into the Render Queue feature of Mantrika Tools.