
Advanced Rename
The companion manual for this is Simple Rename User Manual; we recommend reading Simple Rename first before this one.
1. Overview
Advanced Rename is Mantrika Tools' advanced renaming tool. If Simple Rename solves the "quick overwrite rename" need, Advanced Rename solves the "rule-based transformation from the original name" need — find/replace, add prefix/suffix, structural reordering, list replacement, positional trimming, unified numbering, UCS naming conventions ... all in one window.
Key differences from Simple Rename:
| Simple Rename | Advanced Rename | |
|---|---|---|
| Positioning | Open and use, Enter to apply | Configure rule chain → preview confirmation → Apply |
| Rename method | Overwrite (what you type is the result) | Rule-chain (transform the original name) |
| Applicable objects | Items / Mirror / Tracks | Same + Regions / Markers |
| Live preview | Border color hints match count | Full preview table (original → new) |
| Rule count | Three built-in (List/Numbering) | 8 rules that can be combined freely |
| Preset system | Only mode switch memory | Rule-chain presets + UCS presets |
| UCS support | ❌ | ✅ independent tab |
| Use case | When you already know the desired name | When you need to derive a new name from the original |
Applicable objects (strongly tied to selected mode):
- T&I mode (Tracks & Items) — Items / Mirror / Tracks
- R&M mode (Regions & Markers) — Regions / Markers
2. Opening Advanced Rename
Menu entry:
Extensions → Mantrika Tools → Rename tool (advance)Or search in the Action List:
| Action name | Purpose |
|---|---|
mantrika : Synergy - Advanced Rename | Open / close the Advanced Rename window |
3. Interface Overview
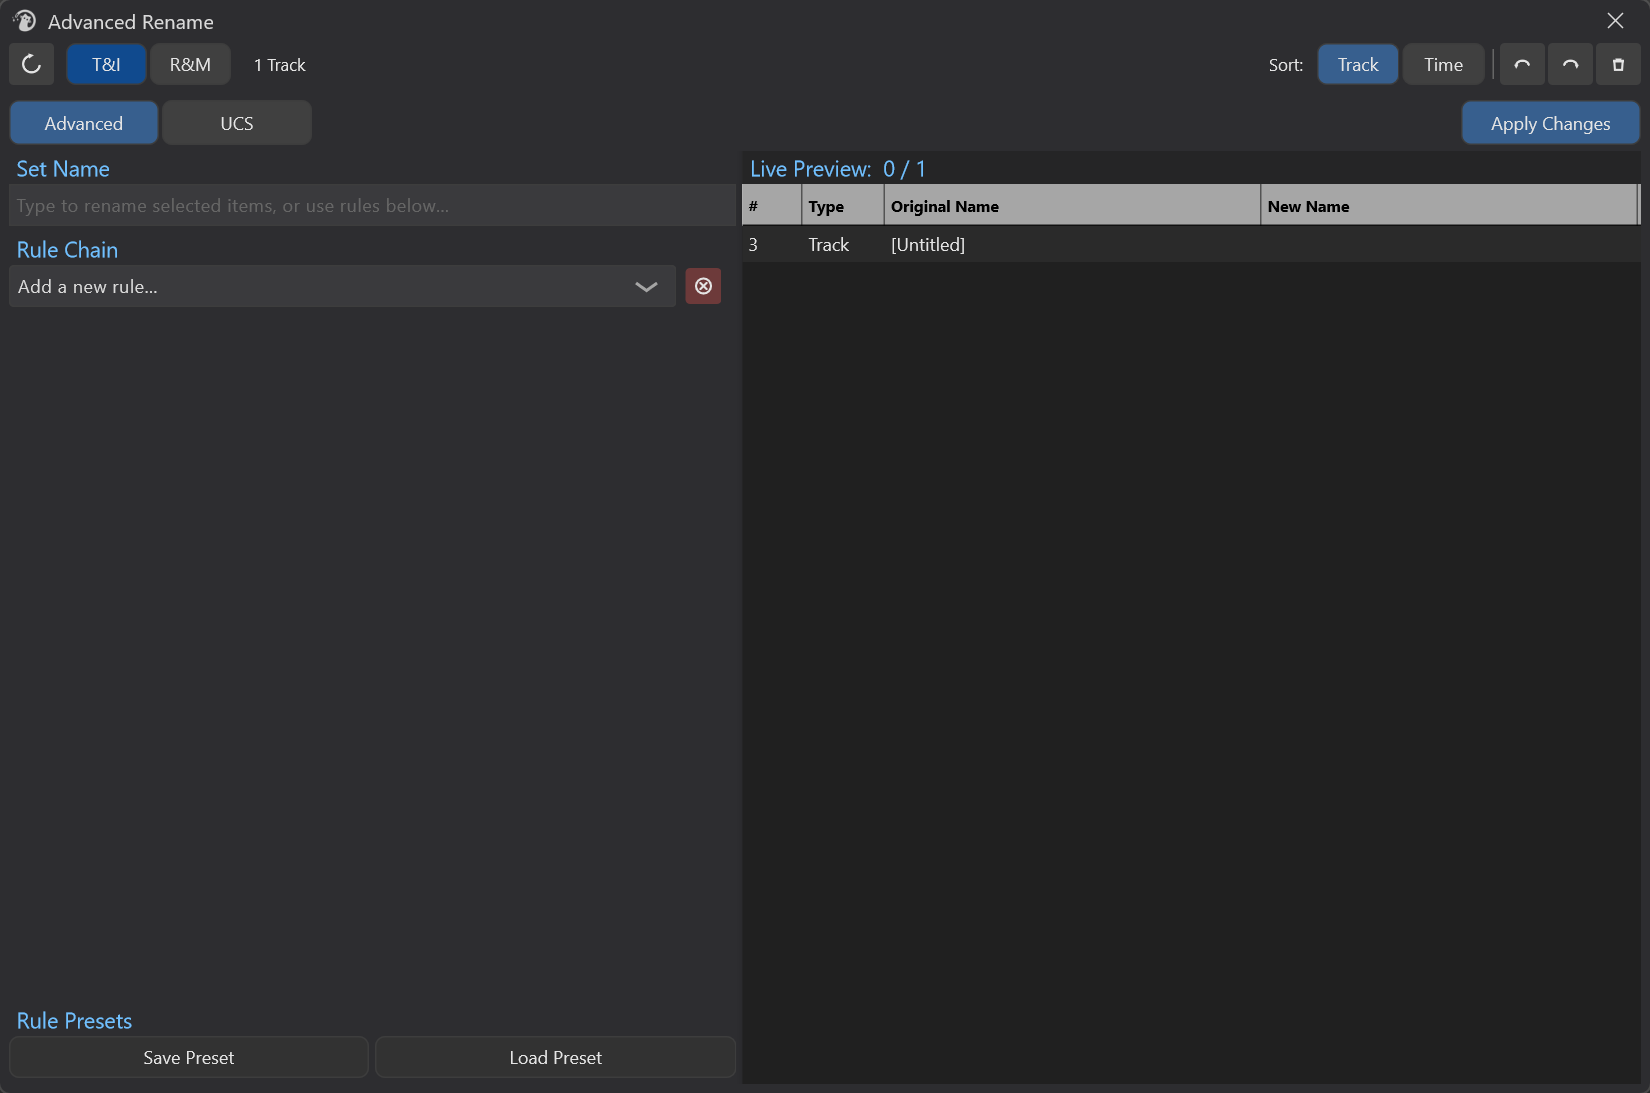
Four main areas:
| Area | Content |
|---|---|
| Header (top 28px) | Refresh / mode switch / Status / Sort / Undo · Redo · Clear Names |
| Tab row (30px) | Advanced / UCS Tab + Apply Changes button |
| Left panel (~45% width) | Configuration area for the current tab (rule chain or UCS fields) |
| Right panel (~55% width) | Preview table (T&I) or Selection + Preview (R&M) |
4. Work Modes: T&I vs R&M
At the top of the window are two mutually exclusive buttons T&I and R&M, which determine what type of objects Advanced Rename is currently processing.
4.1 T&I Mode (Tracks & Items)
Default mode. Reads the current REAPER selection directly — if items are selected it processes items (including Mirror); only if no item is selected at all does it process selected tracks.
The selection recognition rule is exactly the same as Simple Rename: as long as any item is selected, track selection is ignored.
4.2 R&M Mode (Regions & Markers)
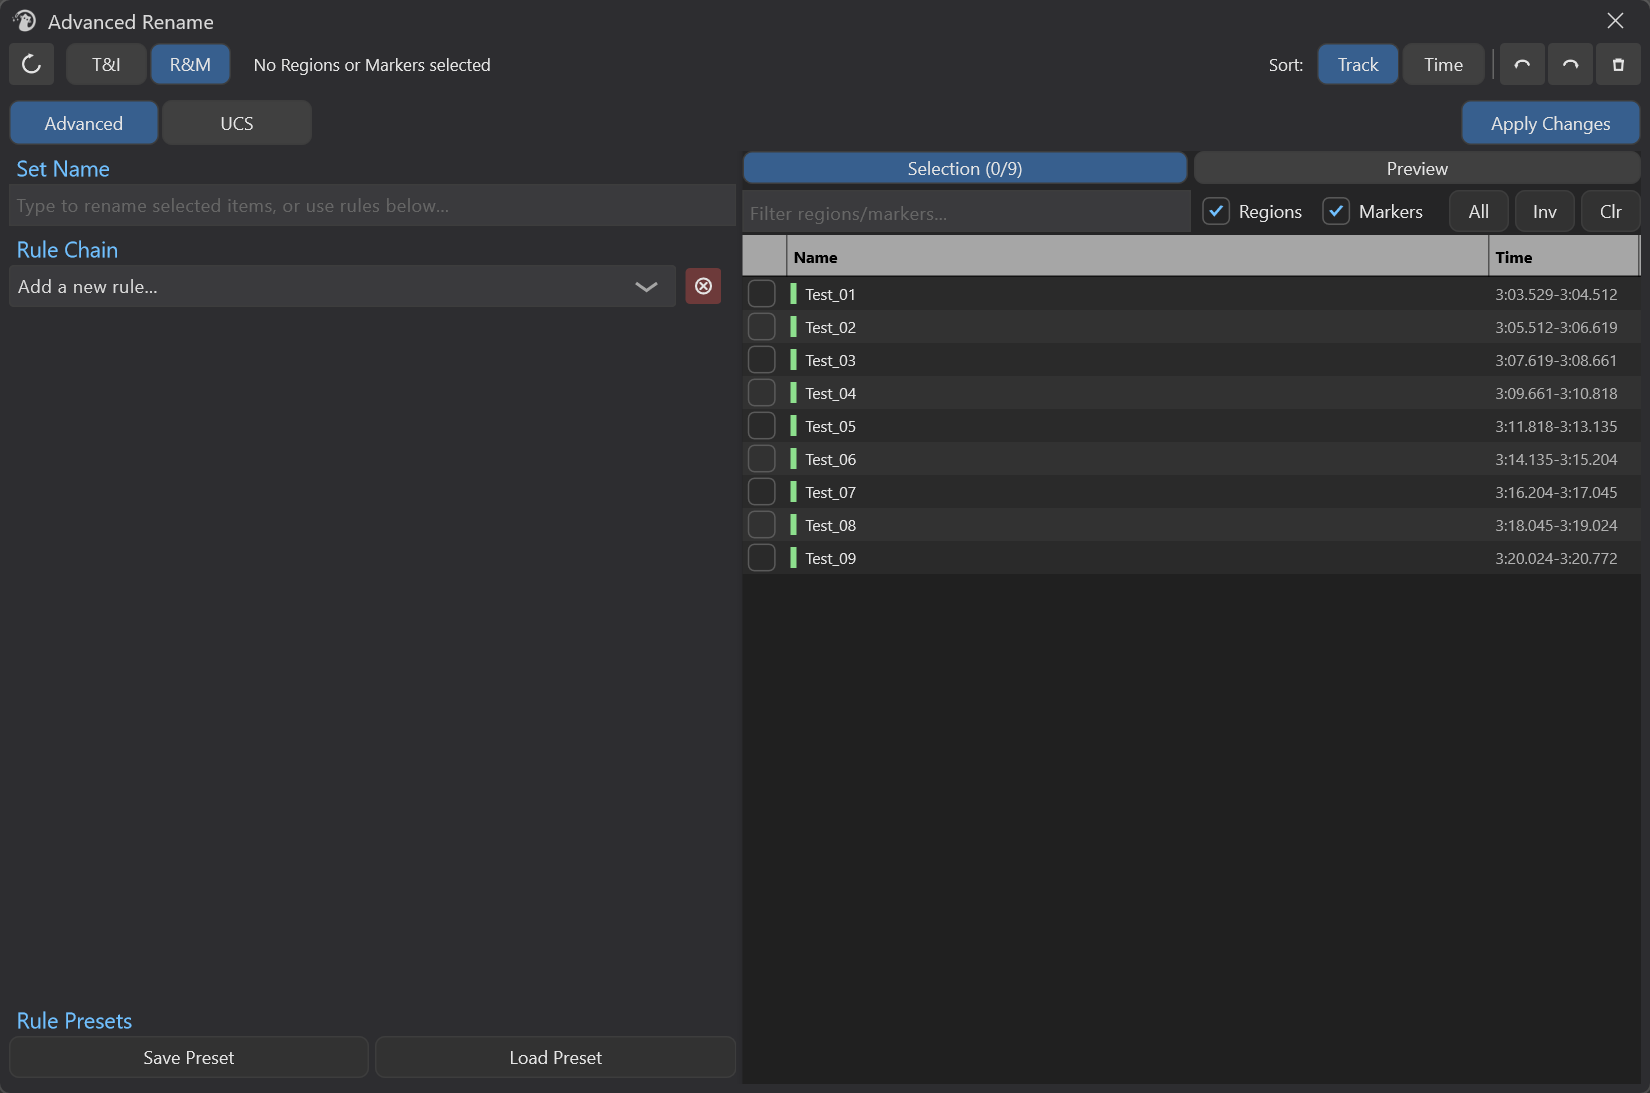
Enables the built-in selector — you no longer use REAPER's normal "selection" mechanism; instead you manually check the regions / markers to rename in the Selection Tab of Advanced Rename's right panel.
After entering R&M mode the right panel shows two tabs:

- Selection — a checkable list of all regions/markers in the project, with filter and batch selection buttons
- Preview — same preview table as T&I mode, but data source is what you checked in the Selection Tab
Detailed operations are in section 11.
4.3 Mode Switching
- Switching modes immediately refreshes the preview table and relayouts the window.
- R&M Tab state is remembered: if you manually switched to the Preview tab in R&M mode, then switched to T&I, then back to R&M, you will still be on the Preview tab.
- T&I ↔ R&M switching does not clear the configured rule chain or UCS fields.
5. Top Toolbar
5.1 Refresh Button ⟳

Rescans the REAPER selection and refreshes the preview table.
⚠️ Must be clicked manually — Advanced Rename does not automatically follow REAPER selection changes (different from Simple Rename). After you change the selection in REAPER, change names, or add/remove regions/markers, you need to return to this window and click Refresh to sync the preview.
Typical scenarios that need Refresh:
- Changed selection in REAPER (added/removed/switched objects)
- Manually changed object names in REAPER (external modification)
- In R&M mode, the region / marker list itself was modified (added/deleted/renamed)
Undo / Redo / mode switching / sort switching already call Refresh internally; no need to click manually after those.
5.2 Sort Mode: Track / Time

- Track (default) — first by owning track order, then by time position
- Time — purely by time position, regardless of owning track
Sorting affects both the display order of the preview table and the execution order of the rule chain. For example, the Numbering rule will number sequentially according to the sorted order.
5.3 Undo / Redo / Clear Names

Three icon buttons at the far right of the Header:
| Icon | Function | Equivalent |
|---|---|---|
| ↶ Undo | Undo REAPER operation | Ctrl+Z / Main_OnCommand 40029 |
| ↷ Redo | Redo REAPER operation | Ctrl+Y / Main_OnCommand 40030 |
| ✕ Clear Names | Clear the names of all selected objects | RenameDataModel::ClearSelectedObjectNames |
⚠️ Clear Names is an irreversible bulk operation (though Undo is available). It directly writes an empty string to the names of N objects, mainly used to clear the slate before "starting naming from scratch".
6. Rule Chain Basic Workflow
Advanced Rename's core mental model is the "rule chain" — you configure a sequence of rules; rules are executed in list order for every selected object, and the final result is shown in the Preview table on the right. Press Apply Changes to write back to REAPER.
6.1 Adding Rules
The Rule Chain area at the top of the left panel has a dropdown:
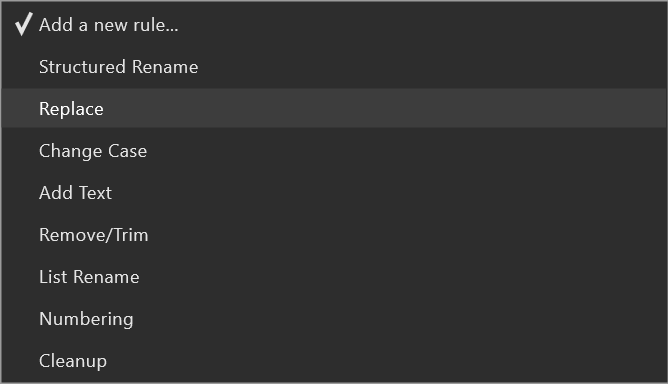
Selecting any item adds one rule to the bottom of the list. Each rule type can be added multiple times (for example two Find Replace rules in a row).
Clear All button (red background with x-in-circle) — deletes all current rules (cannot be undone; save a preset before pressing).
6.2 Rule Card Structure
Each rule in the list is a collapsible card:

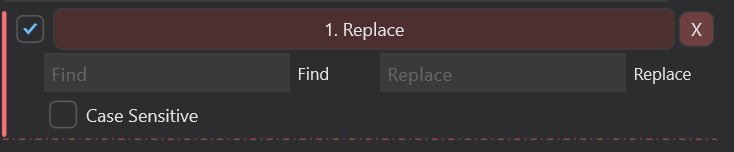
Rule header from left to right:
| Element | Function |
|---|---|
| ⠿ drag handle | Hold to drag up/down and adjust the rule's position in the chain |
| ☑ enable checkbox | Unchecked = rule is skipped (configuration retained but temporarily disabled) |
| Rule name + short description | Shows rule type and current key parameters |
| ⓧ delete button | Red X, deletes the rule |
Clicking elsewhere on the rule header collapses/expands the parameter UI.
6.3 Rule Execution Order
Strictly executed from top to bottom in the list. Each rule's input is the previous rule's output.
Example (rules 1→2→3 executed in order):
Original:    "Footstep_Wood_01.wav"
| Rule 1: Remove/Trim (remove ".wav")
             "Footstep_Wood_01"
| Rule 2: Replace (Wood → Stone)
             "Footstep_Stone_01"
| Rule 3: Change Case (Title)
             "Footstep_Stone_01"
             | Apply
Final:       "Footstep_Stone_01"
Changing rule order changes the result — placing Numbering before Replace vs after produces completely different output.
6.4 Preview Table
The right panel's 4-column table:
| Column | Meaning |
|---|---|
| # | Sequence number after sorting (affected by Sort mode) |
| Type | Object type (Item / Track / Mirror / REG / MRK) |
| Original Name | Current actual name |
| New Name | New name output by the rule chain |
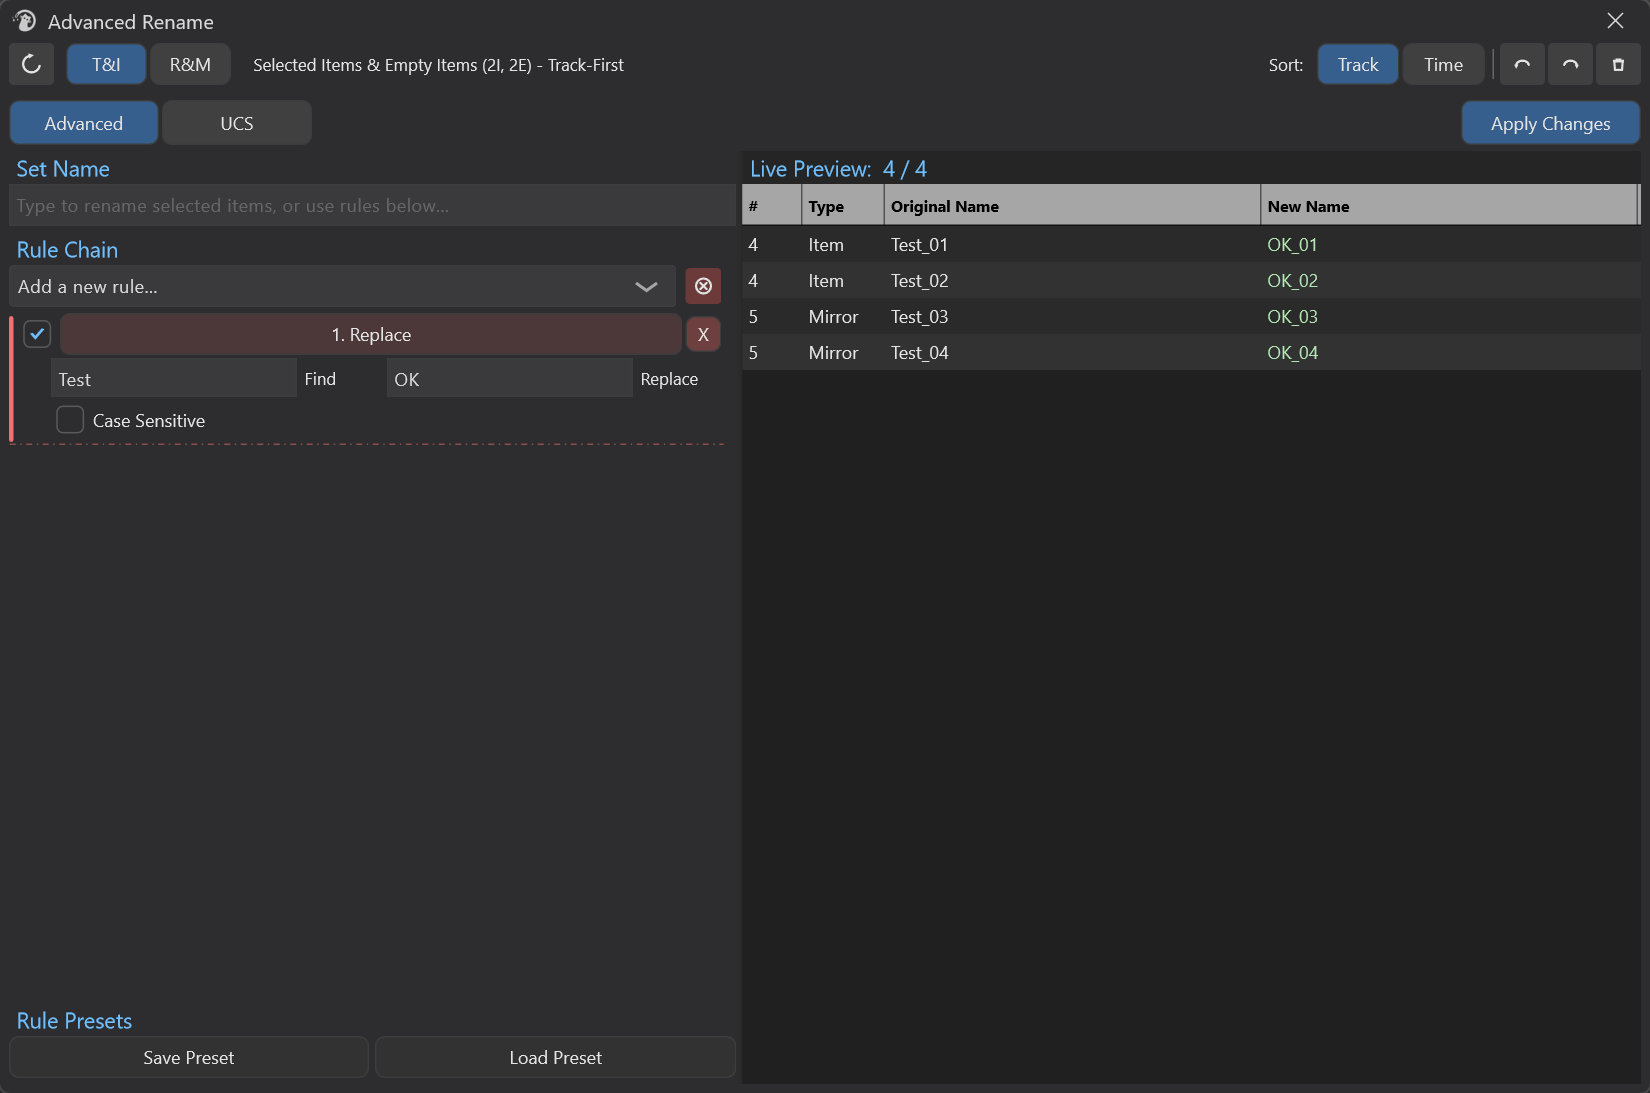
Visual encoding:
- New name differs from original → green highlight (will be changed)
- New name same as original → gray (Apply will skip)
- Selected row → blue background
- When no object is selected, overlay text appears above the table: "Select tracks/items in REAPER to begin"
6.5 Manual Preview Editing
You can double-click a New Name cell to modify the final name of a row. Manual edits override the rule-chain output for that row only; other rows still follow the rule chain.
Purpose: fine-tune individual outliers after bulk renaming.
6.6 Conflict Detection (Does Not Block Apply)
When two or more objects would get the same new name, the Status label shows:
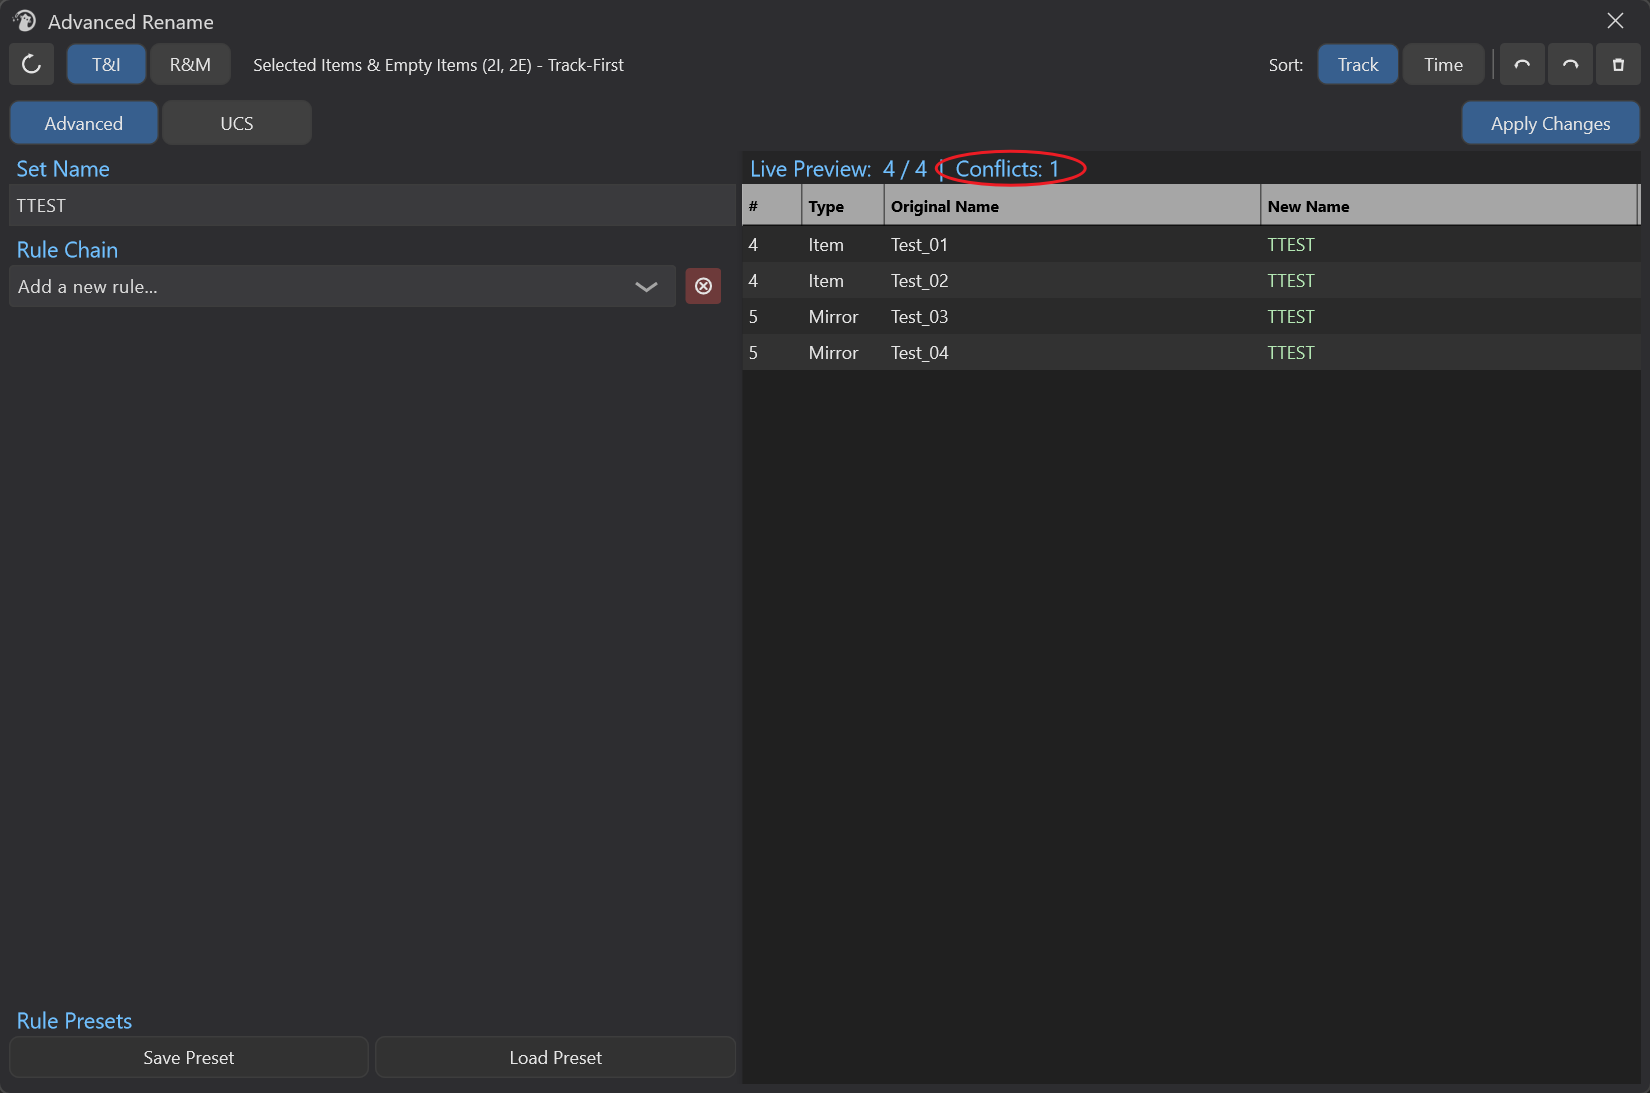
⚠️ Conflicts do not prevent Apply — pressing Apply Changes still executes the rename. Advanced Rename only tells you "there will be duplicates"; whether to handle it is up to you.
If your goal is to make a group of objects share the same name (common), you can ignore the conflict marker. If you do not want duplicates, add a Numbering rule at the end.
6.7 Apply Changes
Button on the right side of the tab row (or press window-level Enter for the same effect):
- Condition: at least 1 object's new name differs from the original (i.e., Stats.successCount > 0). If there are no changes at all, pressing Enter does nothing.
- After execution:
- A
MTK Advanced Renamerecord is written to the REAPER Undo stack (even though it was triggered by Advanced Rename, the description uses this name) - Set Name edit box is cleared
- UCS suggestion state resets
- Apply button turns green and text becomes
Renamed N items, reverting after 0.9 seconds - Status label shows success message
- A
7. Set Name Direct Edit Box
The first line at the top of the left panel is the Set Name edit box:

This is the most easily misunderstood feature in Advanced Rename. It is not "overwrite the rule-chain output" — it is the starting input of the rule chain.
In other words, Set Name determines the "initial name the rule chain receives" — subsequent rules still act on it.
7.1 Three Typical Uses
Use A: Use as Simple Rename
No rules, type Footsteps in Set Name, press Enter → all selected objects are renamed to Footsteps. Equivalent to the most basic Simple Rename scenario.
Use B: Set Name + Numbering Rule
Type Hit in Set Name, add a Numbering rule → get Hit_01, Hit_02, Hit_03 ....
Use C: Leave blank + rule chain
Leave Set Name blank, add Replace / Numbering etc. rules → rules transform based on the original name (the most common "advanced rename" scenario).
7.2 Behavioral Details
- Content changes in real time trigger generatePreview (every keypress updates the preview)
- Pressing Enter inside the Set Name edit box is equivalent to Apply Changes
- After successful Apply, Set Name edit box is automatically cleared
- Only shown in the Advanced Tab; switching to the UCS Tab hides the entire Set Name area
8. The 8 Rules in Detail
The following 8 sections explain each rule in the order they appear in the dropdown.
8.1 Structured Rename
Purpose: break a group of filenames with the same structure into components by delimiter, reorder or edit components, and reassemble with the same delimiter.

For example, turn Punch_Loud_Wood_01 into Wood_Punch_Loud_01.
Workflow:
- Provide an example: paste one example filename into the rule panel (usually the first object's name in the selection).
- Auto-detect delimiter: the engine picks the most likely delimiter from candidates
_ - . space ~ #and splits the example into components. - Drag to reorder components / inline-edit component content / add or remove components.
- Set output delimiter (defaults to the detected one).
- The rule applies to every selected object, splitting with the same delimiter and reassembling in the order you defined.
Special Behavior:
- Extra components retained: if an object splits into more components than the template (e.g., template has 3 parts, target has 5), the extra parts are appended unchanged at the end.
- Manual edit override: components you edited inline are treated as "fixed text" and used for all targets (instead of taking from each target object).
- Fallback on parse failure: if auto-detection fails, the engine tries
_and-in turn; if neither works, the whole string is treated as a single component.
Example:
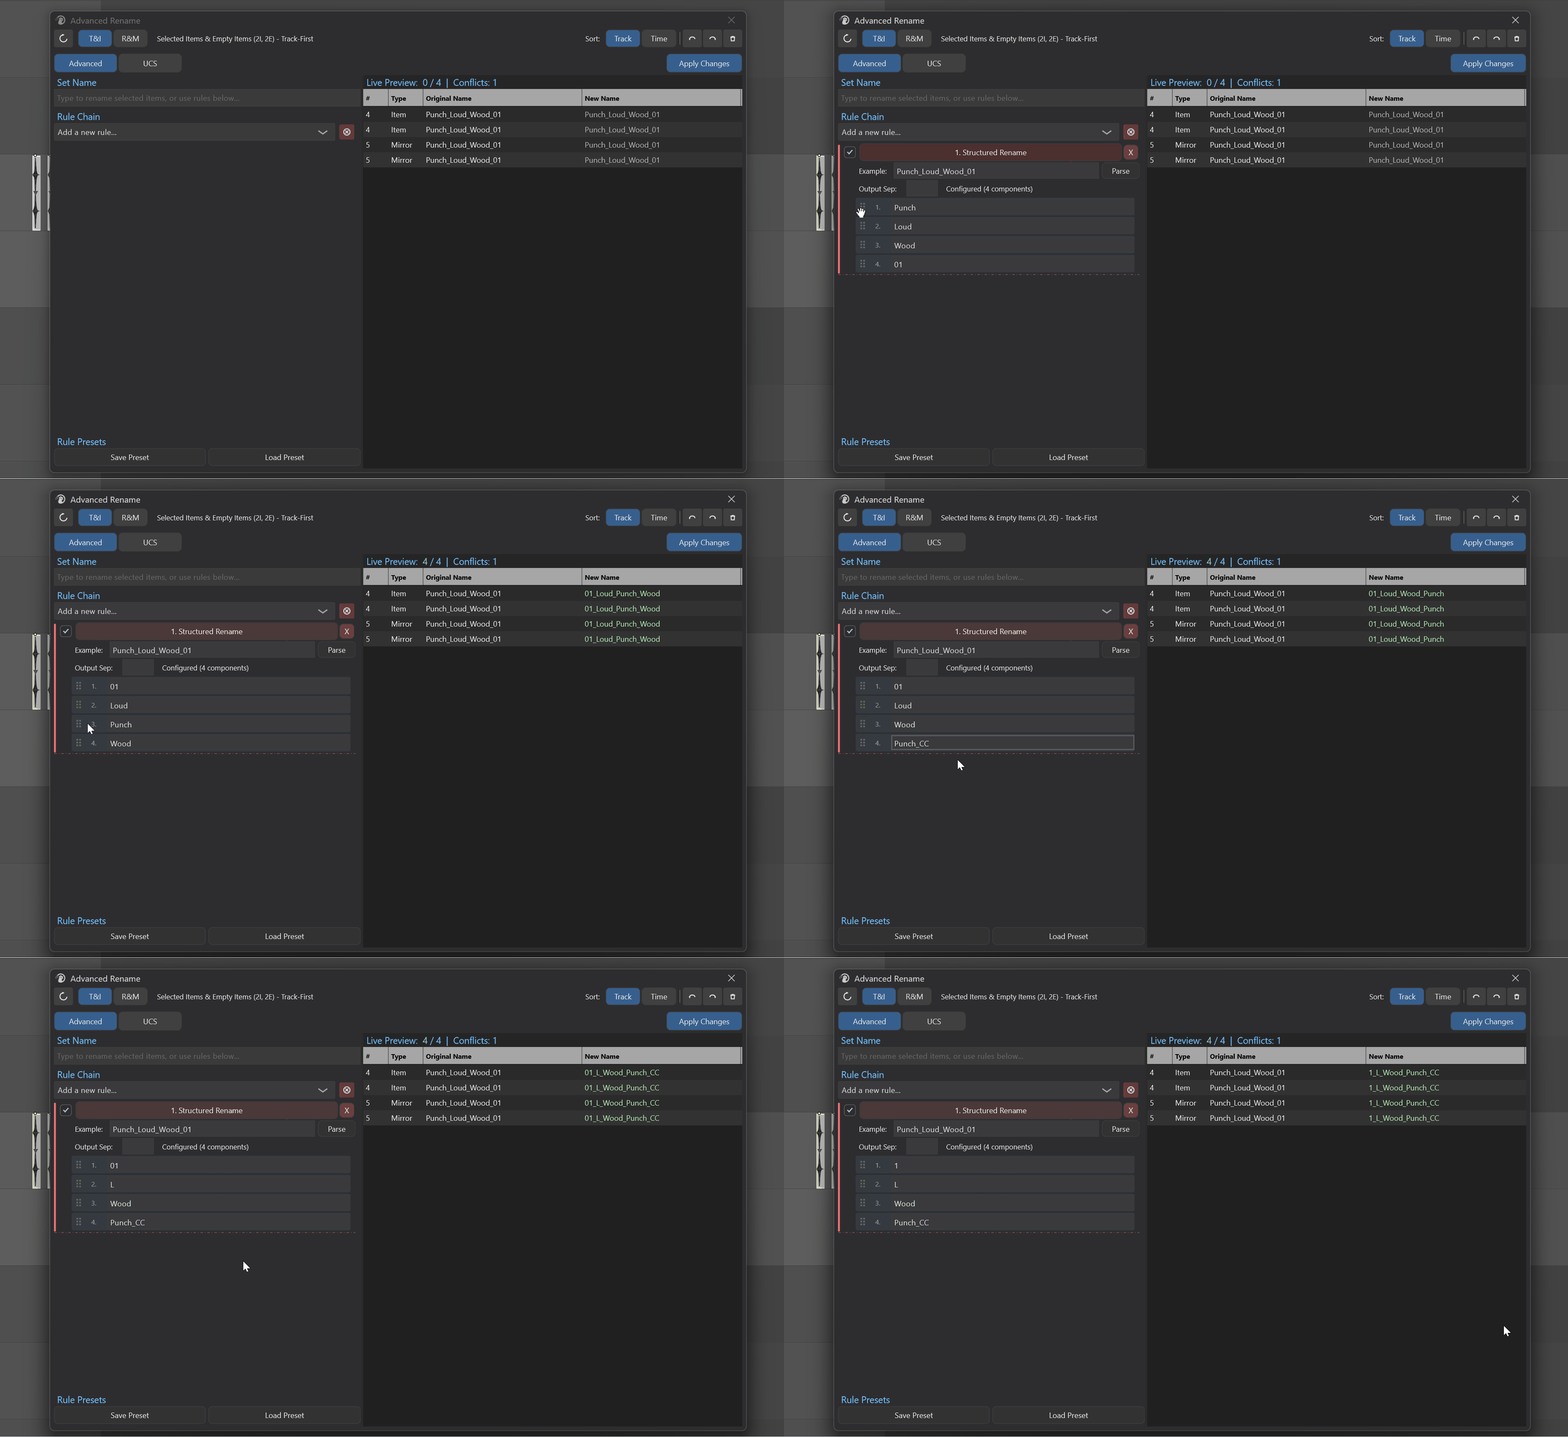
⚠️ Structured Rename assumes all selected objects have a consistent naming structure (same number of components, same delimiter). When structures differ, fallback behavior may not meet expectations.
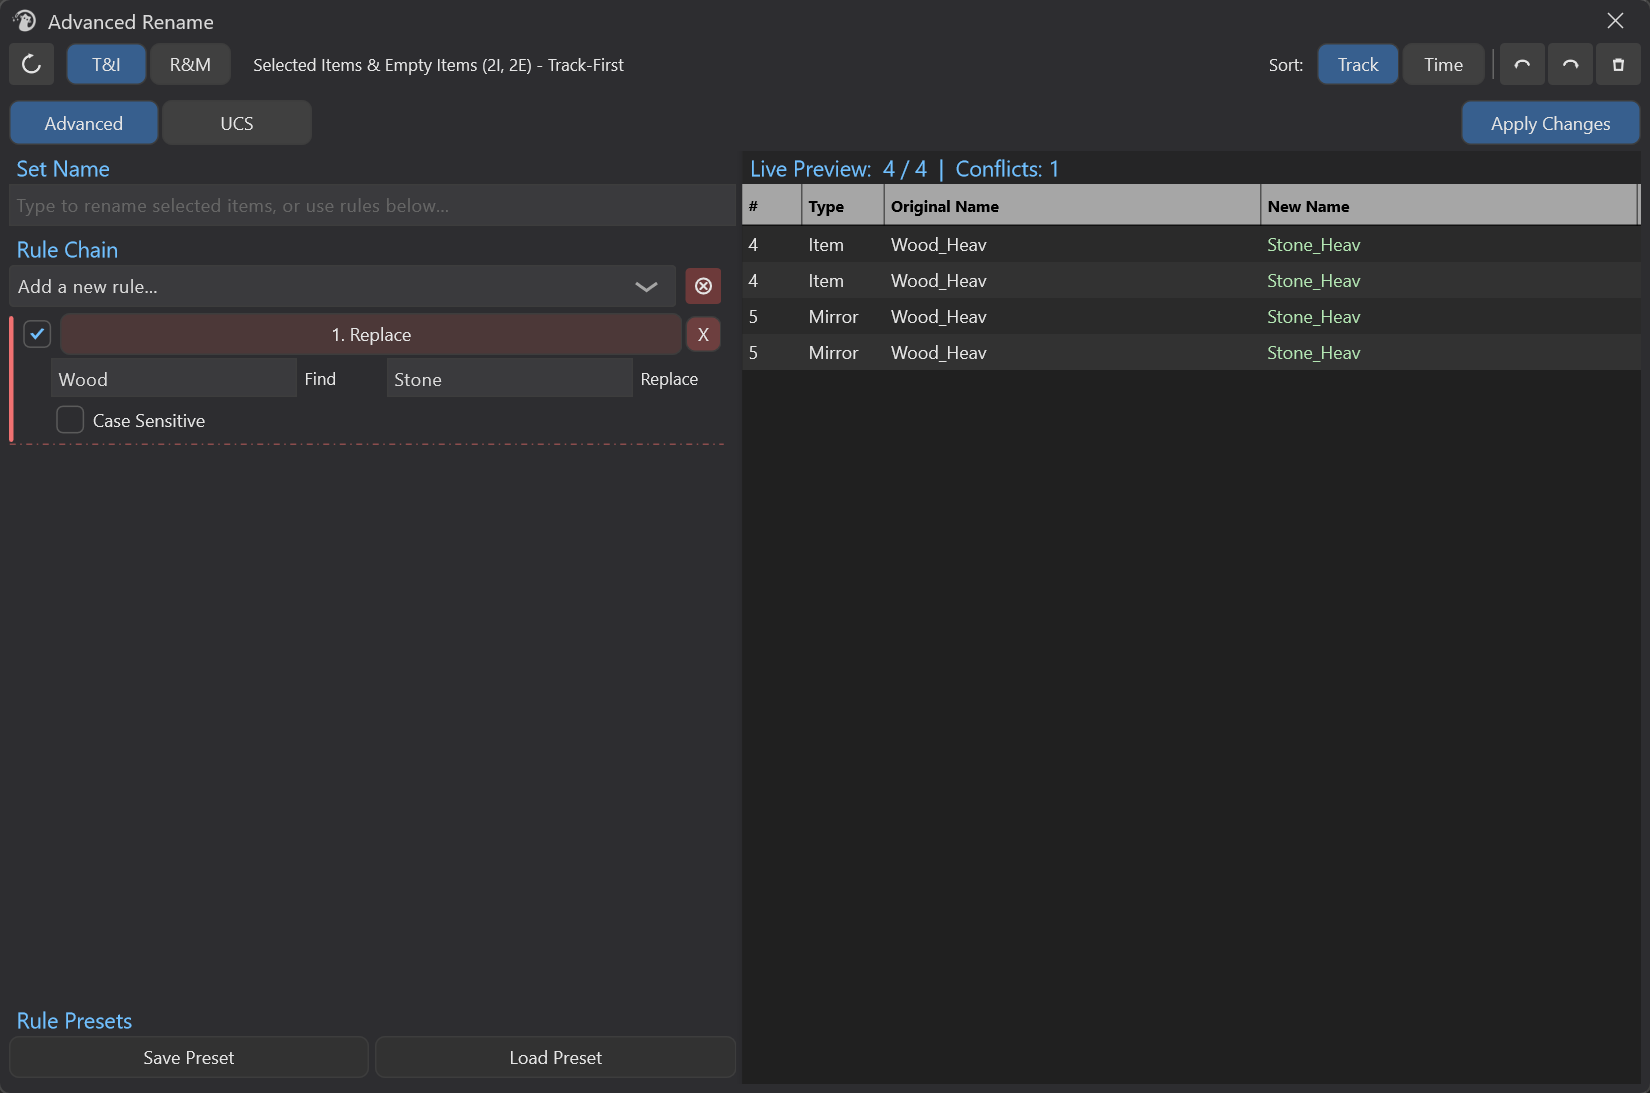
8.2 Replace (Find and Replace)
Purpose: find specified text in the original name and replace it with new text.
Parameters:
| Parameter | Default | Description |
|---|---|---|
| Find | (empty) | Text to find |
| Replace | (empty) | Replacement text (can be blank = delete) |
| Case sensitive | OFF | Whether case is distinguished |
Behavior:
- Replaces all occurrences (not just the first).
- Case-insensitive mode only affects English.
- Find empty means the rule is considered unconfigured and is automatically skipped.
Example:
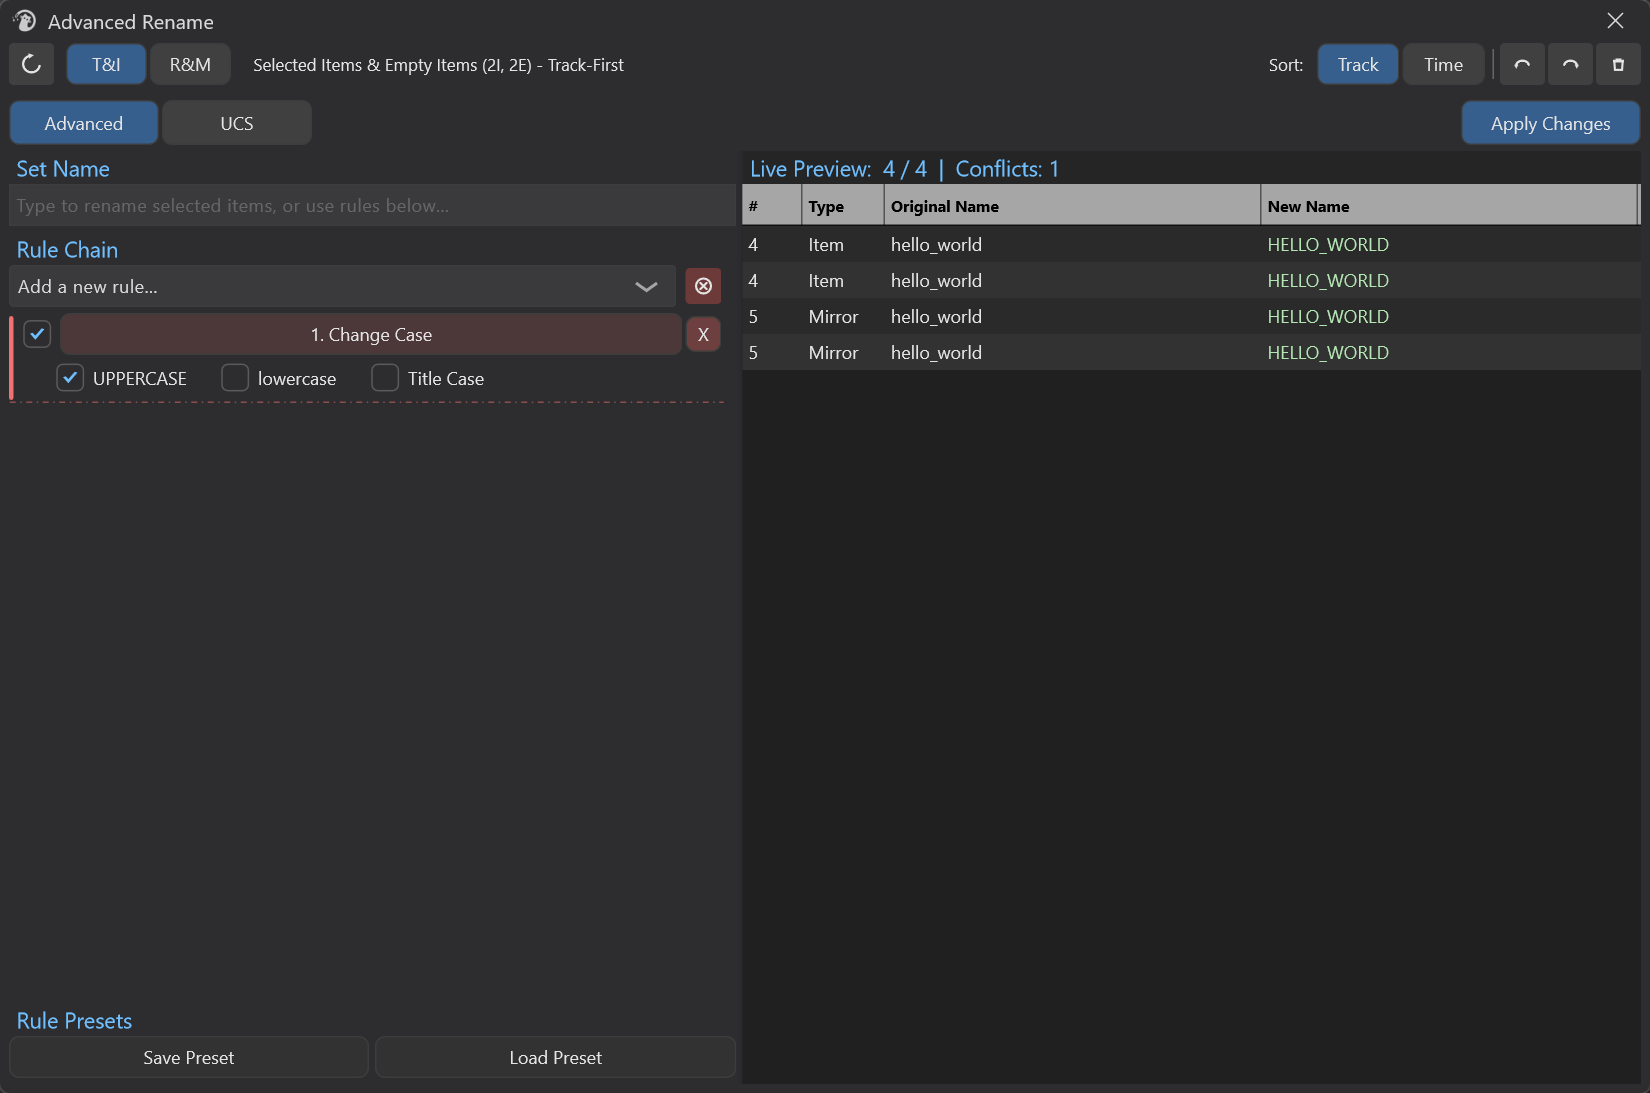
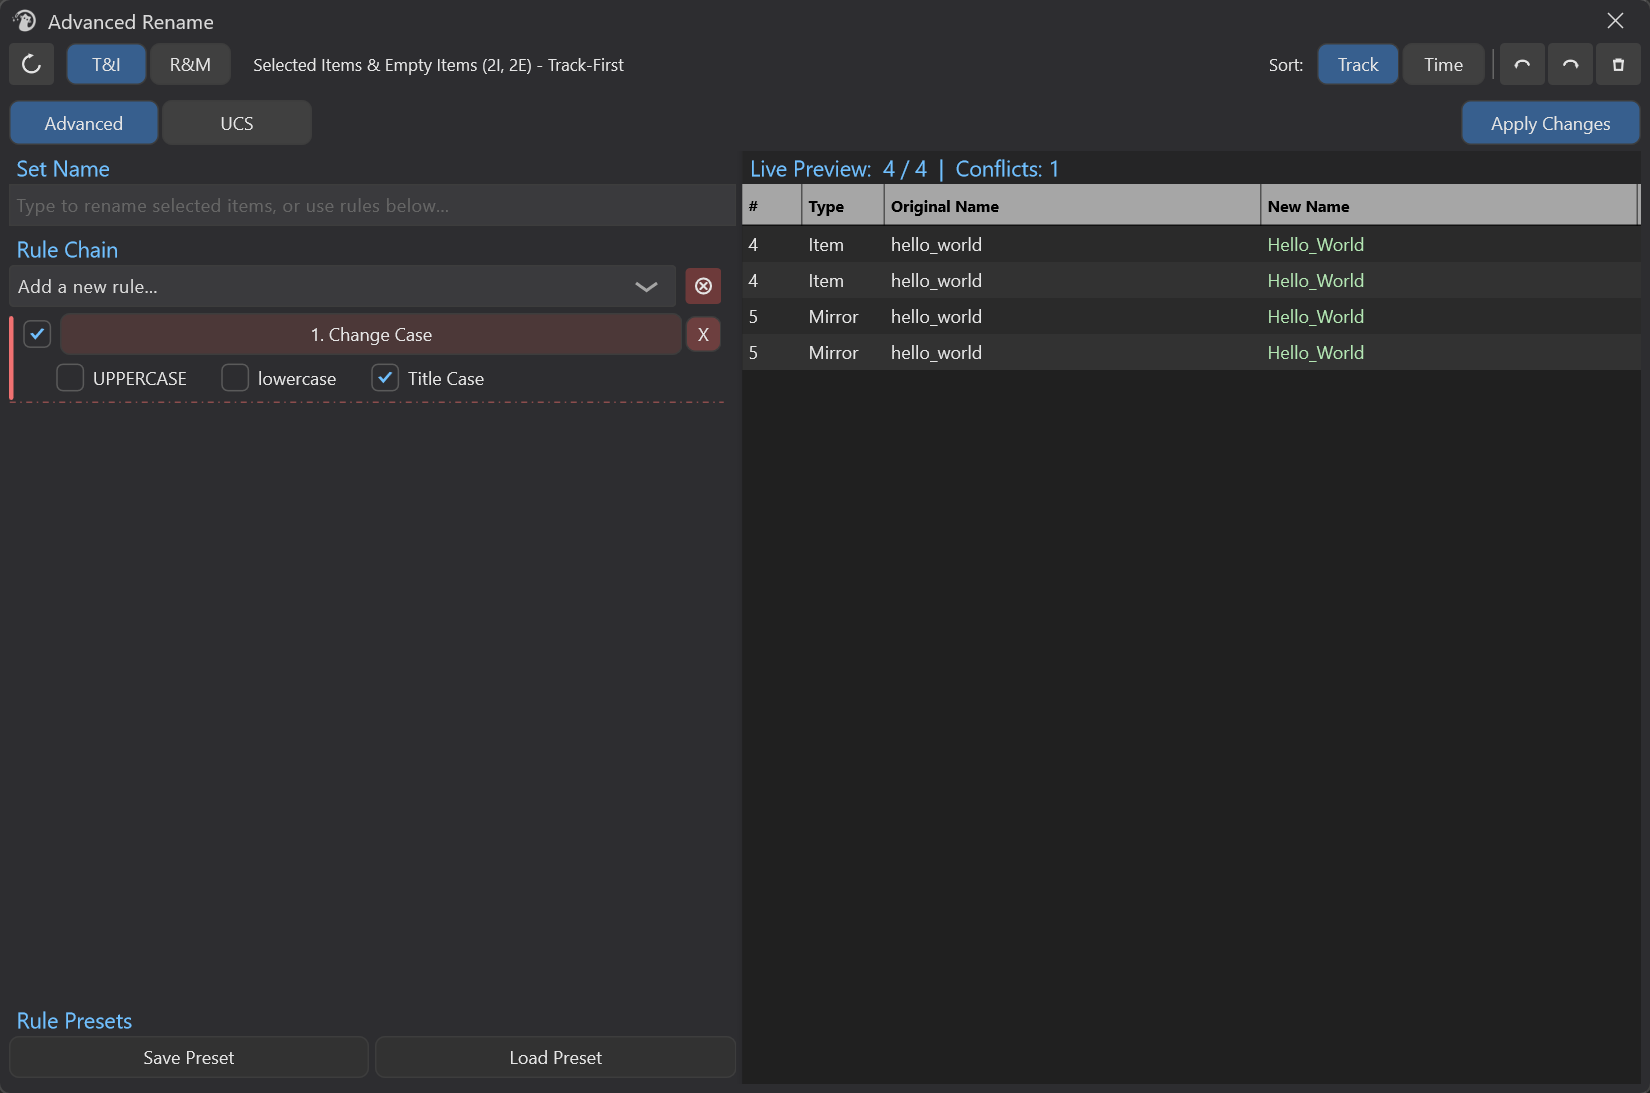
8.3 Change Case
Purpose: convert the name to UPPER / lower / Title Case.
Parameters:
| Parameter | Default | Description |
|---|---|---|
| Case Type | UPPER | UPPER / lower / Title |
| Delimiters | _-. | Only used in Title mode; determines word boundaries |
Behavior:
- Only affects English letters.
- Title Case first converts the whole string to lowercase, then capitalizes the first letter after each delimiter (default
_ - . space).
Example:
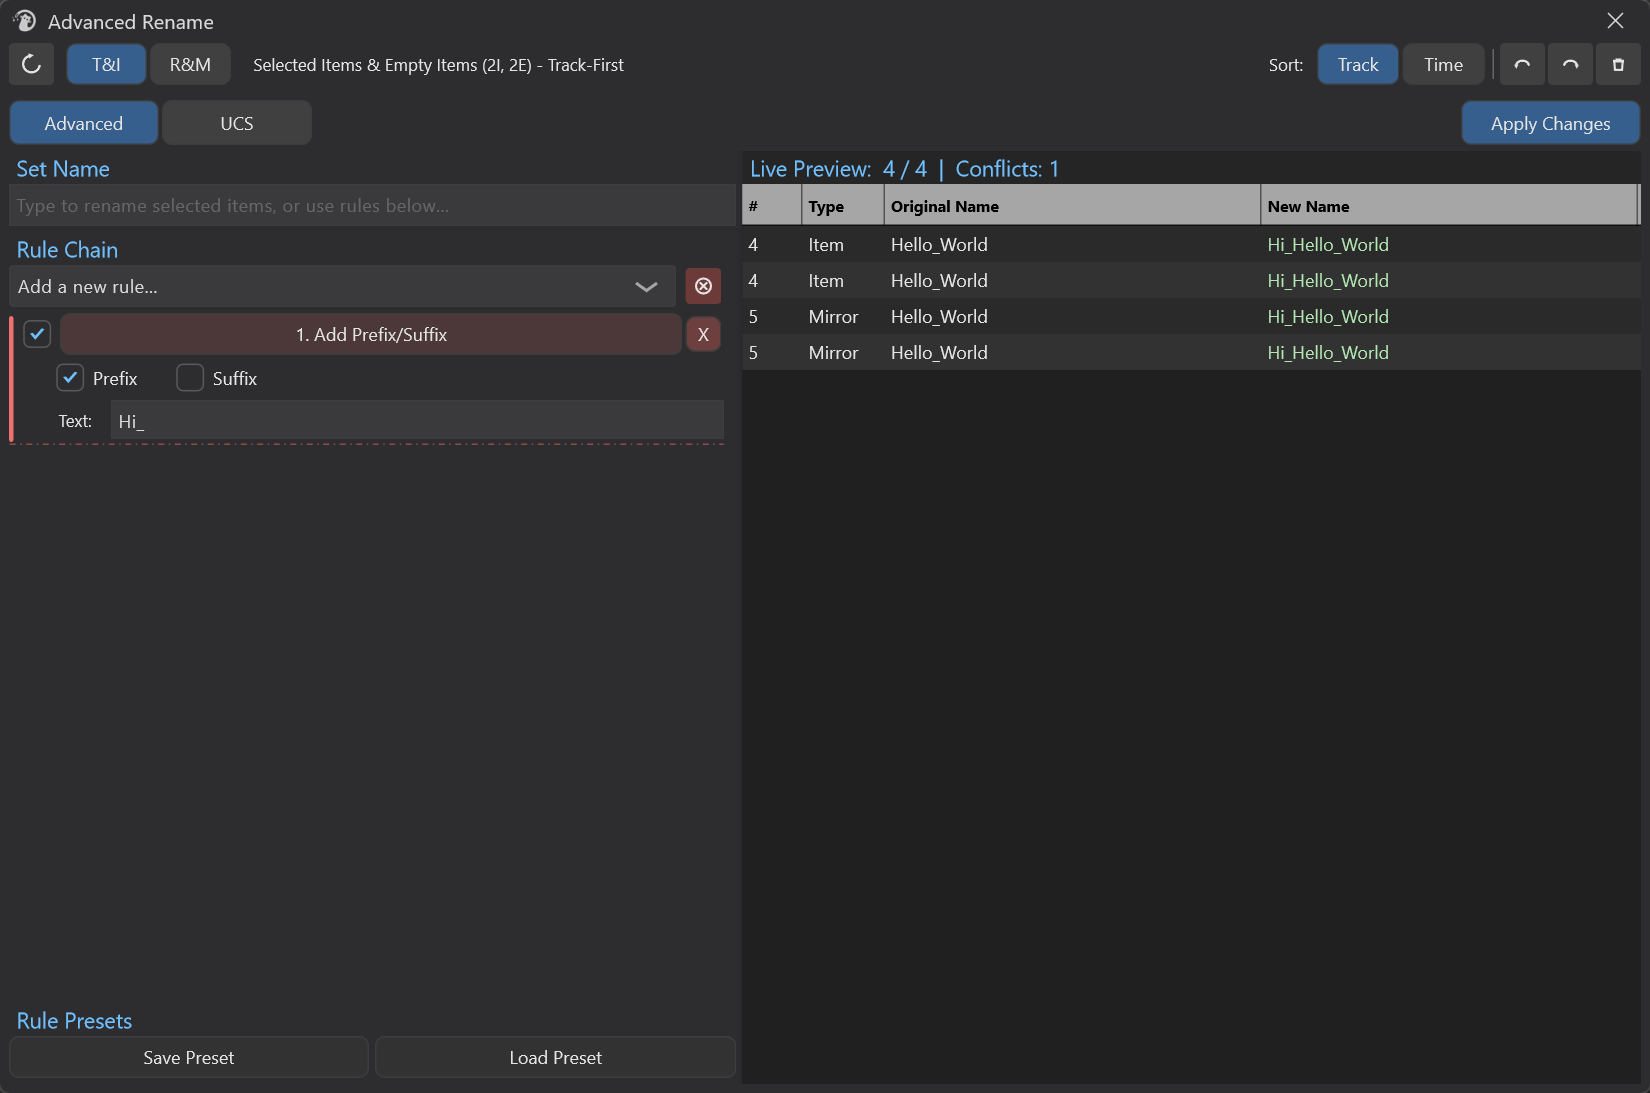
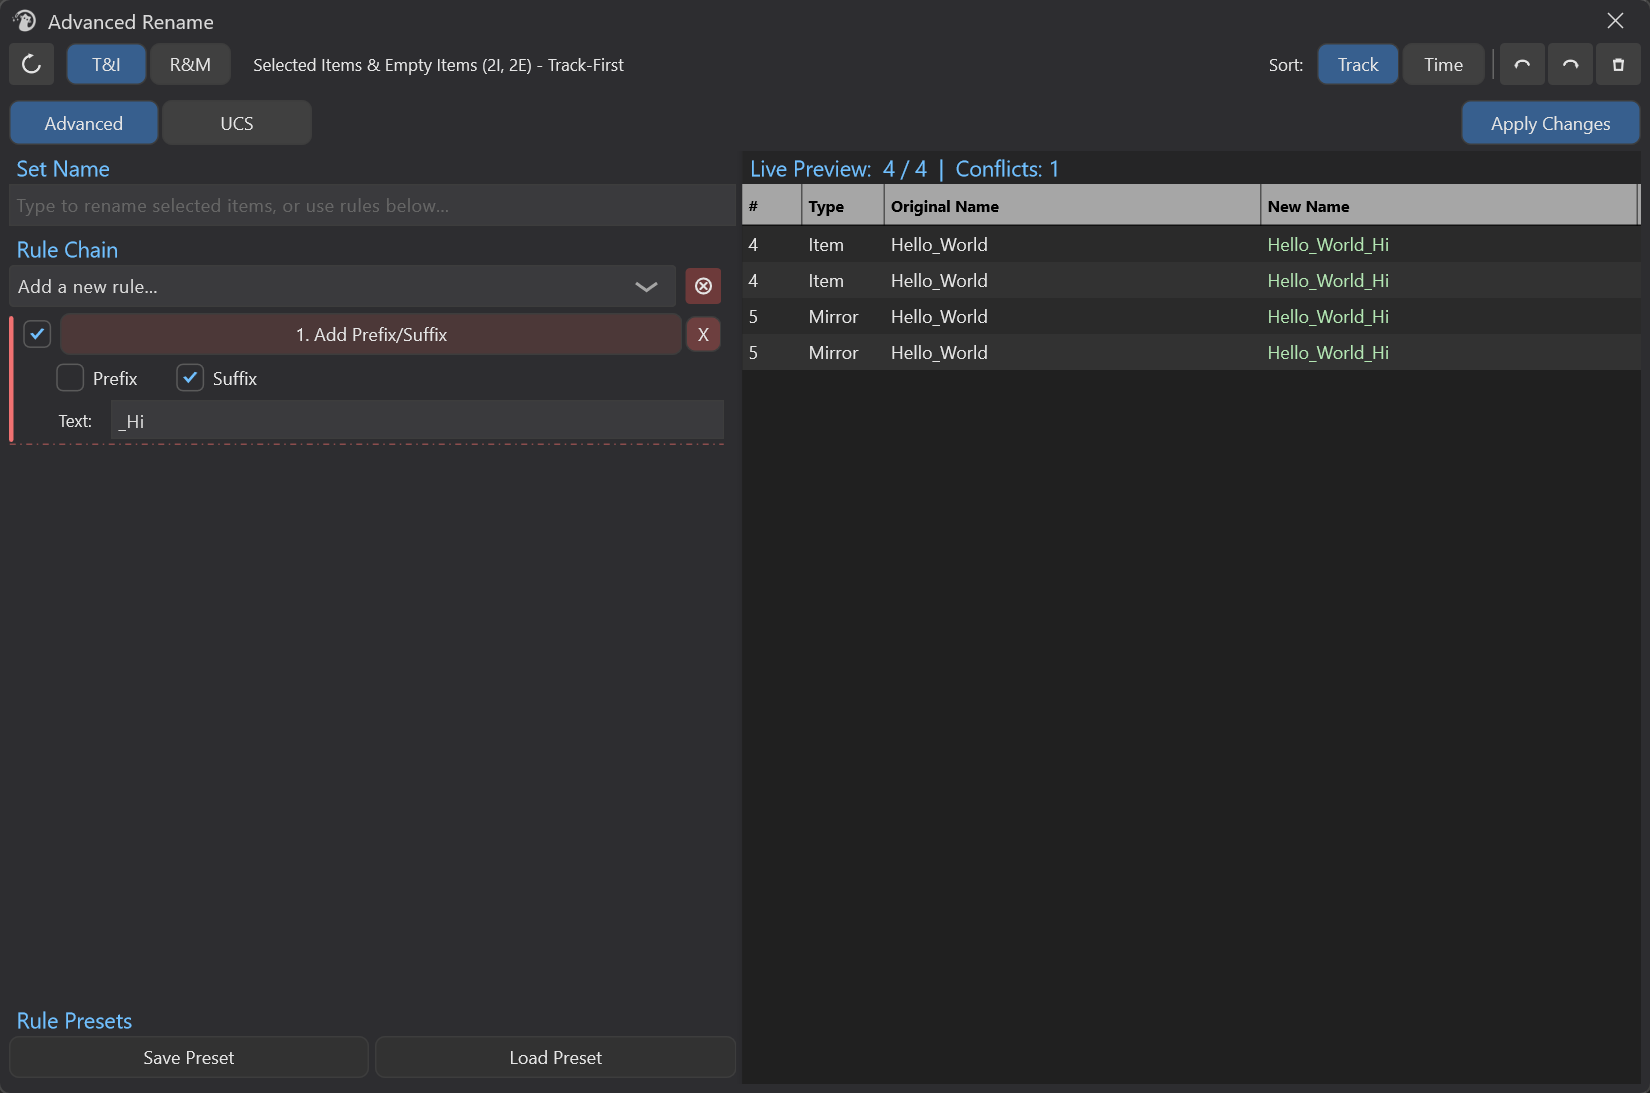
8.4 Add Text (Prefix / Suffix)
Purpose: append text to the beginning or end of the name.
Parameters:
| Parameter | Default | Description |
|---|---|---|
| Add Type | Prefix | Prefix / Suffix |
| Text | (empty) | Text to add |
Behavior: Text empty means the rule is considered unconfigured and is automatically skipped.
Example:
8.5 Remove/Trim
Purpose: remove specified text from the name, or trim a segment of characters by position.
This rule has two working modes, switched via Mode.
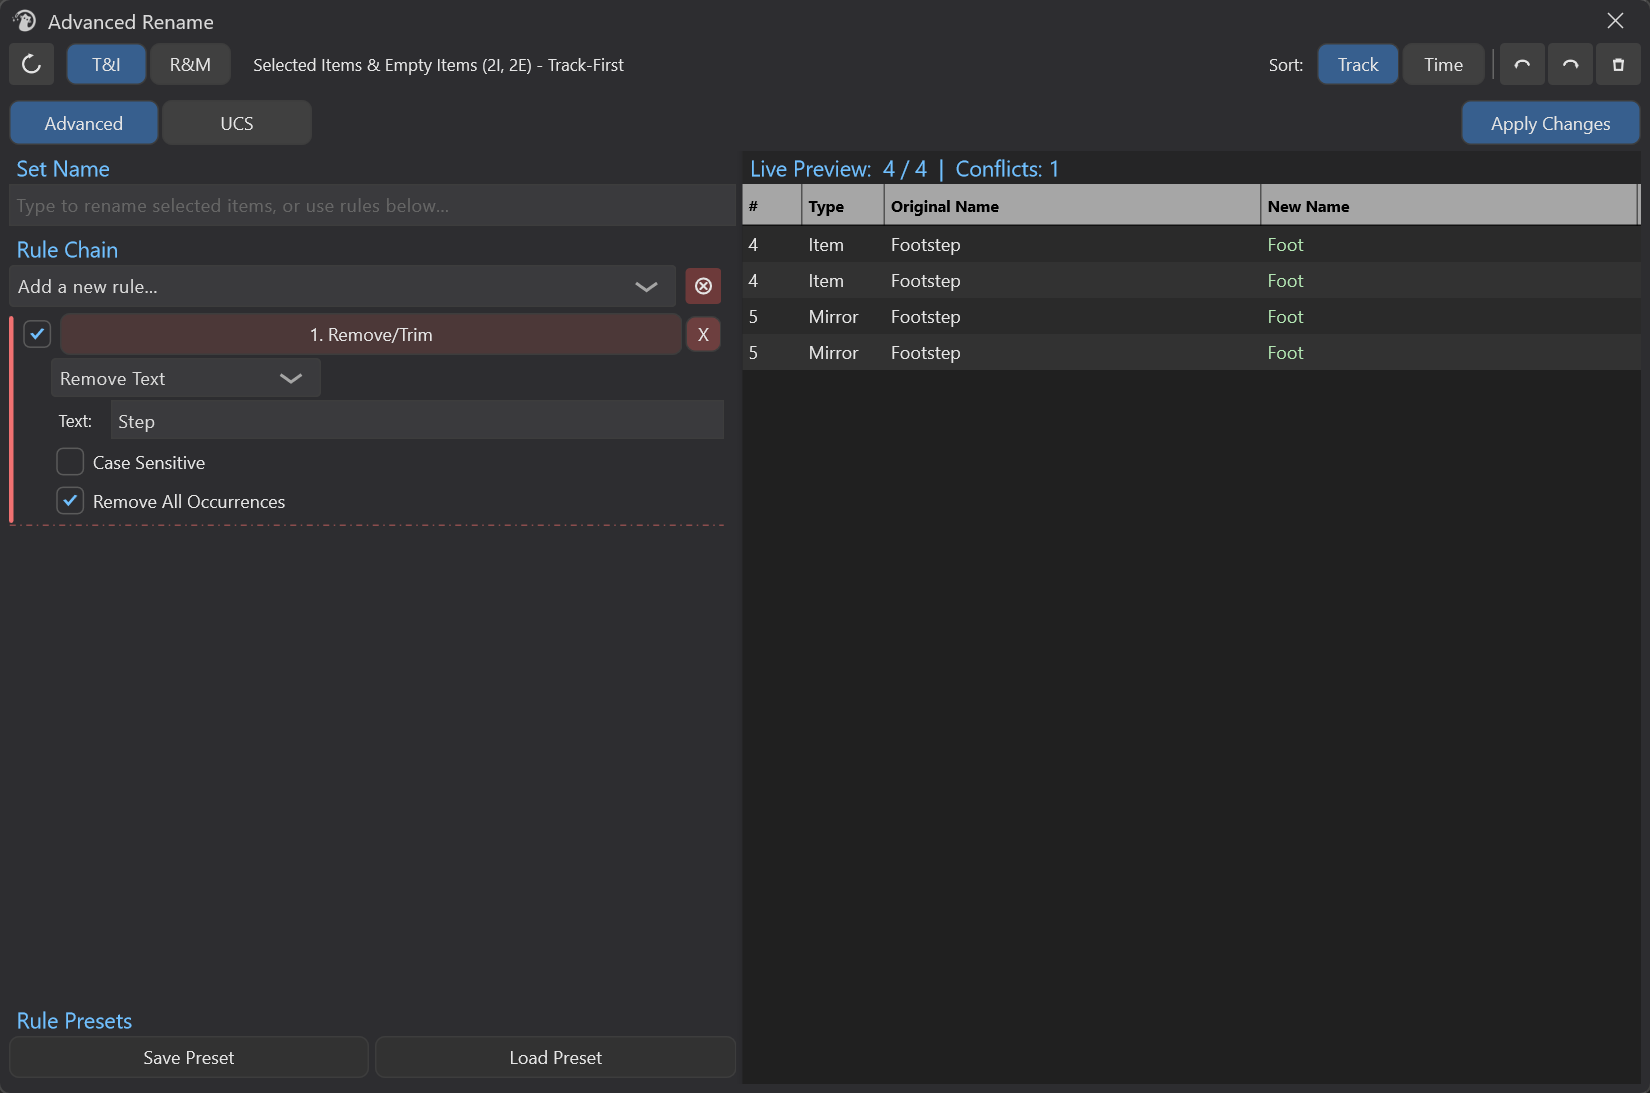
Mode A: Remove Text
| Parameter | Default | Description |
|---|---|---|
| Text to Remove | (empty) | Text to remove |
| Case sensitive | OFF | Whether case is distinguished |
| Remove all occurrences | ON | ON = remove all occurrences, OFF = remove only the first |
Example:
Mode B: Remove by Position
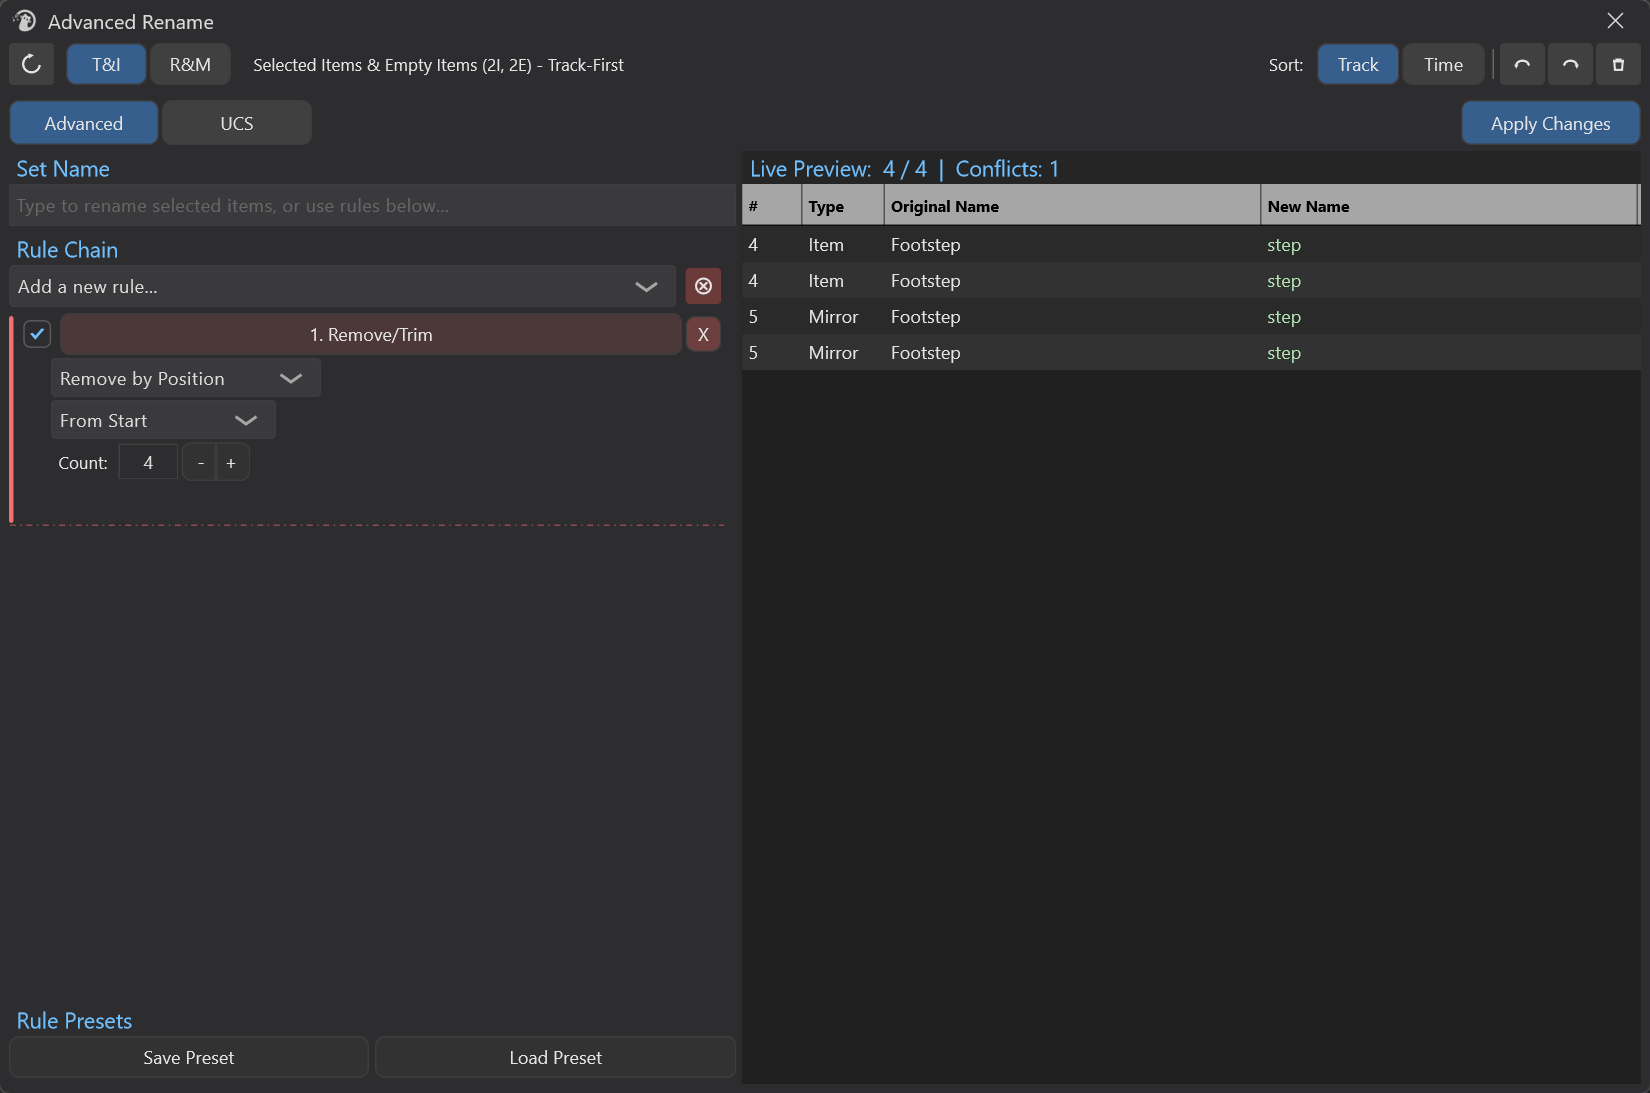
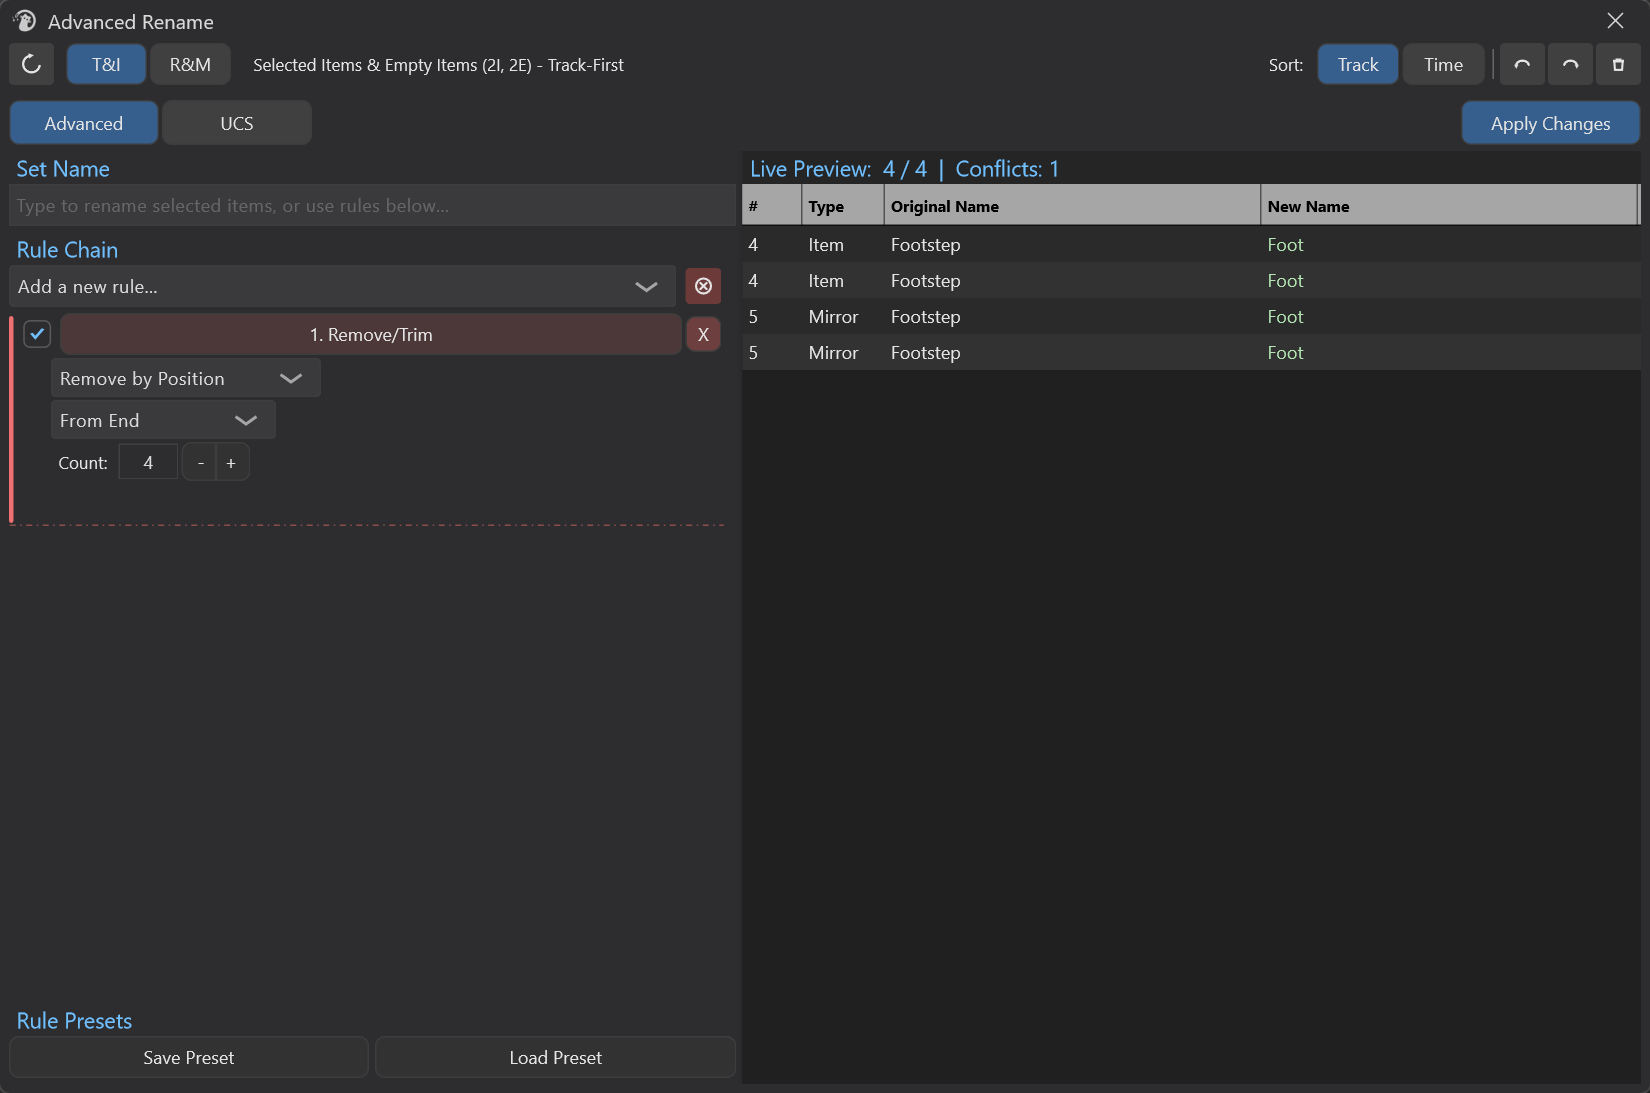
Trim a number of characters by position, three position modes:
| Position Mode | Parameters | Behavior |
|---|---|---|
| From Start | Char Count | Delete N characters from the beginning |
| From End | Char Count | Delete N characters from the end |
| Range | Start Pos / End Pos | Delete characters in index interval [Start, End) |
Example:
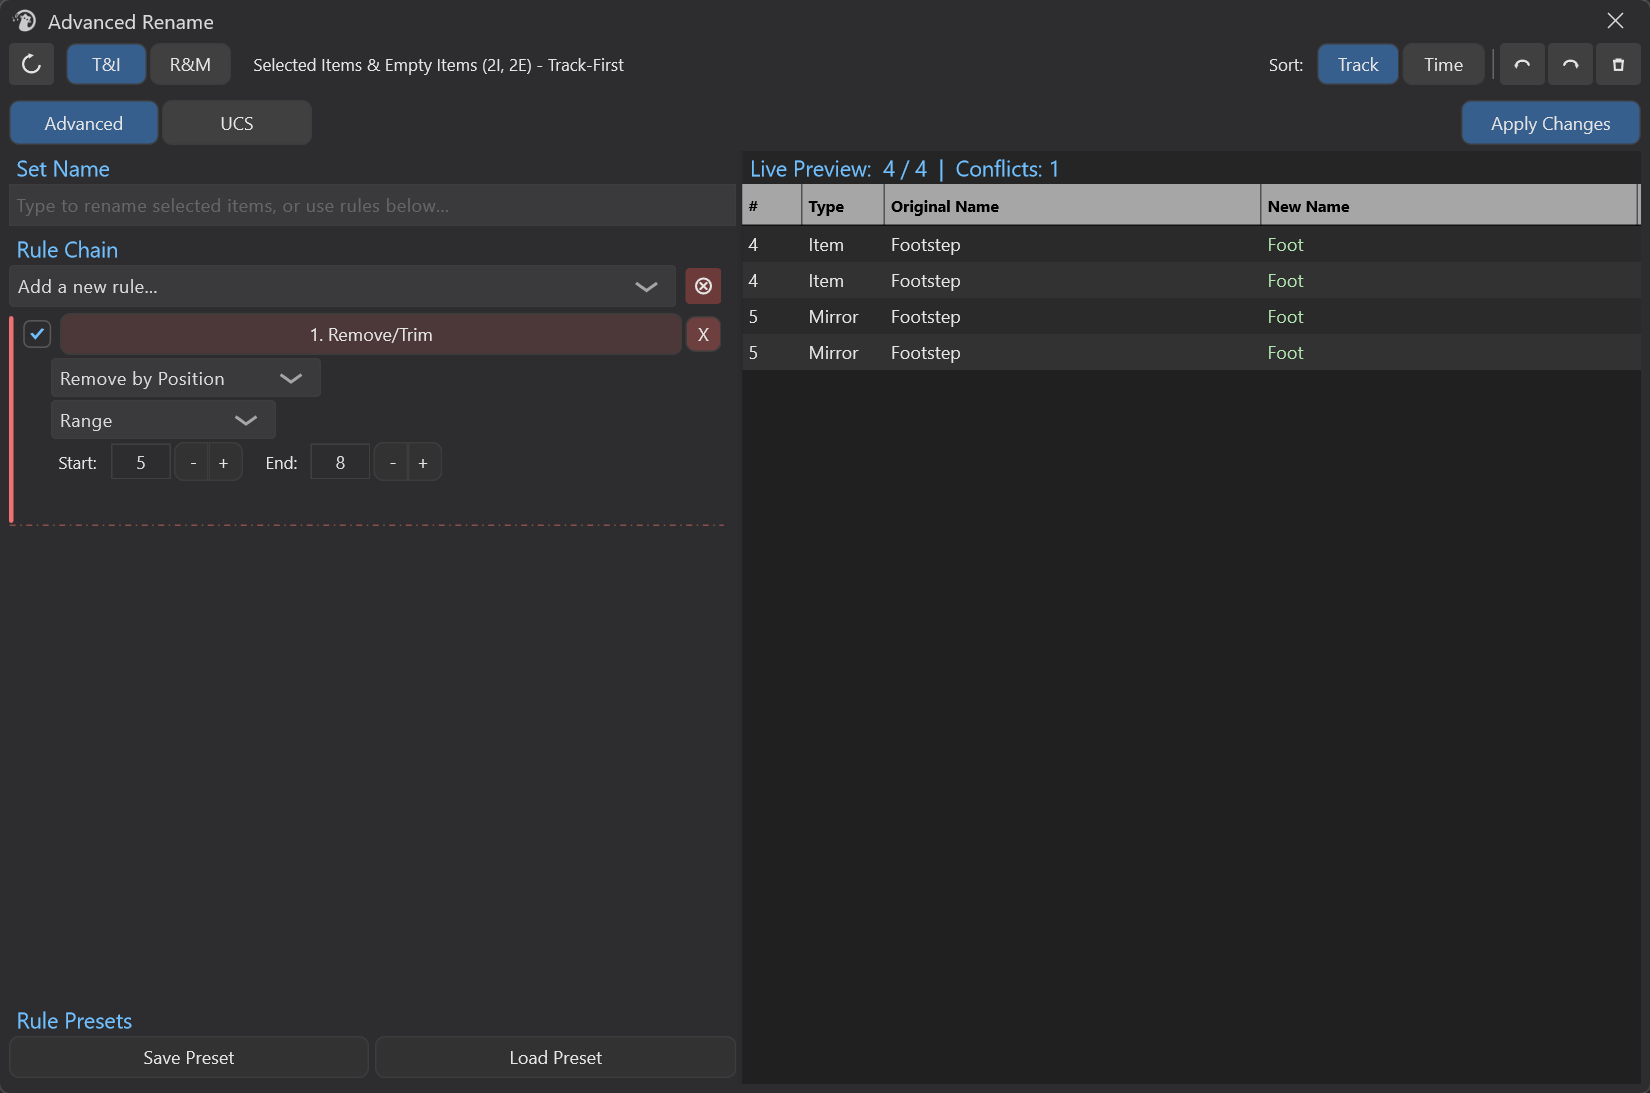
⚠️ Range mode's End is exclusive —
Range[5, 8)deletes the characters at indices 5, 6, 7 (3 characters).
8.6 List Rename
Purpose: replace selected object names one by one using a handwritten list of names.
Parameters:
| Parameter | Default | Description |
|---|---|---|
| Text Buffer | (empty) | Name list (one per line) |
| Group by Track | OFF | Group by owning track |
Input convention (important):
One name per line (separated by newlines, not commas!). This differs from Simple Rename's comma separation.
Leading/trailing whitespace on each line is automatically trimmed, and blank lines are skipped.
Two working modes:
Mode A: Group by Track = OFF (one-to-one)
Maps lines to selected objects in order. Strictly requires line count = selected object count to be considered configured. Count mismatch means the whole rule is skipped (not executed).
Mode B: Group by Track = ON
Groups by track; each line corresponds to one track. Strictly requires line count == unique track count.
⚠️ Group by Track on Tracks / Regions / Markers behaves the same as SimpleRename and degrades to one-to-one behavior (each object itself is a unique track ID).
Tip: Common use: copy a column of names from an external document/Excel and paste it into List Rename's multi-line editor to map immediately to the current selection.
8.7 Numbering
Purpose: append an incrementing number before/after each name.
Parameters:
| Parameter | Default | Description |
|---|---|---|
| Start | 1 | Starting number |
| Step | 1 | Increment (can be negative for reverse, or greater than 1 to skip) |
| Padding | 2 | Zero-pad digits (0 = no padding) |
| Position | Suffix | Prefix / Suffix |
| Separator | _ | Separator between number and name |
| Reset on Name Change | OFF | Reset numbering when the name changes |
Behavior:
- Padding > 0 pads to the specified width, overflowing naturally (Padding=2 gives
01..09 10..99 100 101 ...). - Padding = 0 means no padding (
1 2 3 ...). - Reset on Name Change: resets to Start when the previous row's name differs — classic combo with List Rename's Group by Track.
- Step can be negative (e.g., -1 for reverse numbering).
8.8 Cleanup
Purpose: trim leading/trailing whitespace and collapse extra spaces. Usually the last rule in the chain.
Parameters:
| Parameter | Default | Description |
|---|---|---|
| Trim Whitespace | ON | Remove leading/trailing whitespace (space/tab/CR/LF) |
| Remove Extra Spaces | ON | Collapse multiple consecutive spaces into one |
Behavior: when both switches are OFF the rule is considered unconfigured and skipped.
9. Rule Chain Presets
The whole rule chain can be saved as a preset for one-click loading later. Presets are indexed by preset name.
Operations (Save / Load buttons at the bottom of the left panel):
| Button | Behavior |
|---|---|
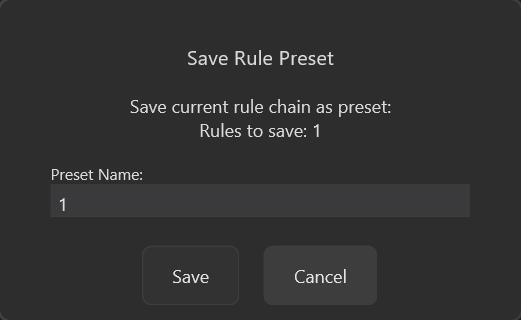
| Save | Popup asks for preset name → saves the current rule chain (including each rule's enabled state, configuration parameters, and order) to disk; duplicate names ask for overwrite confirmation |
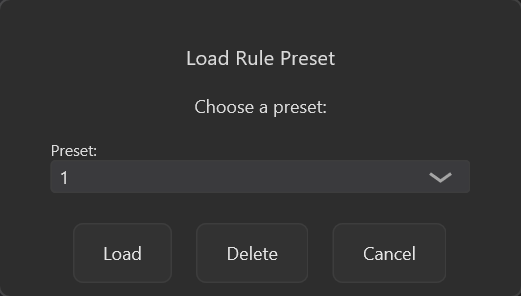
| Load | Popup selects preset → replaces current rule chain; same popup can also delete presets |
9.1 Overwrite Confirmation When Saving a Duplicate Preset
If the entered preset name already exists, it will not silently overwrite; instead a confirmation box appears:
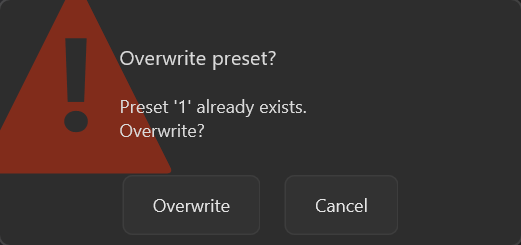
- Click Overwrite → actually overwrite
- Click Cancel → reopen the Save dialog, prefilled with the previous name so you can rename and save again — your input is not lost
If you press Cancel in the initial Save dialog, saving is completely abandoned.
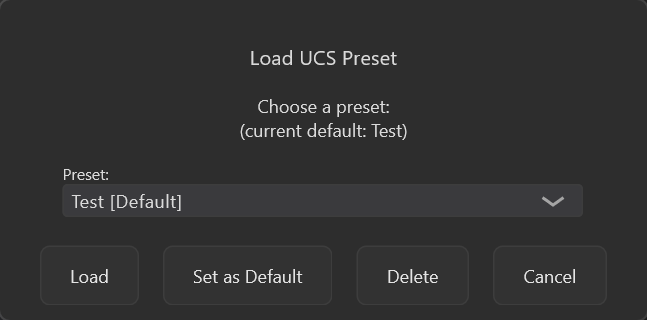
9.2 Three Buttons in the Load Dialog
Clicking Load opens this dialog:
| Button | Behavior |
|---|---|
| Load | Replace current rule chain with the selected preset |
| Delete | Delete the preset after confirmation (deletion cannot be undone) |
| Cancel | Close dialog, do nothing |
9.3 Preset Contents
Preset includes: each rule's type, enabled state, full configuration parameters, and position in the chain.
Preset does not include: Set Name edit box content (cleared after each Apply), UCS field configuration (belongs to UCS Tab's independent preset system).
Tip: Save frequently used workflows (e.g., "clean up audio filenames", "character action group numbering") as presets, then load them directly next time you open Advanced Rename.
10. UCS Tab
UCS = Universal Category System, a naming convention for sound-effect materials. Advanced Rename has a built-in UCS workflow specifically to help you construct filenames from UCS fields.
This section only covers how to use the UCS features inside Advanced Rename, not the UCS specification itself.
10.1 Switching to UCS Tab

Click the UCS label in the tab row. The left panel switches from the rule chain to the UCS field editor, and the Set Name edit box disappears (only visible in the Advanced Tab).
10.2 UCS Field Cards
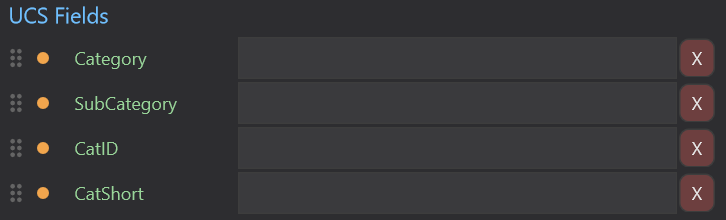
The UCS Tab initializes 4 protected fields by default:
| Field name | Meaning |
|---|---|
| Category | Main category |
| SubCategory | Sub category |
| CatID | Category ID |
| CatShort | Category short code |
"Protected" means these 4 field names cannot be used for custom fields (duplicate additions are rejected).
Each field is a card:
| Element | Function |
|---|---|
| ⠿ drag handle | Adjust field order |
| ● output switch | Orange = enabled, gray = disabled. Disabled fields do not appear in the final name |
| Field name | Custom fields editable; protected fields (green badge) read-only |
| Field value | Field content, participates in final output |
| ⓧ | Delete field |
10.3 Add / Reset / Sort
- [+] Add Custom Field — append a blank custom field at the bottom (custom field names must not collide with protected names).
- Reset (red background) — clear all fields and restore the default 4 protected fields.
- Drag handle — drag fields up/down to adjust order (order determines output concatenation order).
10.4 Auto-Complete (Protected Fields Only)
When entering Category / SubCategory / CatID / CatShort field values, a suggestion list pops up below the left panel, querying relevant items from built-in UCS data:
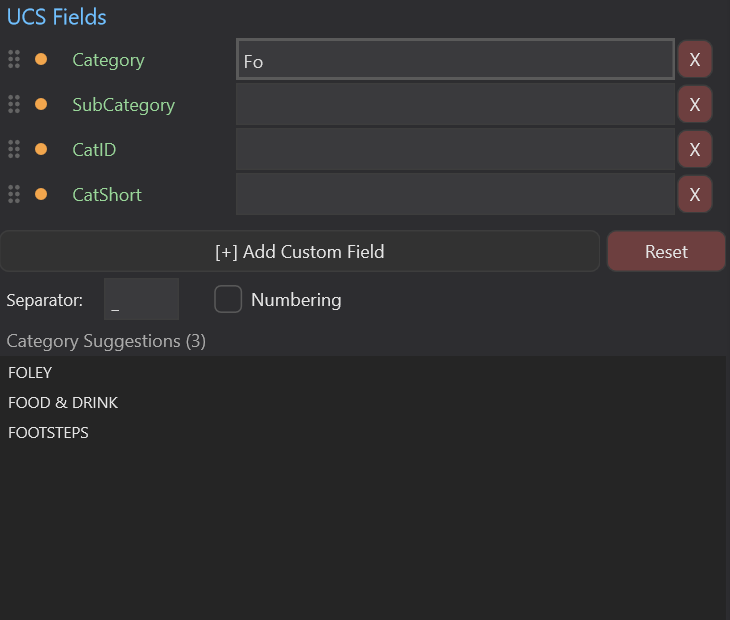
Clicking a suggestion fills the field, and the Explanation box below shows the item's detailed description (e.g., "CatShort: category abbreviation code").
10.5 Output Format (Separator + Numbering)
Below the field cards there is a row:

- Separator — delimiter between fields, default
_. Changing it immediately affects output. - Numbering — when enabled expands the Numbering editor to append numbers to the final output (parameters same as section 8.7).
Tip: Key fact: UCS output = concatenate all "non-empty and output-enabled" field values with the separator. Fields with empty values are automatically skipped — so you do not need to delete unused fields, just leave them blank.
10.6 UCS Presets
A separate preset system from rule-chain presets, at the bottom of the UCS panel:
| Button | Behavior |
|---|---|
| Save | Save all current fields (field names, values, output switches, displayOrder) + Separator + Numbering configuration |
| Load | Load preset, replace current field configuration |
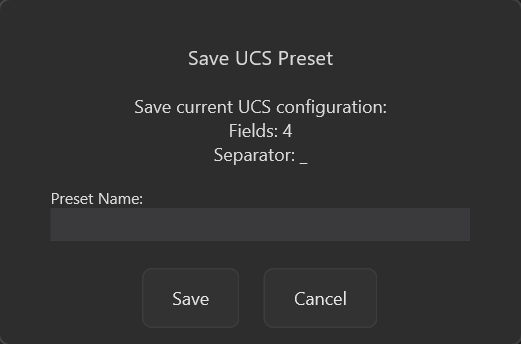
Default preset: you can designate one preset as "default", automatically loaded next time Advanced Rename opens (see UCS-specific documentation).
10.7 UCS Workflow Example
1. Switch to UCS Tab
2. Category field: type "Foot"
   → suggestions pop up [Foley, Footsteps, Forest]
   → click "Footsteps"
3. SubCategory field: type "Wood"
4. CatID / CatShort left blank (automatically skipped)
5. Add custom field "Variant", value "Heavy"
6. Separator: "_", Numbering: ON, Padding: 2
7. Selection has 5 items
8. Apply Changes
→ Footsteps_Wood_Heavy_01
   Footsteps_Wood_Heavy_02
   Footsteps_Wood_Heavy_03
   Footsteps_Wood_Heavy_04
   Footsteps_Wood_Heavy_05
11. R&M Mode Detailed Operations
11.1 Entering R&M
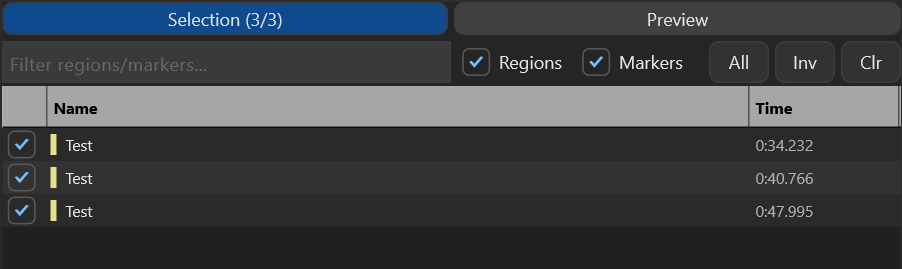
Click the R&M button in the Header. The right panel switches from a single Preview table to two tabs:

11.2 Selection Tab

Controls:
| Control | Function |
|---|---|
| Filter edit box | Fuzzy search by name (real-time filtering) |
| Regions toggle | Whether to show regions |
| Markers toggle | Whether to show markers |
| All | Select all currently visible (filtered) items |
| Inv | Invert current visible selection |
| Clr | Clear all selections (including filtered-out ones) |
Table:
| Column | Content |
|---|---|
| Checkbox | Checked = enters Preview |
| Name (with left color bar) | Green bar = Region; yellow bar = Marker |
| Time position | MM:SS.ddd format |
11.3 R&M Tab Switching
Click the Preview tab to view new-name preview. You can switch freely between Selection and Preview; Preview shows the objects currently checked in Selection.
11.4 Rule Chain in R&M Mode
The rule chain works exactly the same in R&M mode as in T&I mode — all 8 rules are available, and the UCS Tab is also available. The only difference is the data source is regions/markers instead of items/tracks.
⚠️ Group by Track in List Rename is meaningless in R&M mode — regions/markers have no "owning track" concept and degrade to one-to-one.
11.5 Fallback When Filtering Empties the Table
If both Regions and Markers toggles are turned off, the table becomes empty — this is expected behavior and does not error. Turn either type back on to restore.
12. Shortcuts and Enter Behavior
12.1 Global Shortcuts
| Shortcut | Behavior |
|---|---|
Ctrl+Z | Undo (same as Header undo arrow button) |
Ctrl+Y | Redo (same as Header redo arrow button) |
12.2 Enter Key Behavior (Depends on Focus)
| Focus location | Enter behavior |
|---|---|
| Set Name edit box | generatePreview + tryExecuteRename (i.e., Apply) |
| Anywhere else in the window | tryExecuteRename (i.e., Apply) |
| Editing New Name cell in Preview table | Commit edited value → refresh stats / conflict detection |
Summary: pressing Enter almost anywhere equals clicking Apply Changes.
12.3 Apply Failure Does Nothing
If pressing Enter / clicking Apply does nothing, possible causes:
- No object is selected
- All new names are the same as originals (successCount = 0)
- A key rule in the chain is unconfigured (IsConfigured is false)
13. Typical Workflows
Workflow A: Clean Up a Batch of Sound Effect Filenames
Goal: turn a name like My Footstep .wav with trailing extension + extra spaces into a clean name.
1. Select Items
2. Rule chain:
   - Remove/Trim:  Mode=Text, Text=".wav", Case insensitive, Remove all
   - Cleanup:      Trim Whitespace ON, Remove Extra Spaces ON
3. ApplyResult: "My Footstep .wav " → "My Footstep"
Workflow B: Batch Change Prefix + Numbering
Goal: make 5 selected items all named SFX_*_01..05.
1. Select 5 items
2. Set Name input: "Hit"
3. Rule chain:
   - Add Text:  Type=Prefix, Text="SFX_"
   - Numbering: Start=1, Padding=2, Position=Suffix, Sep="_"
4. ApplyResult: SFX_Hit_01, SFX_Hit_02, SFX_Hit_03, SFX_Hit_04, SFX_Hit_05
Workflow C: Structural Reordering
Goal: reorder all names in Type_Material_Variant_NN format to Material_Type_Variant_NN.
1. Select all target items
2. Add Structured Rename
3. Example filename: paste "Footstep_Wood_Heavy_01" (the first one in the selection is enough)
4. Engine auto-detects "_" as delimiter and splits into 4 components
5. Drag: [Footstep] [Wood] → [Wood] [Footstep]
6. ApplyResult: all names reordered according to the new order.
Workflow D: UCS Standardized Naming
Goal: name a batch of Foley materials according to UCS.
1. Switch to UCS Tab
2. Category: Footsteps (select from suggestions)
3. SubCategory: Wood
4. CatID / CatShort: leave blank
5. Custom field "Variant": Heavy
6. Separator: "_", Numbering ON
7. ApplyResult: Footsteps_Wood_Heavy_01 ... Footsteps_Wood_Heavy_NN
Workflow E: Paste a Column of Names from Excel
Goal: paste 6 character names copied from an external table into Advanced Rename.
1. Select 6 items
2. Add List Rename
3. Paste into Text Buffer (one per line):
       Player
       NPC1
       NPC2
       Boss
       Ambient
       Music
4. Group by Track: OFF
5. ApplyResult: the 6 items each get the corresponding name.
Workflow F: Batch Rename Regions
Goal: rename 4 regions named "untitled" to Loop_01..04.
1. Switch to R&M mode
2. Selection Tab:
   - Filter: untitled
   - Check Regions
   - All button (select all filtered)
3. Switch back to Preview Tab
4. Rule chain:
   - Set Name: Loop
   - Numbering: Start=1, Padding=2, Suffix
5. ApplyResult: 4 regions renamed to Loop_01, Loop_02, Loop_03, Loop_04.
Workflow G: Save a Frequently Used Rule Chain
Goal: save the "clean + add SFX prefix + number" combo for repeated use.
1. Configure the rule chain
2. Save Preset at the bottom of the left panel
3. Enter preset name: "SFX Standard"
→ Next time open directly Load Preset to restore with one click
14. Notes / Pitfalls
14.1 Set Name Is the Rule Chain Input, Not Output Override
See section 7. Misunderstanding this causes confusion like "why didn't Numbering add a number after the name I typed" — it did, but you thought Set Name was the final step.
14.2 Rule Chain Executes Strictly in List Order
Swapping two rules changes the result. Numbering usually belongs at the end.
14.3 Conflicts Do Not Block Apply
X conflicts is a warning, not an error. If you do not want duplicates, add Numbering.
14.4 List Rename Uses Newlines, Not Commas
Different from SimpleRename. Pasting one column from Excel is perfect; comma-separated lists will not work.
14.5 List Rename Count Mismatch Is Silently Skipped
Unlike Simple Rename's border color feedback, Advanced Rename's List Rename simply becomes IsConfigured=false when counts mismatch → the whole rule is skipped. If your list does not take effect, first check whether the line count equals the object count.
14.6 UCS Default 4 Fields Cannot Be Renamed
Category / SubCategory / CatID / CatShort are protected field names; custom fields cannot use these names.
14.7 Empty UCS Field Values Are Automatically Skipped
No need to manually delete temporarily unused fields; leave them blank.
14.8 Set Name Edit Box Is Cleared After Apply
This is intentional — prevents accidentally renaming already-renamed objects again if you Apply repeatedly.
14.9 Clear All Cannot Be Undone
There is no Undo for deleting the rule chain. Save a preset first.
14.10 Group by Track in R&M Mode Is Meaningless
Regions/markers have no owning track, so it degrades to one-to-one.
14.11 Refresh Mechanism
Advanced Rename does not automatically detect REAPER selection changes. After changing selection, click the Refresh button (see section 5.1).
15. Troubleshooting
| Symptom | Possible cause | Solution |
|---|---|---|
| Apply button does nothing | successCount = 0 (all new names same as originals) | Check whether the rule chain is configured effectively |
| Apply button does nothing | No object selected | Select objects in REAPER first |
| Apply button does nothing | Focus is on an editable cell in Preview table | Press Esc first to exit edit |
| A rule seems not to take effect | Rule is disabled (checkbox not checked) | Check to enable |
| A rule seems not to take effect | Rule unconfigured (IsConfigured=false) | Check required parameters (e.g., Find is not empty) |
| List Rename not working | Line count does not match object count | Make both counts equal |
| List Rename not working | Used comma separation | Use newline separation (one per line) |
| Numbering always starts from 1 | Reset on Name Change is on + every row name is different | Turn off Reset on Name Change |
| Structured Rename produces strange results | Selected objects have inconsistent naming structures | Known limitation; first select objects with the same structure |
| UCS output is empty string | All fields are empty | Fill at least one field |
| UCS output missing a field | Field output switch is off | Light the orange dot |
| UCS auto-complete not responding | UCS JSON data not loaded | See UCS-specific documentation |
| R&M table is empty | Both Regions / Markers toggles are off | Turn at least one on |
| R&M table is empty | Filter text too strict | Clear Filter |
| Want to rename tracks but items are shown | REAPER selection contains items | Deselect all items |
| Set Name content cleared after Apply | Expected behavior | See section 14.8 |
| Rule chain lost | Switching tab/mode does not lose it; Clear All does | Save Preset before operating |