
Preferences
1. Overview
Preferences is the main control panel for Mantrika Tools. It turns on and tunes the helper behaviors that run in the background after you install the extension, such as:
- Mouse / selection linking
- Item Auto Transient detection
- FX insertion window policy
- Monitor Dim Action attenuation
- Automatic folder-track colors
- Workflow assistants like Mirror Segments and Adaptive Regions
Every toggle takes effect immediately — check a box or release a slider and the change is already applied. There is no OK or Apply button; just close the window when you are done.
The left-hand navigation splits the panel into two groups:
| Panel | Contents |
|---|---|
| Global | General background helpers and visuals: Auto Transient, Selection Enhance, FX insertion pop-ups, Auto Track Colors, Monitor Dim. |
| Assistants | Workflow assistants: the current project's Mirror / Region mode, Mirror sub-options, Adaptive Regions, actions, and mouse modifiers. |
The panel opens on Global by default.
2. Opening Preferences
From REAPER's main menu: Extensions → Mantrika Tools → Mantrika Options → Preferences...
The window is roughly 650 × 700 pixels. The left side holds navigation buttons and the right side is a scrollable settings area — the list is long, so use the mouse wheel to browse.
3. Global panel
Everything in this panel is a global setting (not saved per-project).
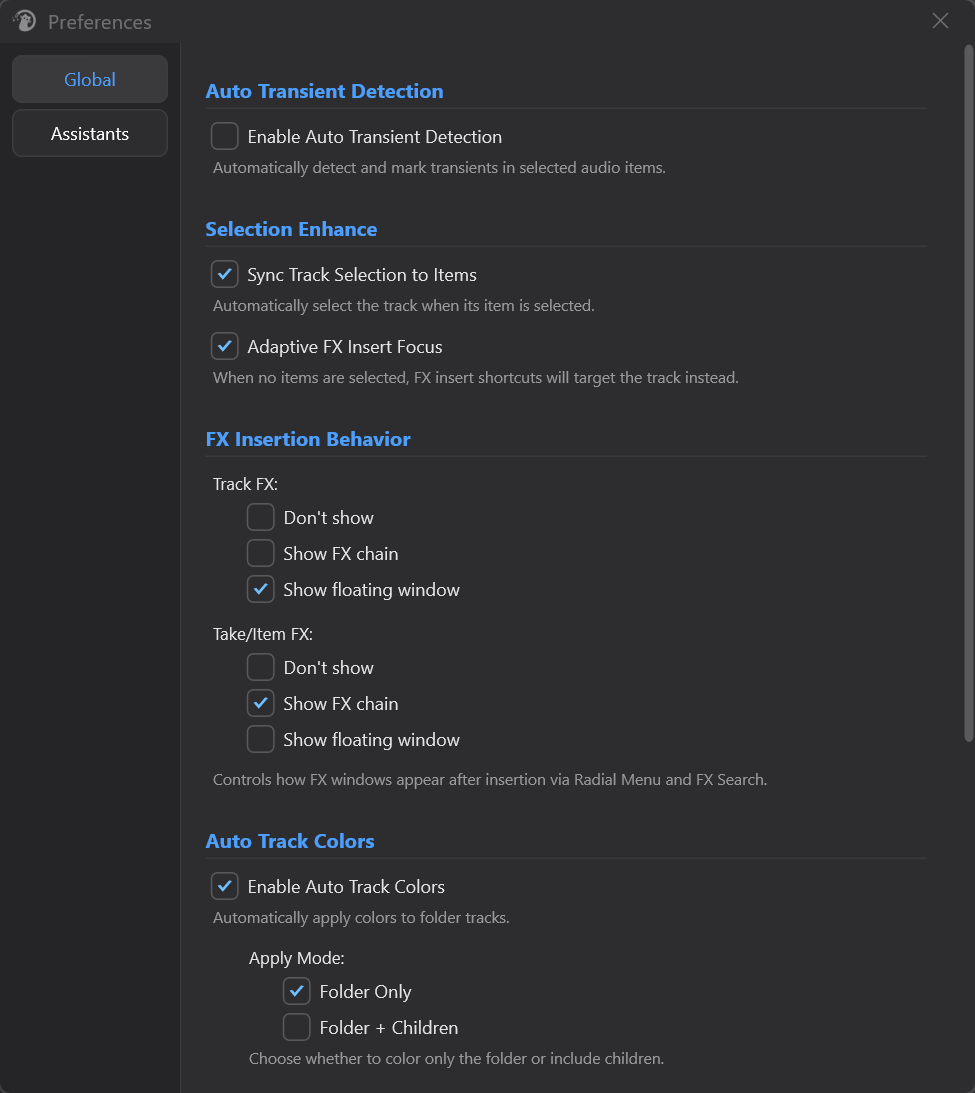
3.1 Auto Transient Detection
| Option | Function |
|---|---|
| Enable Auto Transient Detection | When an audio item is selected, automatically detect and mark transients on its waveform. |
It only acts on selected audio items and stays active in the background.
3.2 Selection Enhance
| Option | Function |
|---|---|
| Sync Track Selection to Items | When you select an item, its track is selected too. Useful for "I clicked an item, so operate on that track" workflows. |
| Adaptive FX Insert Focus | When enabled, clicking an arrange track in the Arrange view (without focus being on the TCP) and then pressing an insert-FX shortcut will attach the FX to the track itself. This fixes the REAPER pain point where you normally have to click the TCP first to give it focus before the shortcut works. |
3.3 FX Insertion Behavior
Controls how the FX window appears after you insert a plug-in through Radial Menu or FX Search.
| Track FX / Take or Item FX option | Meaning |
|---|---|
| Don't show | No window opens after insertion. |
| Show FX chain | Opens the FX Chain window. |
| Show floating window | Opens the plug-in UI directly as a floating window. |
Track FX and Take/Item FX are configured independently.
3.4 Auto Track Colors
Automatically gives folder tracks sensible colors when they are created or reorganized, so you do not have to color them manually one by one.
| Option | Function |
|---|---|
| Enable Auto Track Colors | Master switch. When off, all sub-options below are grayed out. |
Apply Mode
| Option | Function |
|---|---|
| Folder Only | Colors only the folder track itself; child tracks keep their existing colors. |
| Folder + Children | Colors the folder and all its child tracks in the same color family. |
Saturation Mode
Controls which direction colors move when saturation is reduced.
| Option | Function |
|---|---|
| Toward Gray | Lower saturation moves the color toward gray (softer, better for dark themes). |
| Toward White | Lower saturation moves the color toward white (lighter, better for light themes). |
Fine-tune sliders
| Slider | Range | Meaning |
|---|---|---|
| Saturation | 0.0 ~ 1.0 | Overall saturation multiplier. 1.0 = original color; lower values move toward the chosen Saturation Mode endpoint. |
| Brightness | 0.0 ~ 1.0 | Overall brightness multiplier. 1.0 = original color; lower values are darker. |
| Hue Shift | -180° ~ +180° | Overall hue rotation. 0 = no rotation. |
The sliders take effect when you release the mouse — they do not refresh repeatedly while dragging. Using the mouse wheel applies changes instantly.
Reset button
Resets the three sliders to their defaults (saturation 1.0, brightness 1.0, hue 0°). It does not change the master switch, Apply Mode, or Saturation Mode selection.
3.5 Monitor (dim level)
| Item | Function |
|---|---|
| Dim Level | Attenuation applied when toggling the Monitor Dim Action. Range -60.0 dB ~ 0.0 dB, step 0.5 dB; takes effect on release. |
Default is
-15.0 dB.
4. Assistants panel
The Assistants panel manages the two mutually exclusive workflow assistants —Mirror and Region — plus their related actions and mouse modifiers.
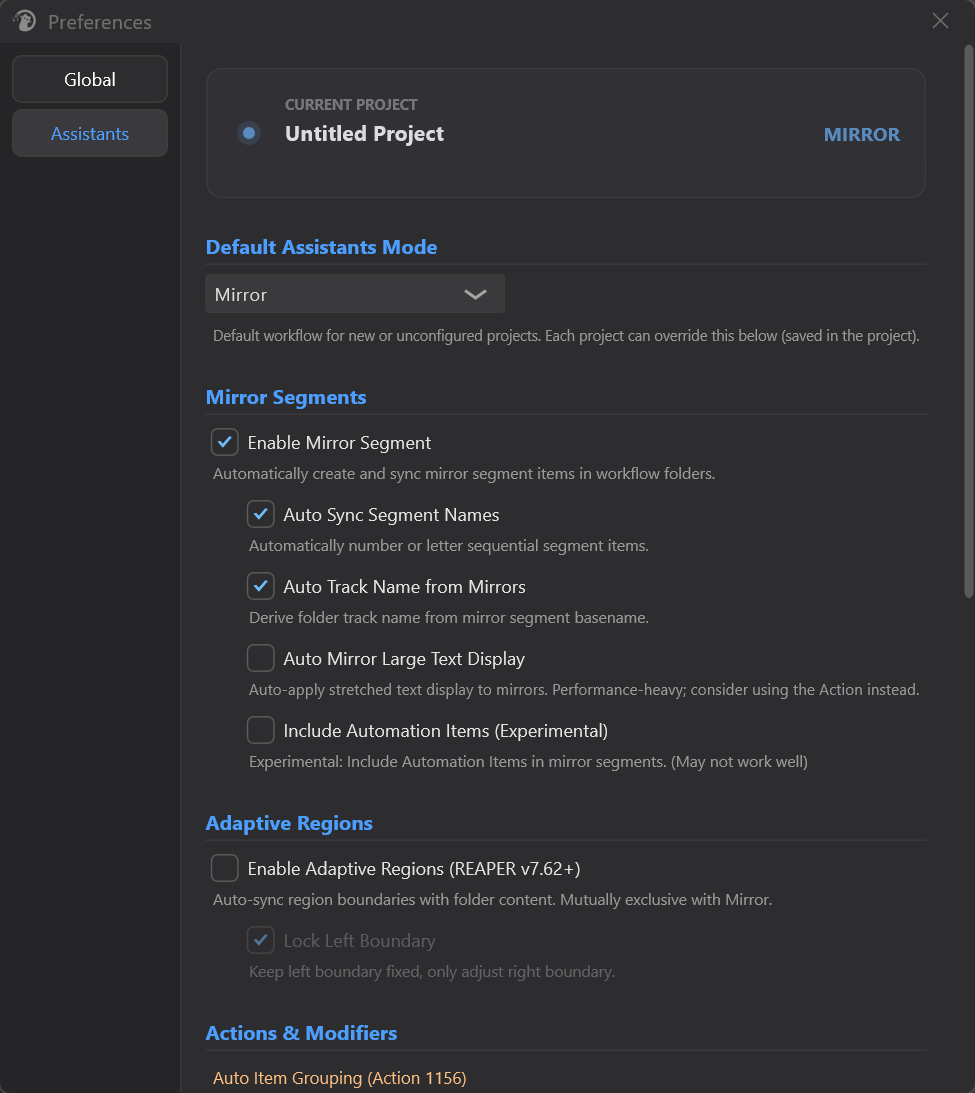
How the mode model works (read this first)
Every project is in one of three modes at any time: None / Mirror / Region.
- Per-project mode: Checking
Enable Mirror SegmentorEnable Adaptive Regionsswitches the current project to that mode. - Global default: The
Default Assistants Modedropdown decides which mode new or unconfigured projects start in. - Mutually exclusive: Mirror and Region cannot both be on — turning one on automatically turns the other off.
4.1 Current project status card
The card at the top of the panel is read-only. It shows which mode the currently active project is in at a glance:
- Left indicator light: lights up by mode (Mirror = steel blue, Region = purple, None = gray).
- Center:
CURRENT PROJECT+ project name. - Right: mode badge MIRROR / REGION / OFF.
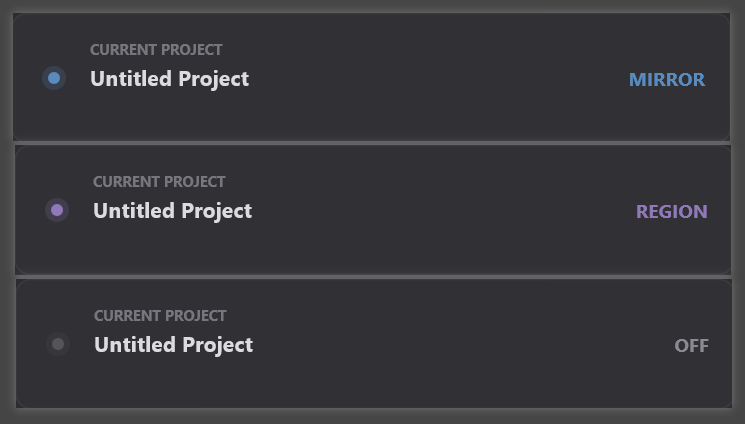
When you switch REAPER project tabs, the status card refreshes automatically to show that project's mode.
4.2 Default Assistants Mode
| Option | Function |
|---|---|
| None / Mirror / Region | Default workflow for new or unconfigured projects. Each project can override this below with the Mirror / Region switches (the override is saved in the project file). |
Changing this dropdown only affects projects that have not been explicitly configured. If the currently active project is in that group, the new default takes effect immediately; if it has been set individually, it is not affected.
4.3 Mirror Segments
Mirror Segments: automatically creates "Mirror items" on a collapsed folder track that represent the contents of its child tracks, making it easy to drag, name, and split whole segments.
| Option | Function |
|---|---|
| Enable Mirror Segment | Switches the current project to Mirror mode (and turns Region off). All sub-options below are disabled (grayed out) when this is off. |
| Auto Sync Segment Names | Sequential segments are auto-numbered / lettered (e.g. _01 _02, _A _B, -1 -2) so you do not have to rename each one manually. |
| Auto Track Name from Mirrors | Applies the Mirror's base name to the folder track name — rename the Mirror and the folder track follows. |
| Auto Mirror Large Text Display | Automatically enables REAPER's stretched-text display for Mirrors. Performance-heavy (can drop frames with many collapsed groups). It is better to apply this with the dedicated action when needed instead of leaving it on here. |
| Include Automation Items (Experimental) | Includes automation items in Mirror. Currently unstable; use for experimentation only. |
Dependencies:
- When the Mirror master switch is off, all sub-options are grayed out.
- When
Auto Sync Segment Namesis off,Auto Mirror Large Text Displayis automatically turned off and grayed out (because it depends on the former).
4.4 Adaptive Regions
Adaptive Regions: the left and right boundaries of qualifying regions automatically follow the actual item boundaries inside a folder. It is essentially the Mirror concept applied to regions.
| Option | Function |
|---|---|
| Enable Adaptive Regions (REAPER v7.62+) | Switches the current project to Region mode (and turns Mirror off). When contents inside the folder's child tracks change, the corresponding region boundaries follow automatically. |
| Lock Left Boundary | Only the right boundary follows content changes; the left boundary stays where you placed it. Useful for game-audio workflows where you anchor at a specific point and extend to the right. |
| Mark Crossing Items | Safety reminder: when Lock Left is on, if an item starts before the region's left boundary (i.e., extends outside the region), a red MTK-Crossing marker is placed at the leftmost crossing point to warn that this portion will be cut by region-based rendering. Only available when Lock Left Boundary is on; off by default. |
⚠️ Adaptive Regions and Mirror Segments are mutually exclusive — only one can be on at a time. Turning one on in Preferences automatically turns the other off, and the status card flips accordingly.
4.5 Actions & Modifiers
Auto Item Grouping (Action 1156)
| Button | Function |
|---|---|
| Enable Item Grouping / Item Grouping: Auto-Enabled | Locks REAPER's built-in Action 1156 (Options: Toggle item grouping and track media/razor edit grouping) to "on" for every project as soon as it opens. Mirror mode + dragging collapsed groups relies heavily on this, so it is recommended to leave it on. |
When the button text changes to "Item Grouping: Auto-Enabled" and turns green, it is active.
Mouse Modifier Presets
Writes Mantrika's recommended double-click / modifier configuration into REAPER's Mouse Modifiers. Each logical feature is now a separate switch, so you can apply all at once or enable only the ones you want — they do not affect each other.
One-click buttons
| Button | Function |
|---|---|
| Apply All | Applies every feature below at once. Grayed out and relabeled "All Applied" when everything is already applied. |
| Restore All | Restores all applied features to your original settings. Clickable as long as any feature is still applied. |
Per-feature switches
Each feature is one row (checkbox + description). Checking applies that item; unchecking restores it to your original setting. Each item's original configuration is backed up independently, so unchecking restores only that item and leaves your other modifiers untouched.
| Feature switch | Effect |
|---|---|
| Enhanced Item Double-Click | Double-click a media item to trigger enhanced item / Mirror selection actions. |
| Enhanced TCP Double-Click (Ctrl/Command) | Ctrl + double-click the TCP to perform enhanced track selection. |
| Focus View on Track Items (Alt/Option) | Alt + double-click the TCP to jump the view to and zoom to the track's item range. |
| Contextual Folder Toggle | Double-click an arrange track / TCP: if it is a folder, collapse / expand it; if it is a normal track, select all items on that track. |
| Select All Automation Items | Double-click an envelope lane to select all automation items on that lane. |
- Each switch's state reflects the real configuration in real time: check/uncheck writes and applies immediately. If a write fails, the switch snaps back to the correct position and a message box appears.
- Write failures are rare. If one happens, follow the prompt and configure the corresponding item manually in REAPER's Mouse Modifiers settings, or check the REAPER Console log.
- "Apply All" is equivalent to checking every item; "Restore All" is equivalent to unchecking every applied item.
5. Notes
5.1 Everything takes effect immediately
There are no OK / Apply buttons. Checking a box, selecting a radio button, or releasing a slider writes and applies the value immediately. Just close the window.
5.2 Modes are per-project; sub-options are global
- Which mode the current project is in (None / Mirror / Region) is saved in the project's
.rppfile — switching projects changes the status card. - Default Assistants Mode is a global default that affects every project that has not been individually configured.
- Mirror / Region detail sub-options (such as Auto Sync Segment Names, Lock Left Boundary, etc.) are global settings shared across all projects.
5.3 Grayed-out sub-options are intentional
When the master switches for Mirror Segments, Adaptive Regions, or Auto Track Colors are off, the related sub-options become semi-transparent and unclickable. This indicates "not active right now" — it is not a bug.
5.4 Mirror and Adaptive Regions are mutually exclusive
Only one can be on at a time. Turning one on automatically turns the other off, and the status card flips. See §4.4.
5.5 Performance trade-off of Auto Mirror Large Text Display
Enabling this option may affect UI frame rate. It is recommended to use the corresponding action to toggle it temporarily and leave this switch off normally.
5.6 Adaptive Regions requires REAPER v7.62+
On older versions the checkbox has no effect — upgrade REAPER first.
5.7 Mouse modifier state is tracked by Mantrika Tools
The applied / restored state of each item is tracked independently: switch positions and the clickable state of Apply All / Restore All reflect the real configuration in real time, preventing duplicate applications or duplicate restorations.
6. Troubleshooting
| Symptom | Likely cause | Fix |
|---|---|---|
| Status card shows OFF and no assistant is active | Current project is in None mode and the global default is also None | Check Enable Mirror Segment or Enable Adaptive Regions, or change Default Assistants Mode |
| Mode changed when I switched projects | Mode is stored per-project (expected behavior) | See §5.2; the status card reflects the current project's setting |
| Nothing appears after enabling Mirror | The current project does not have a valid folder structure | Put items on the child tracks of a folder track and watch it appear |
| Mirror turned off when I enabled Adaptive Regions | The two are mutually exclusive (expected behavior) | See §4.4 |
| Mirror sub-options are always grayed out | The Mirror master switch is not checked | Check Enable Mirror Segment first |
| Auto Mirror Large Text Display is grayed out | Auto Sync Segment Names is not checked | Check Auto Sync Segment Names first |
| Auto Track Colors sliders do nothing | The master Enable switch is not checked | Check Enable Auto Track Colors first |
| Apply All / per-item switches show an error | REAPER Mouse Modifiers write failed (rare) | Follow the prompt and configure the item manually in REAPER, or check the REAPER Console log |
| Item Grouping button stays on "Enable Item Grouping" instead of turning green | Not clicked yet, or the setting did not save | Click again; success is confirmed when the button reads "Item Grouping: Auto-Enabled" |
| No FX window appears after insertion | Track FX / Take FX is set to "Don't show" | Change it back to "Show FX chain" or "Show floating window" |
| Monitor Dim has no attenuation effect | Dim Level is set to 0 dB | Drag it to a negative value, e.g. -15 dB |