
Sample Broker
1. What Is Sample Broker?
Sample Broker is a resident background 60-second rolling recorder. Its motto is "catch what you hear."
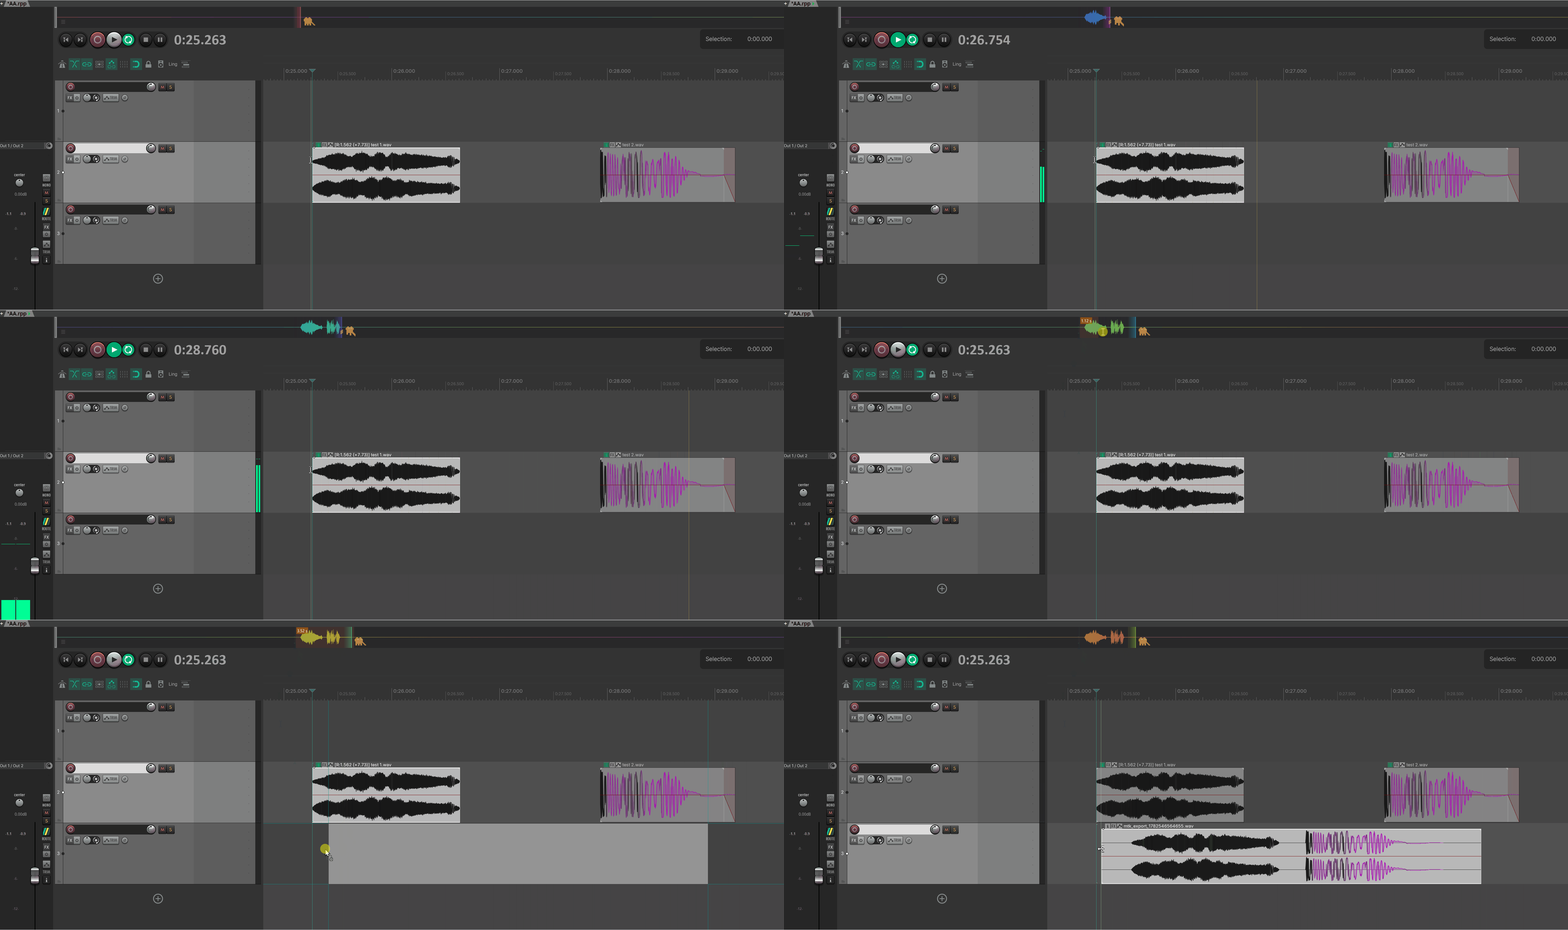
It installs a monitoring plug-in on the Master bus. Whether you are playing back, auditioning FX, or jamming, the last 60 seconds of audio are always being recorded in a looping, overwriting buffer. When you hear something worth keeping, select it in the window and drag it out.
It can do two things:
- Select + drag to Arrange: Drag a selected waveform onto a REAPER track to drop it as an item; a new track is created automatically if needed.
- Select + drag anywhere: With the default OS drag mode, the same selection can be dragged to the file explorer, another DAW, a sampler/synth, a chat app— anywhere that accepts a WAV file.
- Several segments at once: Hold Shift to keep adding selections, then drag them all out together in a single drag.
The whole workflow is "select a segment → drag it out." No record button, no need to stop playback.
2. Opening Sample Broker
Menu path:
Extensions → Mantrika Tools → Sample broker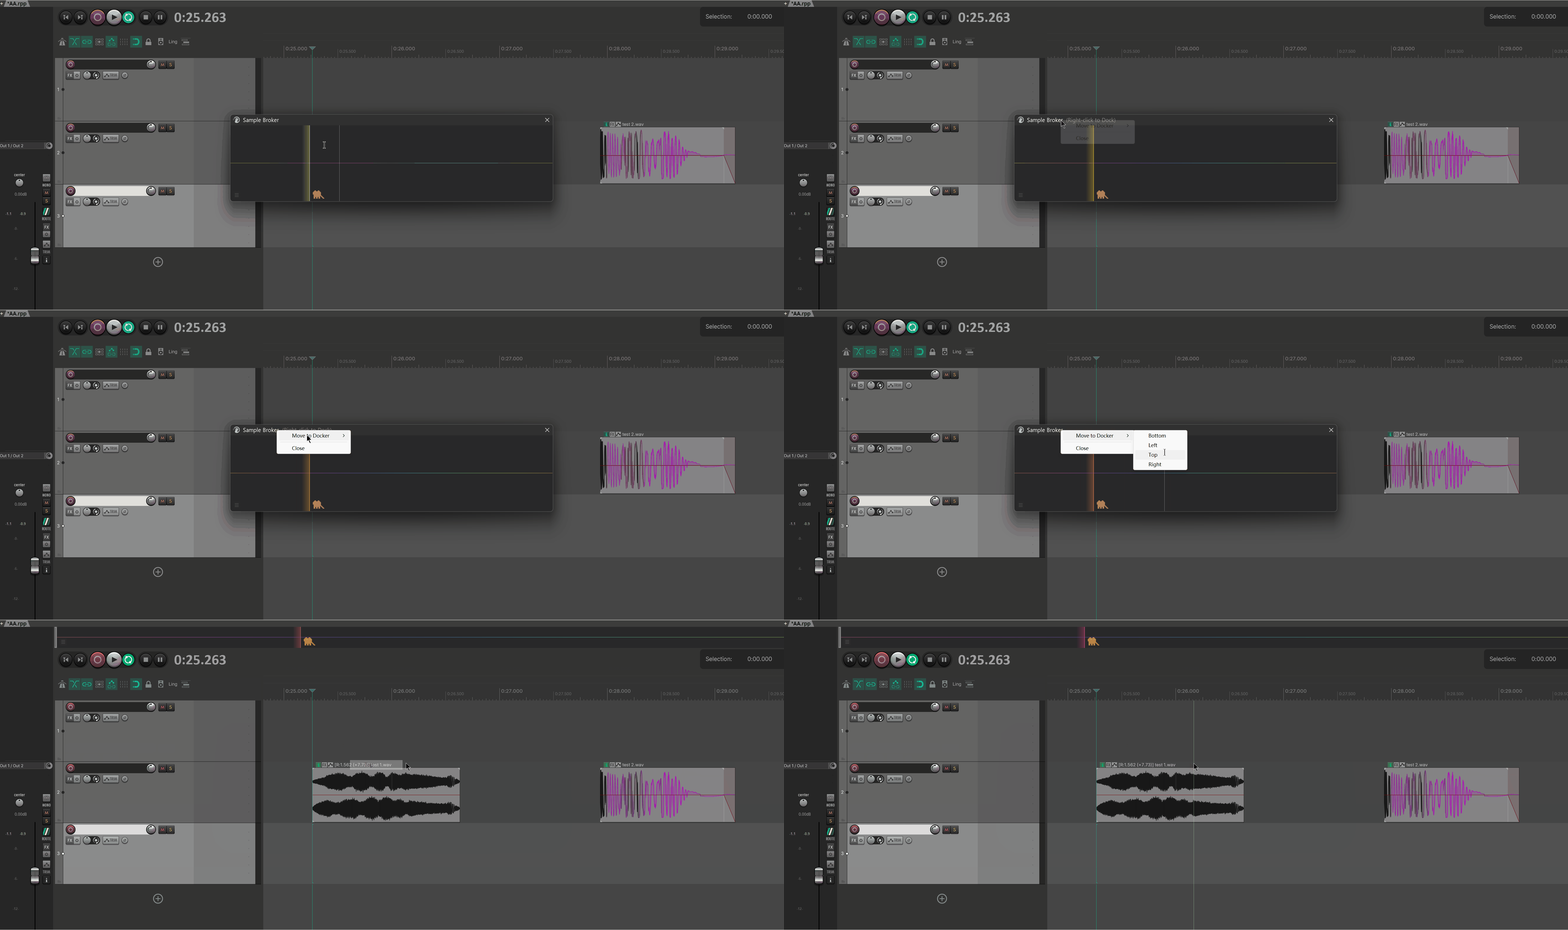
Or use the Action List (search "Sample Broker"):
| Action name | Purpose |
|---|---|
mantrika : Synergy - Sample Broker | Toggle the Sample Broker window on/off |
mantrika : Synergy - Sample Broker - Insert Current Segment to Selected Track | Place the current segment on the selected track without selecting or dragging (see §5.5) |
The window is dockable— the first time it opens it may be a floating window; right-click the title bar to dock it.
3. First Use: Getting Past the Status Warnings
The first time you open the window, you will probably not see a waveform immediately. Instead, you will see a prompt page with a button. The message tells you that something on the Master chain is missing or disabled. Click the button whose label matches the situation:
| Prompt title | Button | Meaning / what to do |
|---|---|---|
| CLAP plugin not found in Monitor FX | Auto Setup | The plug-in has not been recognized by REAPER yet. Go to Preferences > Plug-ins > CLAP, click Re-scan, then return and click Auto Setup. |
| Sample Broker plugin is bypassed | Enable Plugin | The plug-in is individually bypassed; click to enable it. |
| Monitor FX is globally bypassed | Enable Monitor FX | The whole Monitor FX chain is disabled; click to turn it back on. |
| Plugin is not responding | Retry | The plug-in lost contact (rare); this is usually a CLAP scan issue. Click to reactivate. |
Once resolved, the window enters the main interface and the waveform appears.
4. Main Interface Overview
When running normally, the window looks like this:
┌────────────────────────────────────────────────────────────────┐
│                                                       2.0x     │  ← (top-right) horizontal zoom factor
│         ╱╲    ╱╲╱╲  ╱╲      ╱╲╱╲   ╱╲╱╲╲ ╱╲                  │  ← waveform canvas
│     ╱╲╱╱  ╲╱╱╱    ╲╱  ╲╲╱╲╱╱    ╲╱╱    ╲╱  ╲             │
│     ──────────────────│─────────────────────────              │
│        history (dim)  │ current (bright / rainbow)            │
│   ▤                                                            │  ← (bottom-left) hamburger menu button
└────────────────────────────────────────────────────────────────┘
Visual details worth knowing:
- The currently recording segment is shown in rainbow colors; older segments gradually desaturate and darken, so you can tell at a glance which part was just recorded.
- The record head is a thin line that sweeps left to right; when it reaches the end, it wraps back to the start and continues overwriting.
- After zooming, a small
2.0xlabel floats in the top-right corner. - While paused, an orange-red
II PAUSEDlabel floats in the top-right corner. - When the mouse hovers over the canvas, a semi-transparent vertical line shows the position.
- By default the canvas shows a single merged waveform. You can switch to a stereo split view (top = Left, bottom = Right) from the hamburger menu — see §10.
5. Basic Use — Three Typical Actions
5.1 Grab something you just heard and drop it into Arrange
1. In the window, left-click and drag to select a range manually, OR
 hold Ctrl and move the mouse over a sound → a cyan border shows the "smart segment,"
 then Ctrl + left-click to confirm that segment.
2. Hold the selection and drag it into Arrange.
3. Release over the target track → the selection becomes a new item.
Drop rules:
| Where the mouse is released | Result |
|---|---|
| Over a track | Drop the item on that track at the current edit cursor position |
| Over an item / take | Drop on the same track at the edit cursor position |
| Empty area of Arrange | Create a new track automatically and drop the item there |
| Outside Arrange | Nothing is dropped (unless using OS mode; see below) |
5.2 Grab a segment and drag it out as a WAV file
If you want to drag the segment to the desktop, a chat app, or another DAW, the process is the same — the default drag mode just needs to be OS:
1. Select a segment (manually or with Ctrl+smart select).
2. Drag it out of the window and release it over anything that accepts files.
3. A file named mtk_export_<timestamp>.wav is generated in the current project folder.
The default is OS mode out of the box, so this works immediately.
5.3 Temporarily switch drag mode with Ctrl+Alt
If the default is OS mode but you want this one drag to use the API mode and drop only into Arrange, hold Ctrl+Alt while starting the drag. The reverse also works.
This is a "swap" logic: Ctrl+Alt always means use the other mode.
5.4 Grab several segments in one drag
When you recorded a run of takes and want more than one of them:
1. Select the first segment (manually or with Ctrl + smart select).
2. Hold Shift and add more: Shift + left-click drag for manual ranges,
 or Ctrl + Shift + left-click for smart segments.
3. Drag any one of the selections — all of them go together.
What you get depends on the drag mode:
| Drag mode | Result |
|---|---|
| OS | One WAV file per segment, all carried in a single drag. When dropped into REAPER, REAPER asks how to place the files (its own import dialog). |
| Reaper API | The segments are placed end to end on the target track, starting at the drop position, in recording order. A single Ctrl+Z undoes the whole drop. |
See §6.3 for the details.
5.5 Insert the current segment with an action
When you know the take you just recorded is the one you want, you can skip selecting and dragging:
1. Select a track in REAPER.
2. Run "Synergy - Sample Broker - Insert Current Segment to Selected Track"
 (it works best with a keyboard shortcut).
3. The current segment — the rainbow-colored part of the waveform (§4) — is placed on that track.- Position: the edit cursor when REAPER is stopped; the play position while playing, paused, or recording. The edit cursor ends up at the start of the new item.
- The silent tail after the sound ends is trimmed automatically.
- Existing selections are left untouched. Ctrl+Z undoes the insert.
- The Sample Broker window must be open; otherwise the action only shows a reminder.
- While REAPER is playing, everything recorded since playback started counts as one segment.
6. Selection Operations
6.1 Creating selections
| Action | Behavior |
|---|---|
| Left-click drag (on empty canvas) | Manual selection; release to confirm |
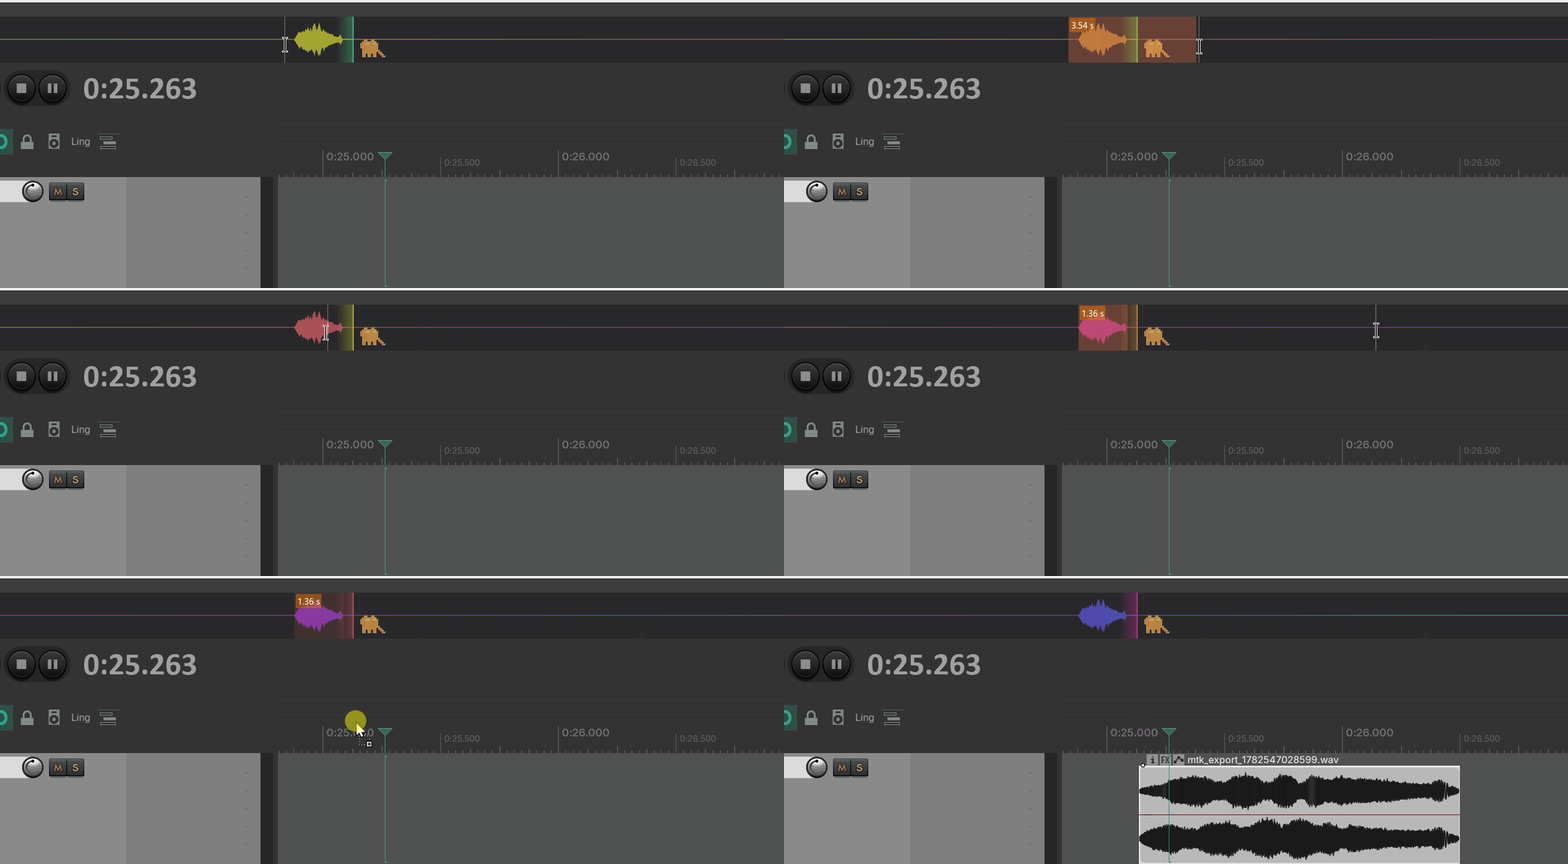
| Ctrl + hover | Smart-detect the "non-silent segment" under the cursor, shown with a cyan border and duration label |
| Ctrl + left-click | Lock the current smart segment as the selection (replaces any existing selections) |
| Shift + left-click drag | Add another manual selection, keeping the existing ones |
| Ctrl + Shift + left-click | Add the current smart segment to the existing selections |
Smart detection uses silence at -54 dB as the separator and automatically expands from the cursor position in both directions until it hits silence. This is useful when you have recorded a string of sounds and want to grab exactly one of them.
With Ctrl + Shift held, the smart segment keeps showing even when you already have selections, so you can hover and click your way through a whole series of sounds.
6.2 Clearing selections
- Quick click on empty canvas (without dragging) = clear all selections.
- Quick click on a selection = clear all selections.
- Shift + quick click on a selection = remove only that one segment.
- Starting a new manual selection without Shift automatically clears the old ones.
- Clicking
Clear Recording Bufferclears both the selections and the entire recording.
6.3 Multiple selections
- Selections that overlap or touch are merged into one segment automatically, so the same audio is never exported twice.
- Each selection shows its own duration label. While dragging, the drag label shows the count and total length, e.g.
Export 3 clips (4.50 s). - Dragging any selection takes all of them.
- Segments are exported in recording order (oldest first). Usually that is simply left to right; after the record head has wrapped around, a segment near the right edge can be older than one on the left, and it still comes first.
- OS mode: files are named
mtk_export_<timestamp>_01.wav,_02, … in recording order. A single selection keeps the plainmtk_export_<timestamp>.wavname. - Reaper API mode: segments are placed back to back, with no gaps, on the target track starting at the drop position. The edit cursor stays at the drop position afterward.
- Ctrl + Alt (the other drag mode) also carries all selections. Ctrl + Alt + left-click on a smart segment outside the current selections replaces them with that single segment.
7. Preview / Audition
| Action | Behavior |
|---|---|
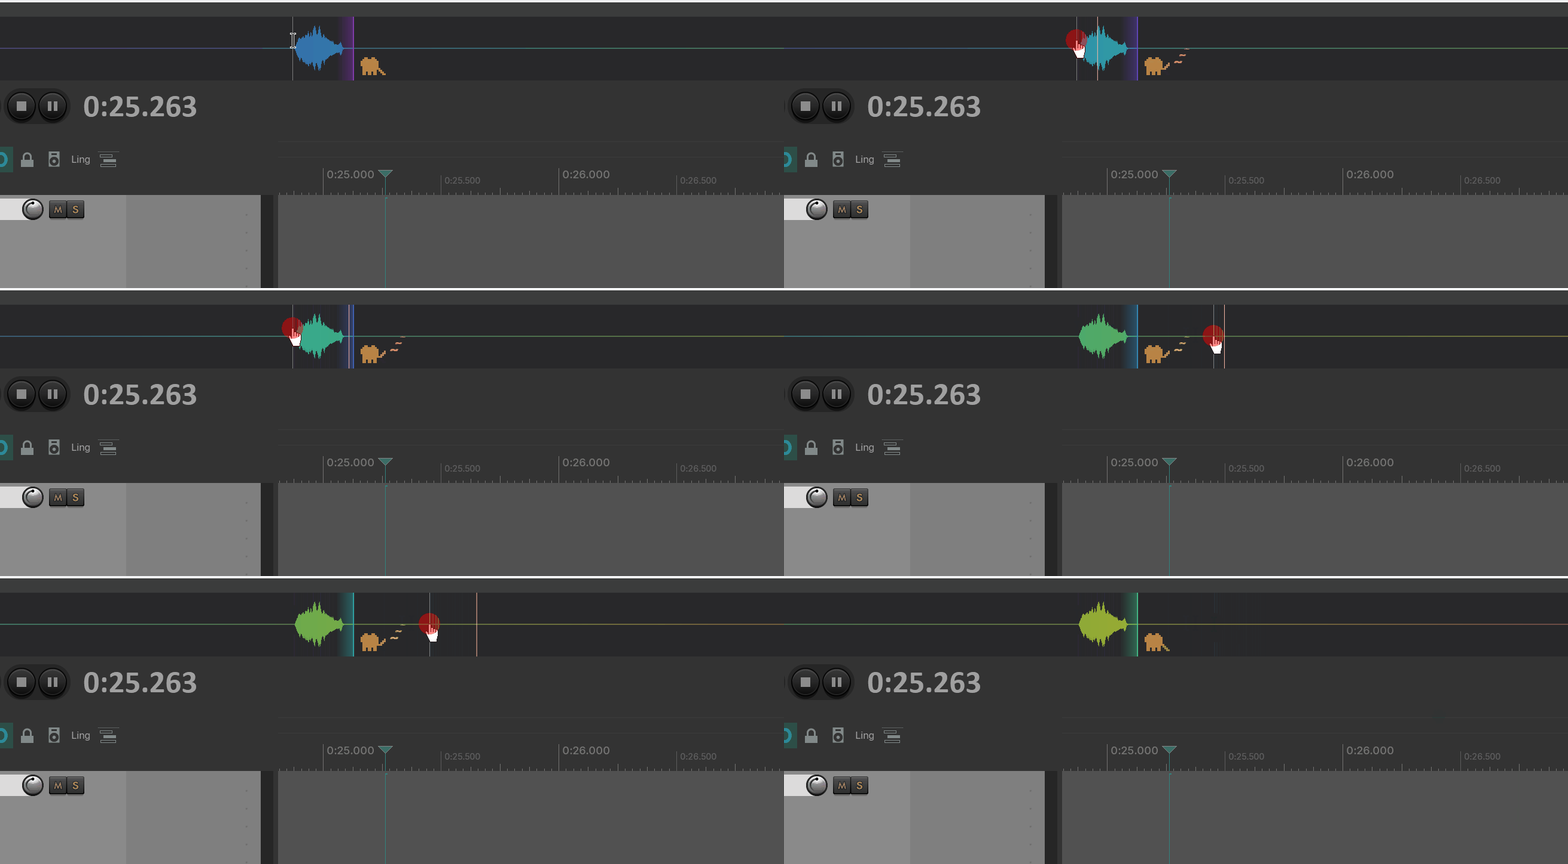
| Right-click and hold (without dragging) | Preview from the cursor position; release to stop |
Preview does not affect the selection or the recording. It is purely for checking what is at the current position.
8. View: Zoom and Pan
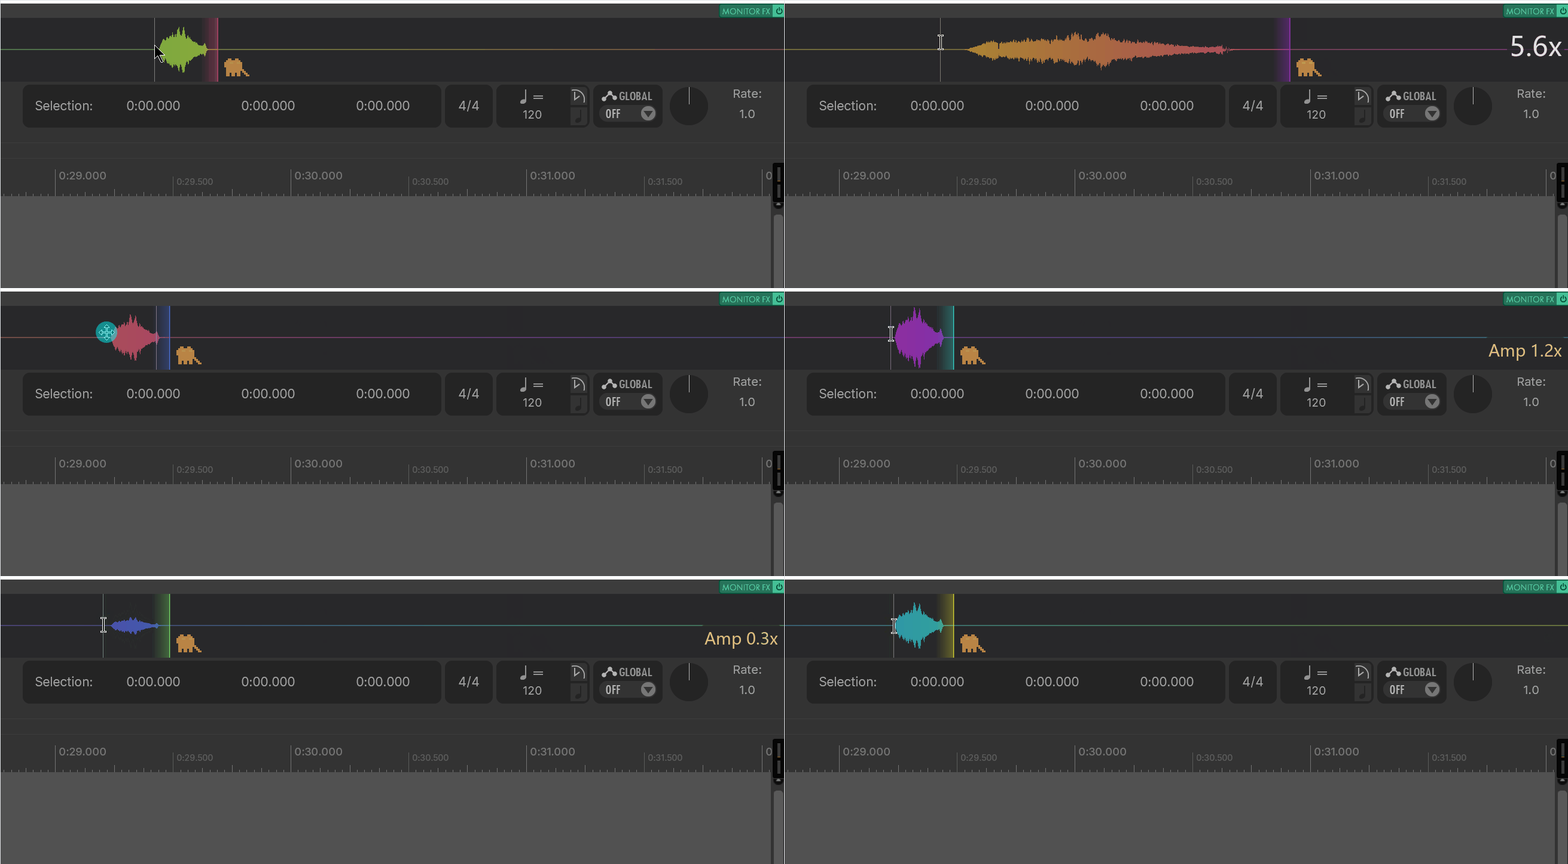
The recording is 60 seconds long, but the canvas is only so wide. Zoom in when you need more detail.
| Action | Behavior |
|---|---|
| Scroll wheel | Horizontal zoom (1x ~ 10x), centered on the mouse position |
| Shift + scroll wheel | Amplitude zoom (0.1x ~ 10x), to see quiet signals or flatten peaks |
| Middle-click drag | Pan the view horizontally |
| Shift + middle-click | Reset amplitude zoom to default |
The 1.5x label in the top-right corner shows the current horizontal zoom level. It is hidden at 1.0x.
9. Recording Control
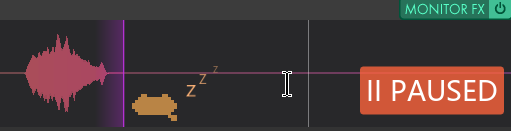
| Action | Behavior |
|---|---|
| Alt + left-click | Toggle recording pause/resume |
While paused: the record head stops moving and new audio is not recorded, but the existing 60-second buffer remains available for selection, preview, and export. Alt+left-click again to resume.
Auto-pause: When the input level stays below the threshold (default -72 dB) continuously, the plug-in decides no one is playing and pauses automatically. The threshold can be changed in the hamburger menu: -72 / -66 / -60 / -54 dB.
10. Hamburger Menu (three lines at the bottom-left)
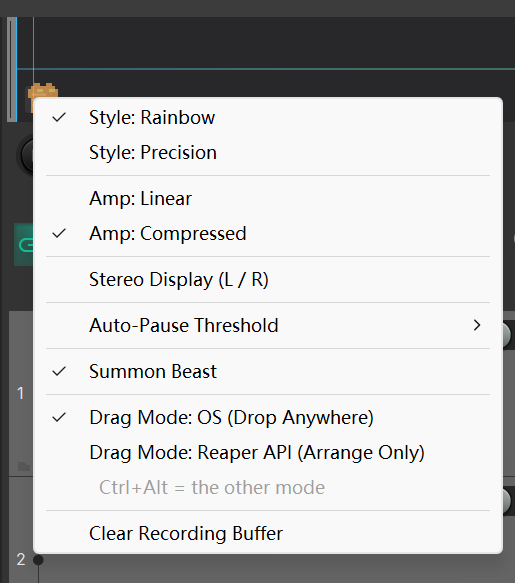
Clicking it reveals all window settings:
| Menu item | Options / meaning |
|---|---|
| Style: Rainbow | Default. Color gradient fill; eye-catching and easy to read. |
| Style: Precision | Watercolor-style wireframe; better for close inspection. |
| Amp: Linear | Default. Shows true amplitude. |
| Amp: Compressed | Compresses low-amplitude display so quiet sections are still clearly visible (matches REAPER's waveform view). |
| Stereo Display (L / R) | Off by default. When off, the canvas shows a single merged waveform (the louder of L/R). When on, the canvas splits into two horizontal bands — top = Left channel, bottom = Right channel — so you can read the stereo image. Works with both Rainbow and Precision styles. |
| Auto-Pause Threshold | -72 / -66 / -60 / -54 dB; higher values trigger auto-pause more easily. |
| Summon Beast | Summon a pixel cat next to the record head for companionship (purely cosmetic). |
| Drag Mode: OS | Default left-drag uses OS drag (can drop anywhere). |
| Drag Mode: Reaper API | Default left-drag uses REAPER's internal drag (Arrange only). |
| Clear Recording Buffer | Clear the entire 60-second recording (with confirmation dialog). |
All settings listed above are saved and persist the next time REAPER opens.
11. Status Messages (floating text in the window)
Under normal conditions the canvas is clean. The following messages indicate special states:
| Text shown | Meaning | What to do |
|---|---|---|
Rendering @ XX Hz... | REAPER is rendering offline; recording is paused during this time | Wait for rendering to finish; recording resumes automatically |
Audio engine paused... | REAPER's audio engine is turned off | Check the audio engine |
WARNING: Sample rate changed (X → Y Hz). Old data invalid and Recording paused. Clear in menu or restore. | The project sample rate was changed. Old waveform data is invalid and recording is paused; the current buffer is no longer reliable. | Either change the sample rate back, or choose Clear Recording Buffer from the hamburger menu to start fresh. |
12. Keyboard / Mouse Quick Reference
| Action | Behavior |
|---|---|
| Left-click drag (empty canvas) | Manual selection |
| Left-click drag (on any selection / smart segment) | Trigger the default mode drag export (takes all selections) |
| Ctrl + Alt + left-click drag | Trigger the other mode drag export (swap OS / API) |
| Shift + left-click drag | Add a manual selection |
| Short left click (empty canvas or selection) | Clear all selections |
| Shift + short left click (on a selection) | Remove only that selection |
| Ctrl + hover | Show smart-detected segment |
| Ctrl + left-click | Lock smart segment as selection |
| Ctrl + Shift + left-click | Add smart segment to the selections |
| Right-click hold | Preview / audition |
| Alt + left-click | Toggle pause |
| Scroll wheel | Horizontal zoom (mouse-centered) |
| Shift + scroll wheel | Amplitude zoom |
| Middle-click drag | Pan view horizontally |
| Shift + middle-click | Reset amplitude zoom |
| Close window (X) | Hide the window (data is preserved) |
| Right-click the close button | Dock the window to the bottom |
On macOS, Ctrl corresponds to Command and Alt corresponds to Option.
13. Typical Workflows
Workflow A: Capture that accidental great take
During rehearsal or a jam, you played something you did not record but now want to keep:
1. Open Sample Broker (if it is not already open). The waveform shows the recent take.
2. Use Ctrl + hover to locate the segment, then Ctrl + left-click to confirm the selection.
3. Drag it onto the target track in Arrange and release.
4. Done — it is now part of the project.
Workflow B: Drag a segment out as a WAV for someone else
1. Select a segment.
2. Drag it out of the window to a chat app or file explorer.
3. A WAV file is generated automatically in the current project directory.
Workflow C: Default API mode, but occasionally drag to OS
1. Set the default Drag Mode to Reaper API.
2. When you need to drag to the file explorer, hold Ctrl+Alt for that one drag.
3. No need to open the hamburger menu every time.
Workflow D: Monitor the Master bus without recording a video/loop section
If the project contains video or a long loop you do not want continuously overwriting the buffer:
1. Alt + left-click to pause recording.
2. Work on the project.
3. Alt + left-click again to resume when you want to record.
Workflow E: Pick the best few takes from a series
You recorded ten variations of a sound and only want three of them:
1. Right-click and hold to audition each take.
2. Ctrl + Shift + left-click the ones you like.
3. Drag them into Arrange (Reaper API mode) → placed end to end on one track,
 or drag them to the file explorer (OS mode) → three numbered WAV files.
14. Troubleshooting
| Symptom | Cause | Fix |
|---|---|---|
Window shows CLAP plugin not found | First-time use; CLAP has not been scanned yet | Go to Preferences > Plug-ins > CLAP, click Re-scan, then return and click Auto Setup |
Window shows Enable Plugin / Enable Monitor FX | The plug-in or the entire Monitor FX chain is bypassed | Click the corresponding button |
No waveform; message Audio engine paused... | REAPER's audio engine is off | Turn REAPER's audio engine back on |
Red warning Sample rate changed | Project sample rate was changed mid-session | Change the sample rate back, or choose Clear Recording Buffer from the hamburger menu to start fresh |
| Drag to Arrange does nothing | Currently in OS drag mode and the drop target is inside REAPER | Switch to Reaper API mode, or hold Ctrl+Alt while dragging |
| Drag to OS does not create a file | Currently in Reaper API mode | Switch to OS mode, or hold Ctrl+Alt while dragging |
| Record head is not moving | Input level is too low and auto-pause triggered | Raise the volume, or set a stricter threshold in the hamburger menu (e.g., -72 dB) |
II PAUSED label does not disappear | You manually paused with Alt+left-click | Press Alt+left-click again to resume |
| Dropping several segments into REAPER opens a dialog | In OS mode REAPER receives multiple files and asks how to place them | Pick an option in the dialog, or switch to Reaper API mode to place them end to end without asking |
| Want to undo the last export | For Arrange drops, press Ctrl+Z (a multi-segment drop is a single undo step). For OS drops, manually delete the generated WAV files. | — |