
Quick Render
1. What Is Quick Render?
Quick Render solves a core gap in REAPER: there is no native one-click way to glue items across multiple tracks and bake FX into the result.
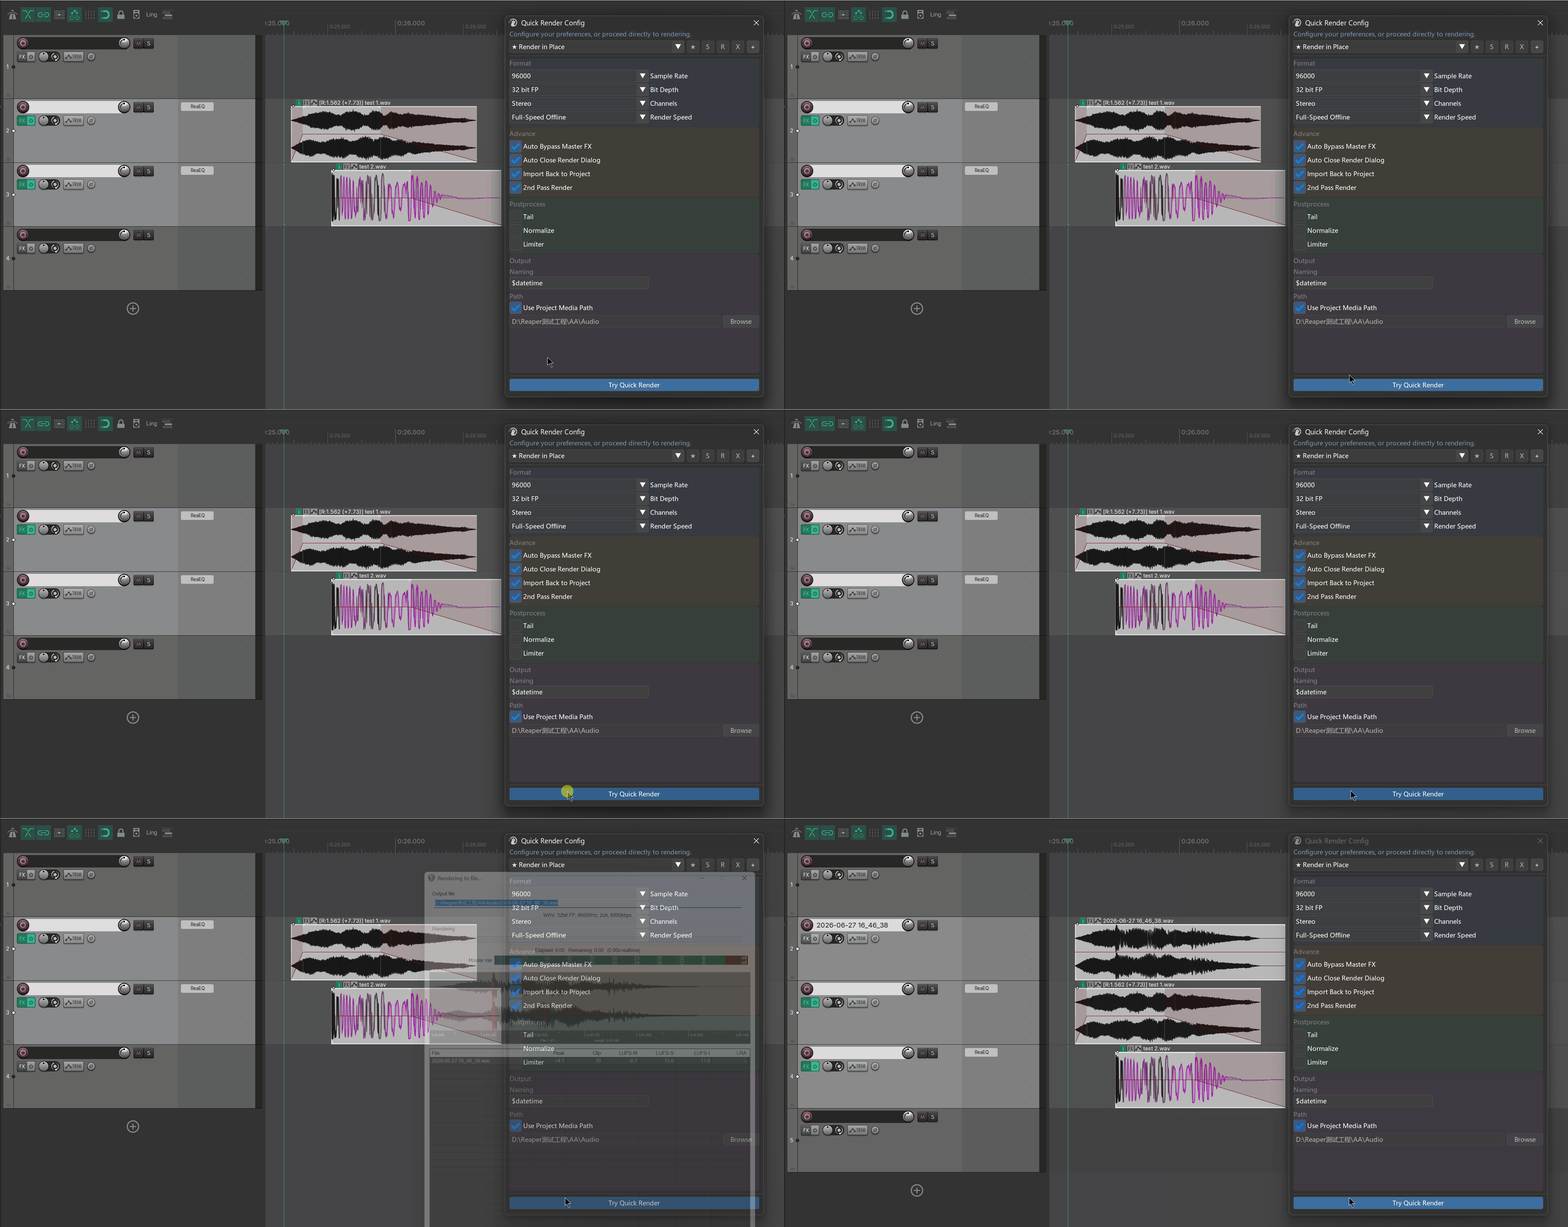
Specifically:
- REAPER's native Glue items only works inside a single track and does not bake track or Master bus FX into the audio.
- To merge a selection of items across multiple tracks into one file with FX baked in, the native workflow requires opening the Render dialog, setting "selected media items (via master) / as one file," and adjusting parameters every time.
Quick Render compresses this into select → one key: it renders your selected items (which can span multiple tracks) through the Master bus into a single file, baking item, track, and Master FX into the output, and optionally imports the result back into the project at the original position.
It consists of two parts that work together:
| Part | What it is | What it does |
|---|---|---|
| Quick Render Config window | A small configuration window (500×740) | Tune your common render parameters, save them as presets, and designate one as the default preset |
| Quick Render one-click action | A REAPER action that can be bound to a shortcut | Renders the current selection using the default preset without opening any window |
In one sentence: configure once in the window, set it as default, then select items and press one shortcut to render a merged, FX-baked file.
Difference from Render Queue: Render Queue is a batch manager that accumulates a list and produces multiple separate files; it is suited for final project exports. Quick Render is a lightweight tool that merges the selected cross-track items into one FX-baked file with one click. They are independent— use whichever fits the task.
Parameter scope: The Quick Render window exposes only the most commonly used parameters (enough for everyday game-sound quick exports). For finer format control (OGG/MP4, fades, silence removal, dither, etc.), use the more comprehensive Render Queue. If a native REAPER option you need is missing from both, use REAPER's own Render panel and contact the plugin author to request it.
2. Opening Quick Render
Quick Render provides two actions (search "Quick Render" in REAPER's Action List):
| Action name | Purpose |
|---|---|
mantrika : Synergy - Quick Render Config | Toggle the Quick Render Config window on/off |
mantrika : Synergy - Quick Render (use user's default preset) | One-click render: render the current selection using the default preset without opening a window |
It is recommended to bind a shortcut to the second one-click action. In the Action List, select it → Add → press the key combination you want. This is the real payoff: select items → press the key → render is done.
3. Main Workflow (see the diagram first)
        ┌─────────────────────────────┐
        │  Quick Render Config window  │
        │  1. Set parameters            │
        │     (format/post/output)      │
        │  2. Save as Preset            │
        │  3. Click ★ to set default    │
        └──────────────┬──────────────┘
                       │  Default preset saved
                       ▼
        ┌─────────────────────────────┐
        │  From now on:                │
        │  Select items → press the    │
        │  one-click shortcut →        │
        │  render with default preset  │
        └─────────────────────────────┘
Spend a couple of minutes setting up the default preset the first time; after that, daily work usually uses only the one-click shortcut.
4. Window Overview (Config Window)
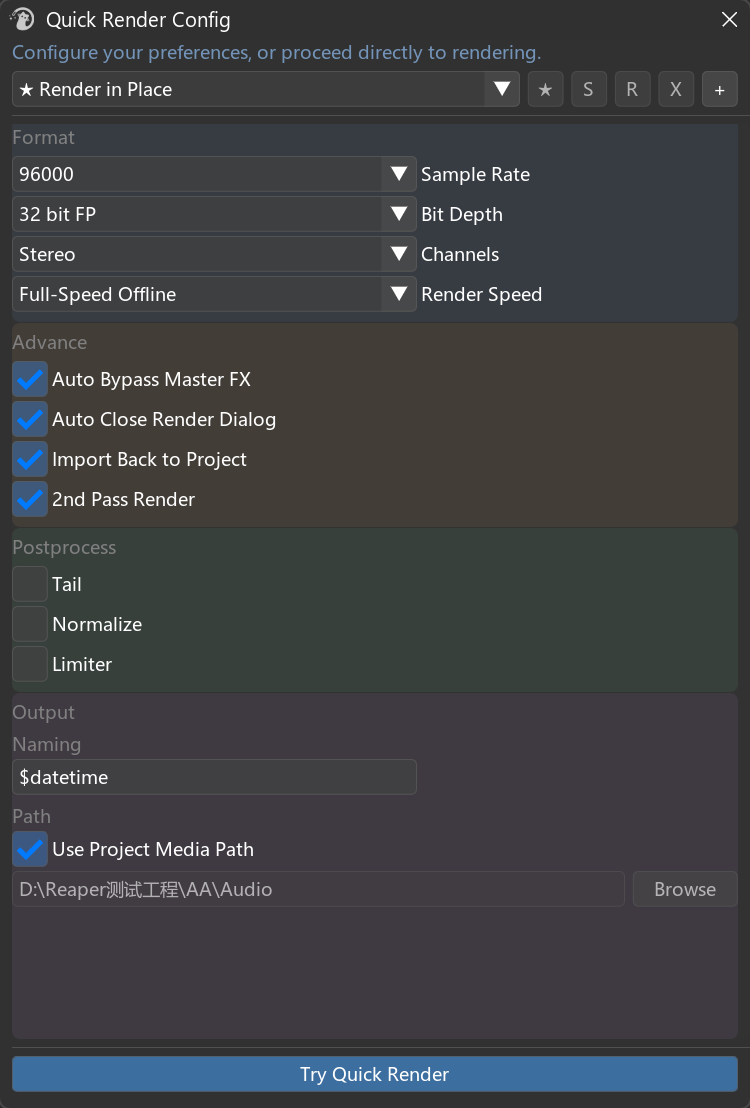
The window is divided into four colored sections from top to bottom:
| Area | Purpose |
|---|---|
| Top preset bar | Select / save / rename / delete presets and set the default |
| Format 🔵 | Sample rate, bit depth, channels, render speed |
| Advance 🟠 | Master FX bypass, auto-close render dialog, import back, second-pass render |
| Postprocess 🟢 | Tail, loudness normalization, limiting |
| Output 🟣 | File naming, output path |
| Bottom button | Try Quick Render — render once immediately using the parameters currently shown in the window |
5. First-Time Setup
1. Run the action "Synergy - Quick Render Config" to open the window.
2. Click the [+] button on the preset bar to create a new preset from the current parameters.
3. Adjust Format / Postprocess / Output to your usual settings.
4. Click [S] to save the changes back to the preset.
5. Click [★] to set it as the default (a ★ appears in front of its name).
6. Select the items you want to render in the project, then click [Try Quick Render] at the bottom to verify.
7. When satisfied, bind a shortcut to "Synergy - Quick Render (use user's default preset)".
 → From now on, select items and press the shortcut to render.
6. Top: Preset Bar
The preset bar = one dropdown + five small buttons.
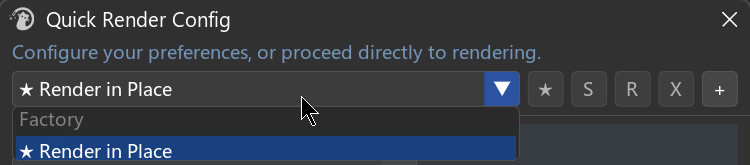
6.1 Preset dropdown
The dropdown shows presets in two groups:
- Factory: Built-in presets. Cannot be renamed, deleted, or overwritten (see section 9).
- User: Presets you created. Fully editable.
- A ★ in front of a name marks the current default preset. When no preset is selected, it shows
No Preset.
Click a preset to load all its parameters into the settings area below.
6.2 The five buttons (left to right)
| Button | Name | Purpose | Grayed out when |
|---|---|---|---|
| ★ | Set as Default | Set the currently selected preset as the default (used by the one-click action) | It is already the default |
| S | Save to Preset | Save the current settings-area parameters back to the selected preset | No preset selected / a Factory preset is selected |
| R | Rename | Rename the selected preset (a popup appears; press Enter to confirm) | No preset selected / a Factory preset is selected |
| ✕ | Delete | Delete the selected preset | No preset selected / a Factory preset is selected |
| + | New Preset | Create a new User preset from the current settings-area parameters (auto-named Preset N) | Never |
Remember to click S: Changes made in the settings area live in the "working area." To keep them in a preset, you must click S (or + to create a new one first). Otherwise, switching to another preset or closing the window discards unsaved changes.
Default must be set manually: Creating a new preset does not make it the default. Click ★ to set it. If no default preset exists, the one-click action will prompt you to set one in the Config window first.
7. Settings Area Explained
7.1 Format 🔵
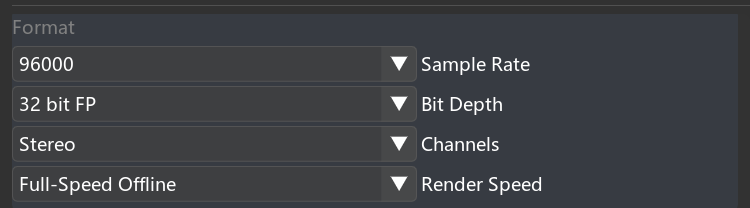
| Field | Options | Description |
|---|---|---|
| Sample Rate | 44100 / 48000 / 96000 | Output sample rate (Hz) |
| Bit Depth | 16 bit / 24 bit / 32 bit FP | Bit depth (output WAV precision) |
| Channels | Mono / Stereo | Channel configuration |
| Render Speed | Full-Speed Offline / 1x Offline / Online Render / Offline Render (Idle) / 1x Offline Render (Idle) | Render speed mode. The default Full-Speed Offline is usually fastest |
7.2 Advance 🟠
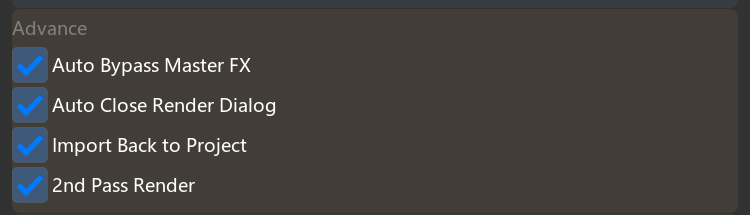
Four checkboxes:
| Option | Purpose |
|---|---|
| Auto Bypass Master FX | Temporarily bypass FX on the Master bus during rendering, then restore them afterward. Enable this when you want a "dry" file unaffected by Master processing. |
| Auto Close Render Dialog | Automatically close REAPER's render dialog after rendering finishes, saving a click. |
| Import Back to Project | Import the rendered file back into the project as a new track, placing it near the source items. |
| 2nd Pass Render | Second-pass render (second pass improves loudness/limiting accuracy and can also help with looping material). |
7.3 Postprocess 🟢
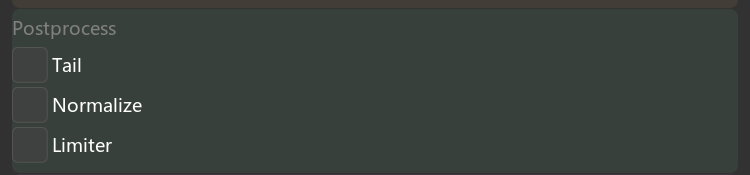
Each item is a checkbox plus a parameter; it does nothing unless checked:
| Field | Parameter | Description |
|---|---|---|
| Tail | [ ] ms | Append a tail length to the end of each render (default 1000 ms) to avoid cutting off reverb or delay. |
| Normalize | Type [▼] + Target | Loudness normalization. Type options: LUFS-I / LUFS-M max / LUFS-S max / Peak / True Peak / RMS-I; Target is the target value (default -23.0). |
| Limiter | Ceiling [ ] dB + □ True Peak | Limit to the specified ceiling (default -0.1 dB); check True Peak to use true-peak mode. |
7.4 Output 🟣
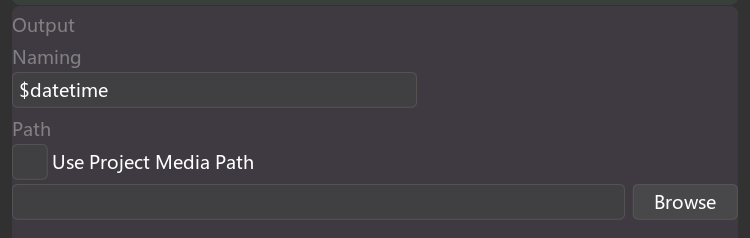
| Field | Description |
|---|---|
| Naming | Naming rule for the merged file (default $item — uses the selected item's name). REAPER naming wildcards are supported, such as $item, $datetime, etc., and can be combined freely. |
| Use Project Media Path | When checked, the output path follows the current project's media folder automatically (the manual path field becomes gray and disabled). The path updates when you switch projects. |
| Path + Browse | When the above is unchecked, specify the output folder manually: type directly in the field, or click Browse to open the system folder picker. |
Naming examples:
$item→ file name equals the item name;$item_$datetime→ item name plus timestamp.
8. Bottom: Try Quick Render
The blue button at the bottom, Try Quick Render, renders once immediately using the parameters currently shown in the settings area, regardless of the default preset. This is useful for testing while tuning.
Requirements:
- Select the items you want to render in the project first (the window itself does not enforce this, but rendering needs a selection).
- Output Path cannot be empty, or a popup warns
Please set an output path..
Difference from the one-click action:
Try Quick Renderuses the current parameters in the window (good for testing). The one-click action uses the preset you set as default (good for daily work).
9. Built-in Preset: Render in Place
The Factory group includes a ready-to-use preset called Render in Place, tuned for "render in place and replace" scenarios:
- Format: WAV / 32 bit FP / 96000 Hz / Stereo, second-pass render
- Naming:
$datetime(timestamp, avoids overwriting) - Checked: Auto Bypass Master FX, Auto Close Render Dialog, Import Back to Project, Use Project Media Path
The result: select items → one click → high-quality render → automatically imported back into the project near the original position, saved to the project media folder. To use it directly, set it as default with ★.
It is a built-in preset, so it cannot be renamed, deleted, or overwritten. To customize it, select it first (its parameters load into the settings area), then click [+] to save a new User preset.
10. Typical Workflows
Workflow A: Create a common preset + bind a shortcut (recommended daily workflow)
1. Open the Config window →[+] create a new preset.
2. Set WAV / 48000 / 24 bit, the normalization and limiting you need, and naming `$item`.
3. [S] Save → [★] Set as Default.
4. Bind a shortcut to "Quick Render (use user's default preset)".
5. From now on: select items → press shortcut → render done, no window needed.
Workflow B: Use the built-in Render in Place directly
1. Open the Config window → select "Render in Place" from the Factory group.
2. Click [★] to set it as default.
3. Select items → one-click action → high-quality render imported back into the project.
Workflow C: Render once with temporary settings without changing the default
1. Open the Config window and change the settings area to what you want for this render.
2. Select items → click [Try Quick Render].
3. Do not click S; close the window. The default preset is unchanged.
Workflow D: Switch between multiple common configurations
1. Create several presets (for example, "Engine WAV 48k" and "Preview Reference").
2. When you need one, select it from the dropdown → [★] Set as Default.
3. The one-click action always follows the current default.
11. Troubleshooting
| Symptom | Cause | Fix |
|---|---|---|
Red text in the window: REAPER v7.37+ Required | REAPER version is too low | Upgrade REAPER to 7.37 or later |
One-click action shows No items selected. | No items were selected before rendering | Select the items you want to render, then try again |
One-click action shows No default preset found... | No default preset has been set | Open the Config window, select a preset, and click ★ to set it as default |
Try Quick Render shows Please set an output path. | Output path is empty | Fill in the Output path, or check Use Project Media Path |
| Parameter changes disappear when switching presets | Changes were only in the working area, not saved | After changing, click [S] to save to the preset, or [+] to save as a new preset |
| S / R / X buttons are gray and unclickable | A Factory built-in preset is selected (not editable) | Click [+] to save it as a User preset first, then edit that one |
| Rendered sound is colored by Master FX | Master FX were not bypassed | Check Auto Bypass Master FX |
| Rendered file does not appear in the project | Import back was not enabled | Check Import Back to Project |