
Render Queue
1. Overview
Render Queue is a batch-render management console. Its purpose is collect what you want to render into one list → configure format and post-processing → render everything with one click.
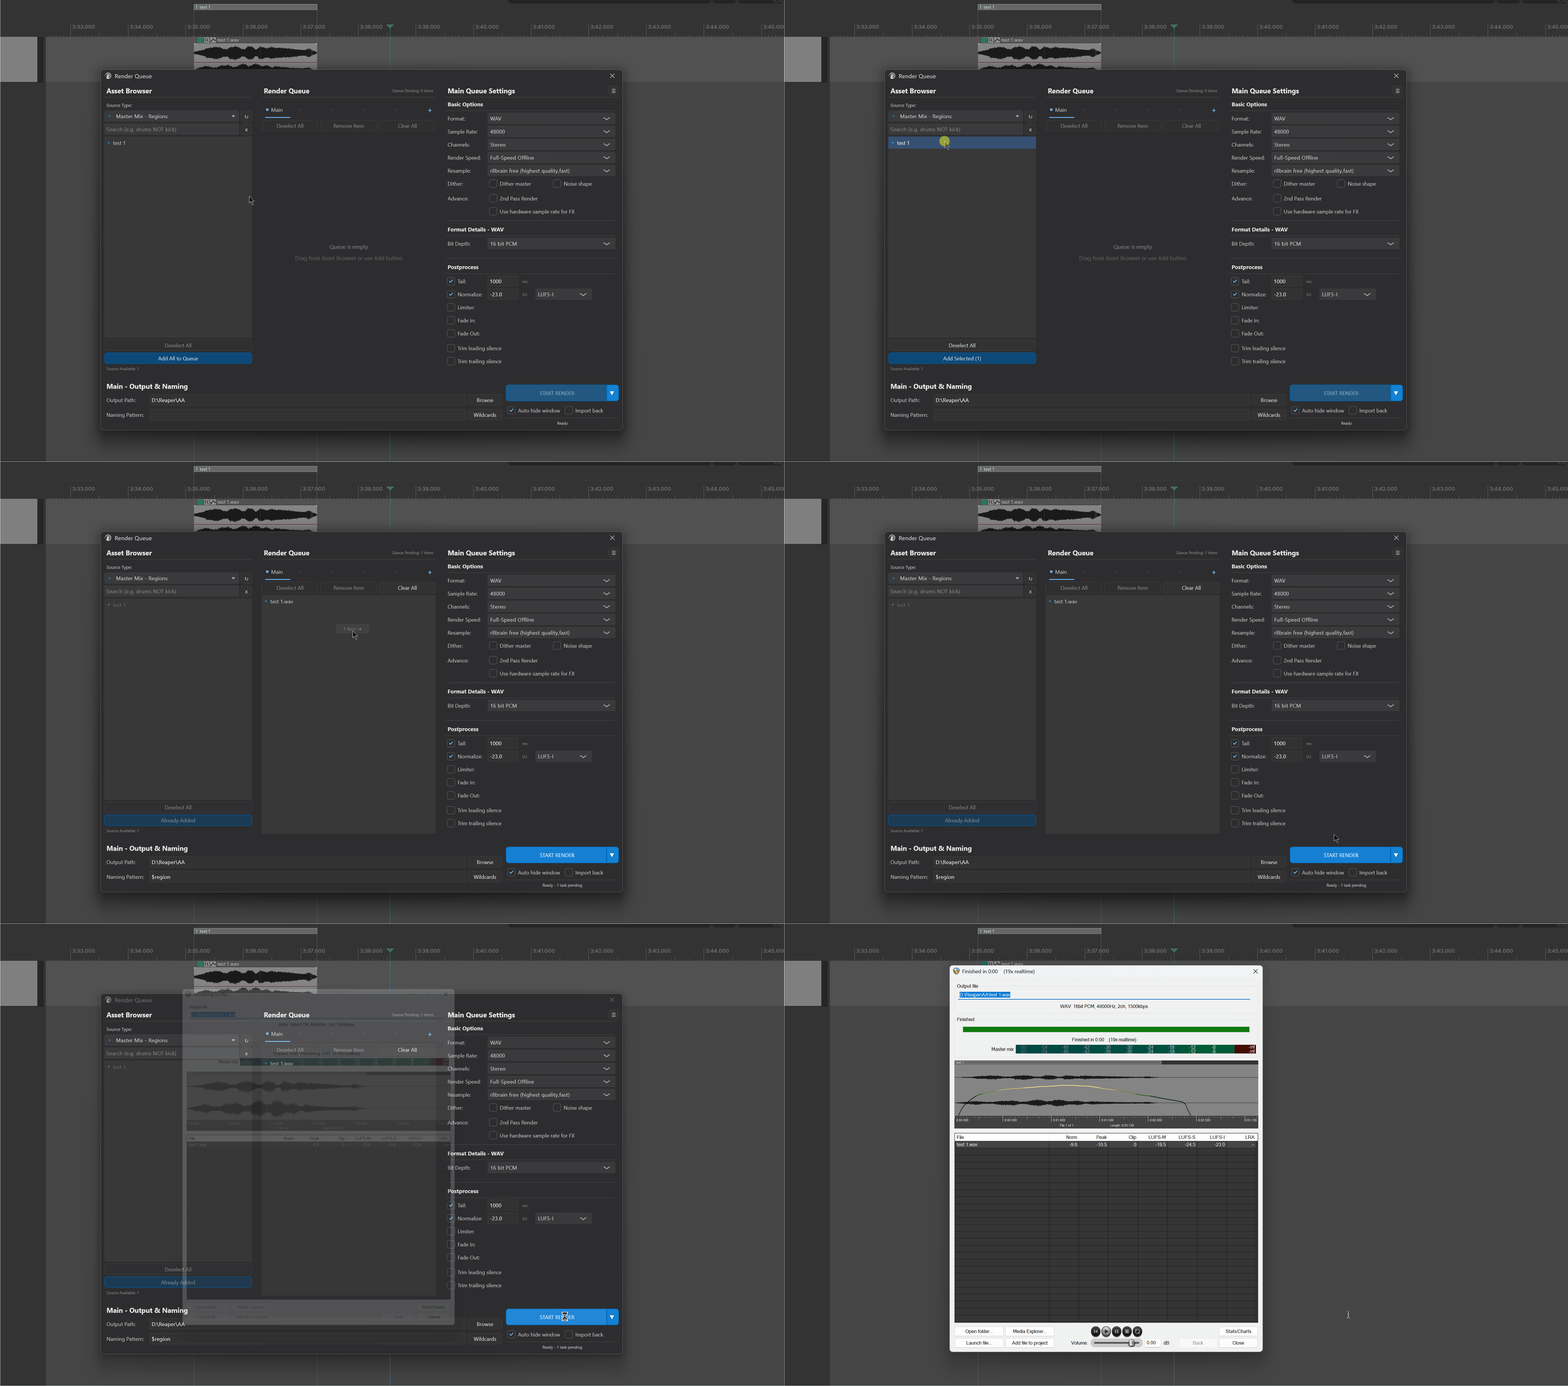
It solves several pain points of REAPER's native rendering:
- Want to render multiple regions or items with different formats or loudness settings? The native dialog forces you to change and click repeatedly.
- Want to produce both a "WAV 48 kHz for the engine" and an "OGG for preview" in one go?
- Want stems — every region split across its tracks? The native Region Render Matrix is a grid of ticks that gets unreadable fast (see §10).
Render Queue wraps this into a three-column window: left column picks assets → middle column queues them → right column configures parameters, with output path + naming + START RENDER at the bottom. The configuration is saved automatically with the project and is still there the next time you open it.
About parameter scope: the render parameters here correspond almost one-to-one with REAPER's own Render panel, but trimmed to the actual needs of game-audio rendering. If you find a REAPER-native option that is essential and missing here, use REAPER's own Render panel for that render and contact the extension author — the missing option may be added to the interface.
This manual only covers the Render Queue window. Quick Render (one-click rendering of selected items) is a separate feature and is not covered here.
2. Opening the tool
Menu path:
Extensions → Mantrika Tools → Render queueOr use the Action List (search "Render Queue"):
| Action name | Function |
|---|---|
mantrika : Synergy - Render Queue | Toggle the Render Queue window on/off |
The window is a standalone floating window; you can drag, resize, close, and reopen it. It restores its previous state when reopened.
3. Interface overview
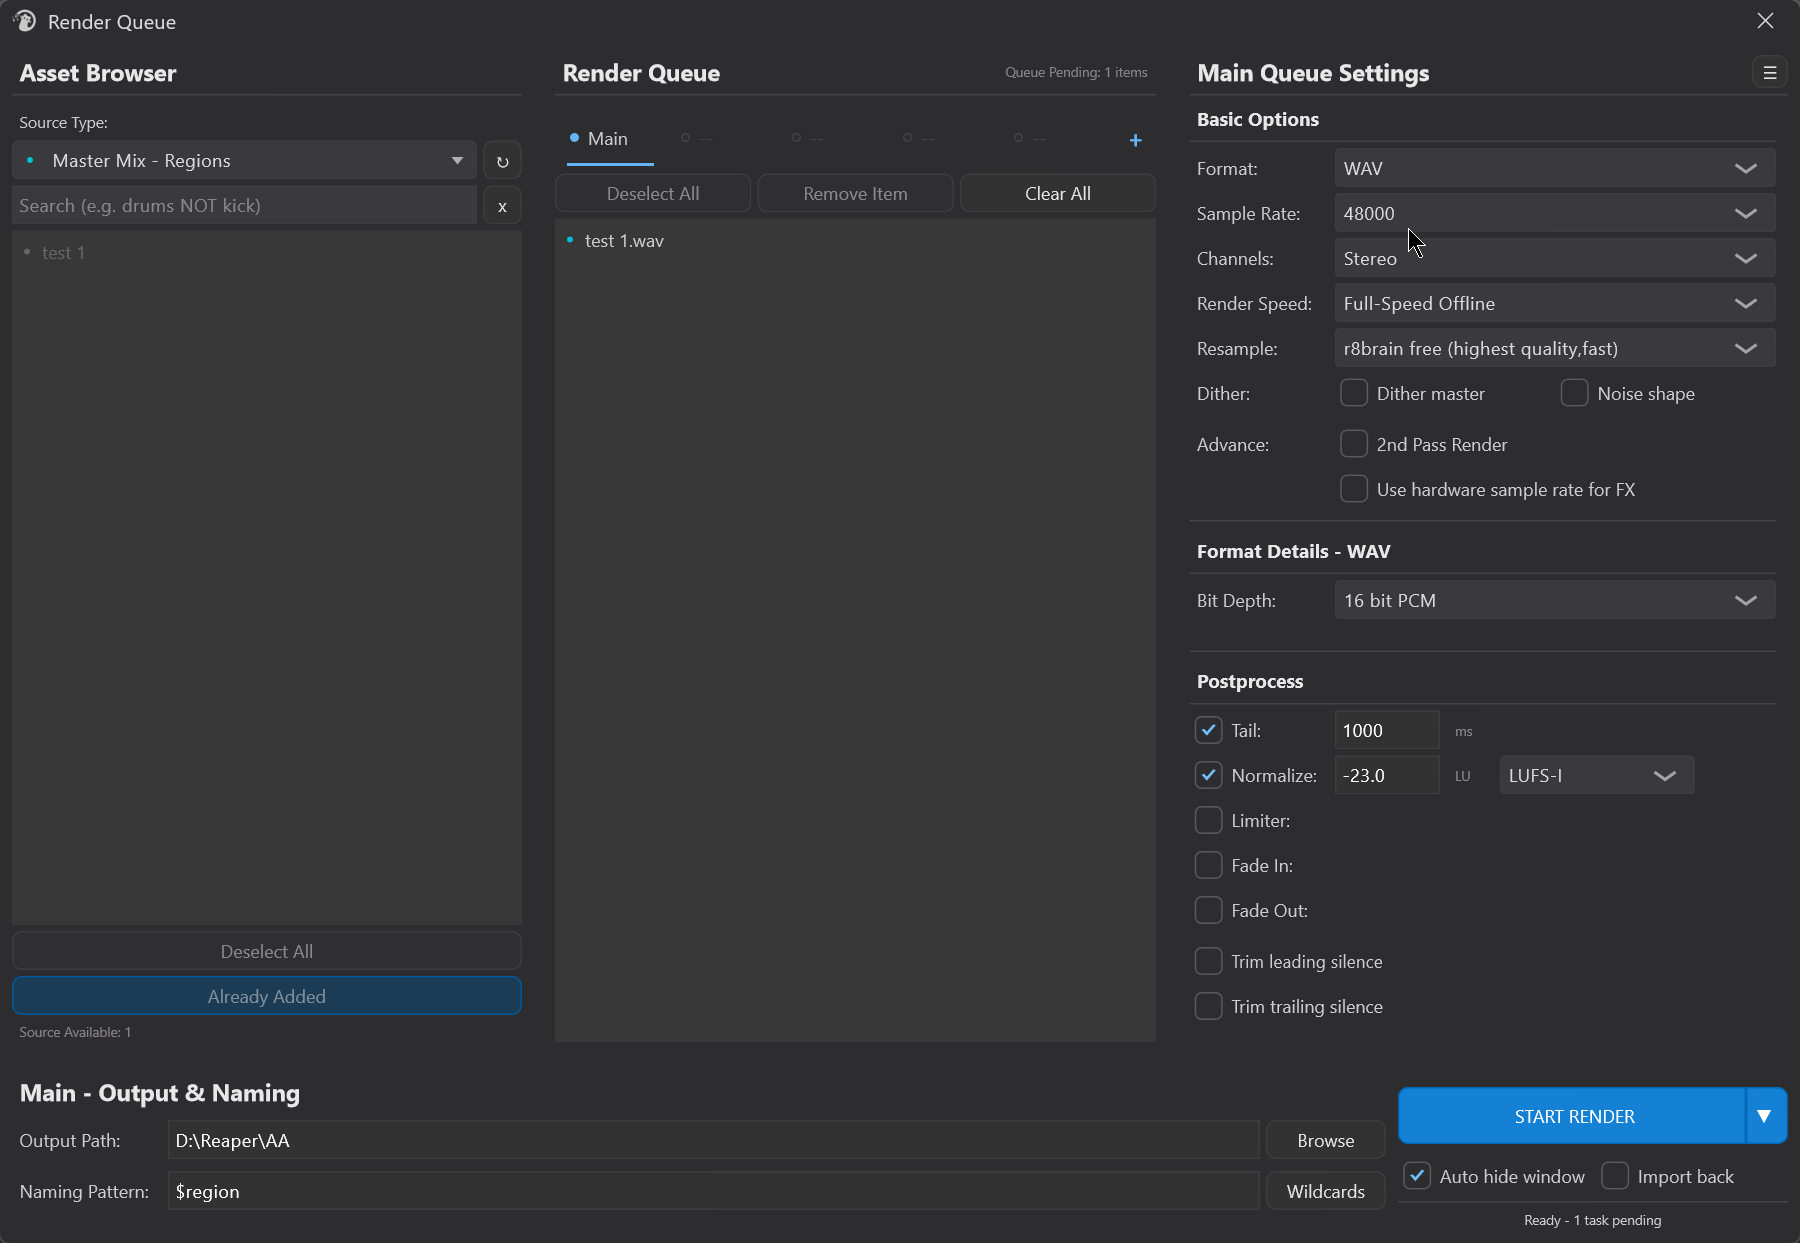
The workflow runs left to right, then bottom:
| Area | What it does |
|---|---|
| Left column: Asset Browser | Pick the assets you want to render (regions / items) and add them to the queue |
| Middle column: Render Queue | See what is currently queued; create multiple queues to split different configurations |
| Right column: Config | Configure format, sample rate, and post-processing for the current queue (or a single item) |
| Bottom: Output & Naming | Set output folder, file-naming rules, then press START RENDER |
4. Fastest getting-started flow (four steps)
1. In the left column, choose a Source Type (for example, "Master Mix - Regions") → the list shows all regions.
2. Select the ones you want and click [Add Selected]; they appear in the middle-column queue.
3. In the right column, set Format / Sample Rate / any post-processing you need (fade, loudness normalization...).
4. Set the output folder at the bottom → click START RENDER (or press Enter).
The rest of this manual explains each column in detail.
5. Left column: Asset Browser (picking assets)
5.1 Source Type — decide what to render
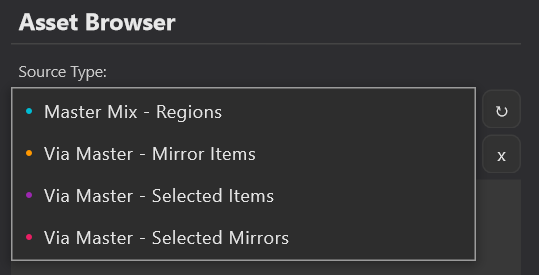
The Source Type: dropdown at the top determines which kind of assets the list grabs. There are five types, each with its own color dot:
| Option | Color | What it renders |
|---|---|---|
| Master Mix - Regions | Cyan | Render each region through the master bus |
| Via Master - Mirror Items | Orange | Mirror items through the master bus |
| Via Master - Selected Items | Purple | The items currently selected in the project, through the master bus |
| Via Master - Selected Mirrors | Pink | Selected named Mirror items through the master bus |
| Via Master, fast - Region Matrix | Green | Stem export: render each region once per linked track, each stem through the master bus |
The most common choice is Master Mix - Regions: draw regions around each sound in the project, and this list lets you render them all as separate files in one go.
Via Master, fast - Region Matrix works differently from the other four — it turns the left and middle columns into a region × track linking view. See §10 for the whole workflow.
5.2 Search and refresh
- Search box (placeholder
Search (e.g. drums NOT kick)): type keywords to filter the list. Supports logic such asAND,NOT,OR(for example,drums NOT kick= contains "drums" but not "kick"). Click thexon the right to clear the search. ⟳refresh button: rescans the assets in the project.- If there are more than 150 assets, auto-refresh is disabled to avoid lag, and the button tooltip changes to
Auto-refresh disabled (too many items, >150)— click⟳manually to refresh.
- If there are more than 150 assets, auto-refresh is disabled to avoid lag, and the button tooltip changes to
5.3 Adding to the queue
After selecting assets, send them to the middle-column queue in one of three ways:
| Method | Description |
|---|---|
| Select → click bottom button | The button text changes with state: when items are selected it shows Add Selected (N); when nothing is selected it shows Add All to Queue (adds the whole filtered list). |
| Drag and drop | Drag assets directly from the list to the middle-column queue area. |
| Double-click | Double-click an asset to jump to its position on the timeline, useful for confirming it is the right one before adding it. |
The bottom label Source Available: N shows how many assets are available for the current type; Deselect All clears the current selection.
Two cases where the button is grayed out:
Requires New Queue: the selected asset type does not match the type already locked by the current queue (each queue holds only one Source Type; see §6.2). Create a new queue first.Already Added: the selected assets are already all in the current queue.
6. Middle column: Render Queue (lining up)
6.1 What is in the queue
The top of the middle column shows the title Render Queue, and Queue Pending: N items shows the current queue's pending count in real time.
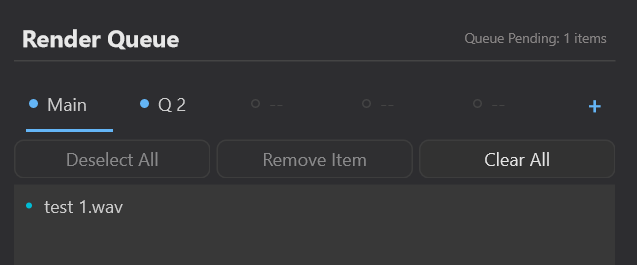
When empty, the queue shows:
Queue is empty
Drag from Asset Browser or use Add button
Each entry shows the asset name plus a colored dot indicating its type. Three buttons at the bottom:
| Button | Function |
|---|---|
| Deselect All | Clear selection inside the queue |
| Remove Item | Remove the selected entry (grayed out when nothing is selected) |
| Clear All | Empty the entire queue (grayed out when the queue is empty) |
6.2 Multiple queues — split configurations with tabs
Above the queue title is a row of tabs. Each tab is an independent queue, up to 5. This is the core workflow:
One queue = one configuration + one Source Type. Want to produce both "WAV for the engine" and "OGG for preview" at the same time? Open two queues, configure each separately, and one START RENDER renders both.
Tab operations:
| Operation | Behavior |
|---|---|
| Click tab | Switch to that queue (right-column config switches with it) |
| Dot on tab | Shows that queue's enabled state; click it to toggle. Disabled queues are not rendered |
| Right-click tab | Menu: Enable / Disable, Rename, Delete |
[+] button | Create a new queue (grayed out when 5 queues already exist) |
Each queue locks to the Source Type of the first asset added; afterwards only assets of the same type can be added (this is why the left column shows
Requires New Queue).
7. Right column: Config (parameters)
The right column is the render parameter panel. The title changes depending on the current selection:
- Nothing selected:
<Queue name> Queue Settings(defaultMain Queue Settings) — edits configuration for the whole queue. - Single entry selected: title becomes the entry name +
Settings, and an Override switch appears (see §7.1). - Multiple entries selected: title shows
[N items selected]and the config form is disabled (multi-selection does not support config changes).
The ☰ button in the top-right corner opens Presets (see §8).
7.1 Override — special settings for a single entry
By default all entries in a queue share the queue's configuration. If one entry needs different settings:
1. Click that entry in the middle column (single selection)
2. The right column shows □ Override Queue Settings
3. Check it → the config form unlocks, and changes affect only this entry
The switch is orange = not overridden (follows queue), green = overridden (independent); overridden entries show [Override] in their title.
Note: output path and naming rules are always queue-level. Override only covers format / post-processing parameters.
7.2 Basic Options
| Item | Description |
|---|---|
| Format | Output format: WAV / OGG Vorbis / OGG Opus / MP4 (H.264/AAC) / MP4 (FFmpeg HW). Choosing a format reveals its detail panel below (for example, bit depth for WAV). |
| Sample Rate | Sample rate, 8000 ~ 192000 Hz |
| Channels | Channels: Mono / Stereo / 4 / 6 / 8 |
| Render Speed | Render speed mode (Full-Speed Offline / 1x Offline / Online / Offline idle, etc.) |
| Resample | Resampling algorithm, from Point Sampling to r8brain free (highest quality, fast) |
| Dither | Dither master / Noise shape (noise shape requires dither to be enabled first) |
7.3 Format details — MP4 (FFmpeg HW) (Windows only)
MP4 (FFmpeg HW) hands video encoding to your graphics card (NVIDIA NVENC / AMD AMF) instead of the CPU. For long video renders this is typically several times faster than the software MP4 (H.264/AAC) encoder, and it leaves the CPU free for the audio side of the render.
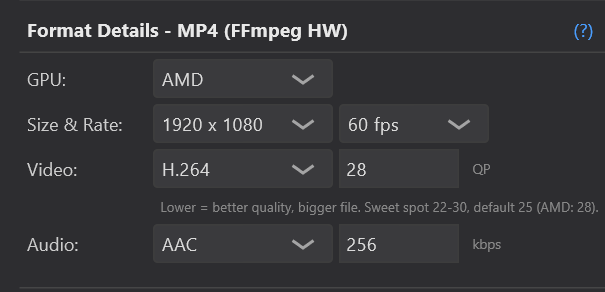
Requirements (one-time setup):
- Windows only. The option is not offered on macOS.
- REAPER 7.66 or newer.
- FFmpeg (shared build) installed and on PATH, plus an up-to-date graphics driver.
The
(?)link at the end of the panel title opens the setup guide: REAPER 7.66+ Stop Letting Your GPU Sleep on the Job. If the render produces no file or REAPER falls back to software encoding, work through that guide first — the problem is almost always the environment, not the queue.
Panel contents:
| Item | Options | Description |
|---|---|---|
| GPU | NVIDIA / AMD | Which hardware encoder to drive. See the note below — this is a machine setting, not a project setting. |
| Size & Rate | 320×240 … 1920×1080 / 24 … 60 fps | Output resolution and frame rate (default 1920×1080, 60 fps) |
| Video | H.264 / H.265 (HEVC) | Video codec. Default is H.264 for compatibility: Windows' built-in player has no HEVC decoder out of the box. Switch to H.265 when you want smaller files and know the target machine can play them. |
| Quality (QP) | 15 – 40 | Constant quantizer. Lower = better quality, bigger file. Sweet spot 22–30. Default 25 (NVIDIA) / 28 (AMD). Values outside the range are clamped. |
| Audio | AAC / 16 bit PCM / 24 bit PCM / 32 bit FP / NONE | Audio codec inside the MP4. The PCM options give you lossless audio in the video file; NONE renders video only. |
| Audio Bitrate | 96 – 512 kbps | AAC only (hidden for the PCM and NONE options). Default 256 kbps. |
The GPU choice follows the machine, not the project. It is stored as a global preference, so it is not saved into the project and not carried in queue presets — pick it once and every project on that machine uses it. This is deliberate: a project opened on a different computer should use whatever card that computer has. Switching GPU also updates the QP field to the new card's default, as long as you had not typed your own value.
7.4 Advance
| Item | Description |
|---|---|
| 2nd Pass Render | Two-pass render (second pass is useful for precise loudness/limiting, or works particularly well for game-audio loop material) |
| Use hardware sample rate for FX | Process FX at the hardware sample rate |
7.5 Postprocess
Each item is a checkbox + parameters; unchecked means no effect:
| Item | Parameters | Description |
|---|---|---|
| Tail | [ ] ms | Append a tail length at the end of each render (default 1000 ms) |
| Normalize | [value] [LU/dB] [type▼] | Loudness normalization. Type options: LUFS-I / LUFS-M max / LUFS-S max / Peak / True Peak / RMS-I; LUFS types show LU, others show dB |
| Limiter | [value] dB [Peak/True Peak▼] | Limit to the specified ceiling (default -0.1 dB) |
| Fade In | [ ] ms [curve▼] | Fade in. Curves: Linear / Fast Start / Fast End / Slow Start/End / Sharp Curve |
| Fade Out | [ ] ms [curve▼] | Fade out; same curves as Fade In |
| Trim leading silence | threshold [ ] dB | Cut leading silence below the threshold (default -60 dB) |
| Trim trailing silence | threshold [ ] dB | Cut trailing silence |
8. Presets
Click the ☰ button in the right column to open the Queue Preset Manager, where you can save a full configuration for reuse.
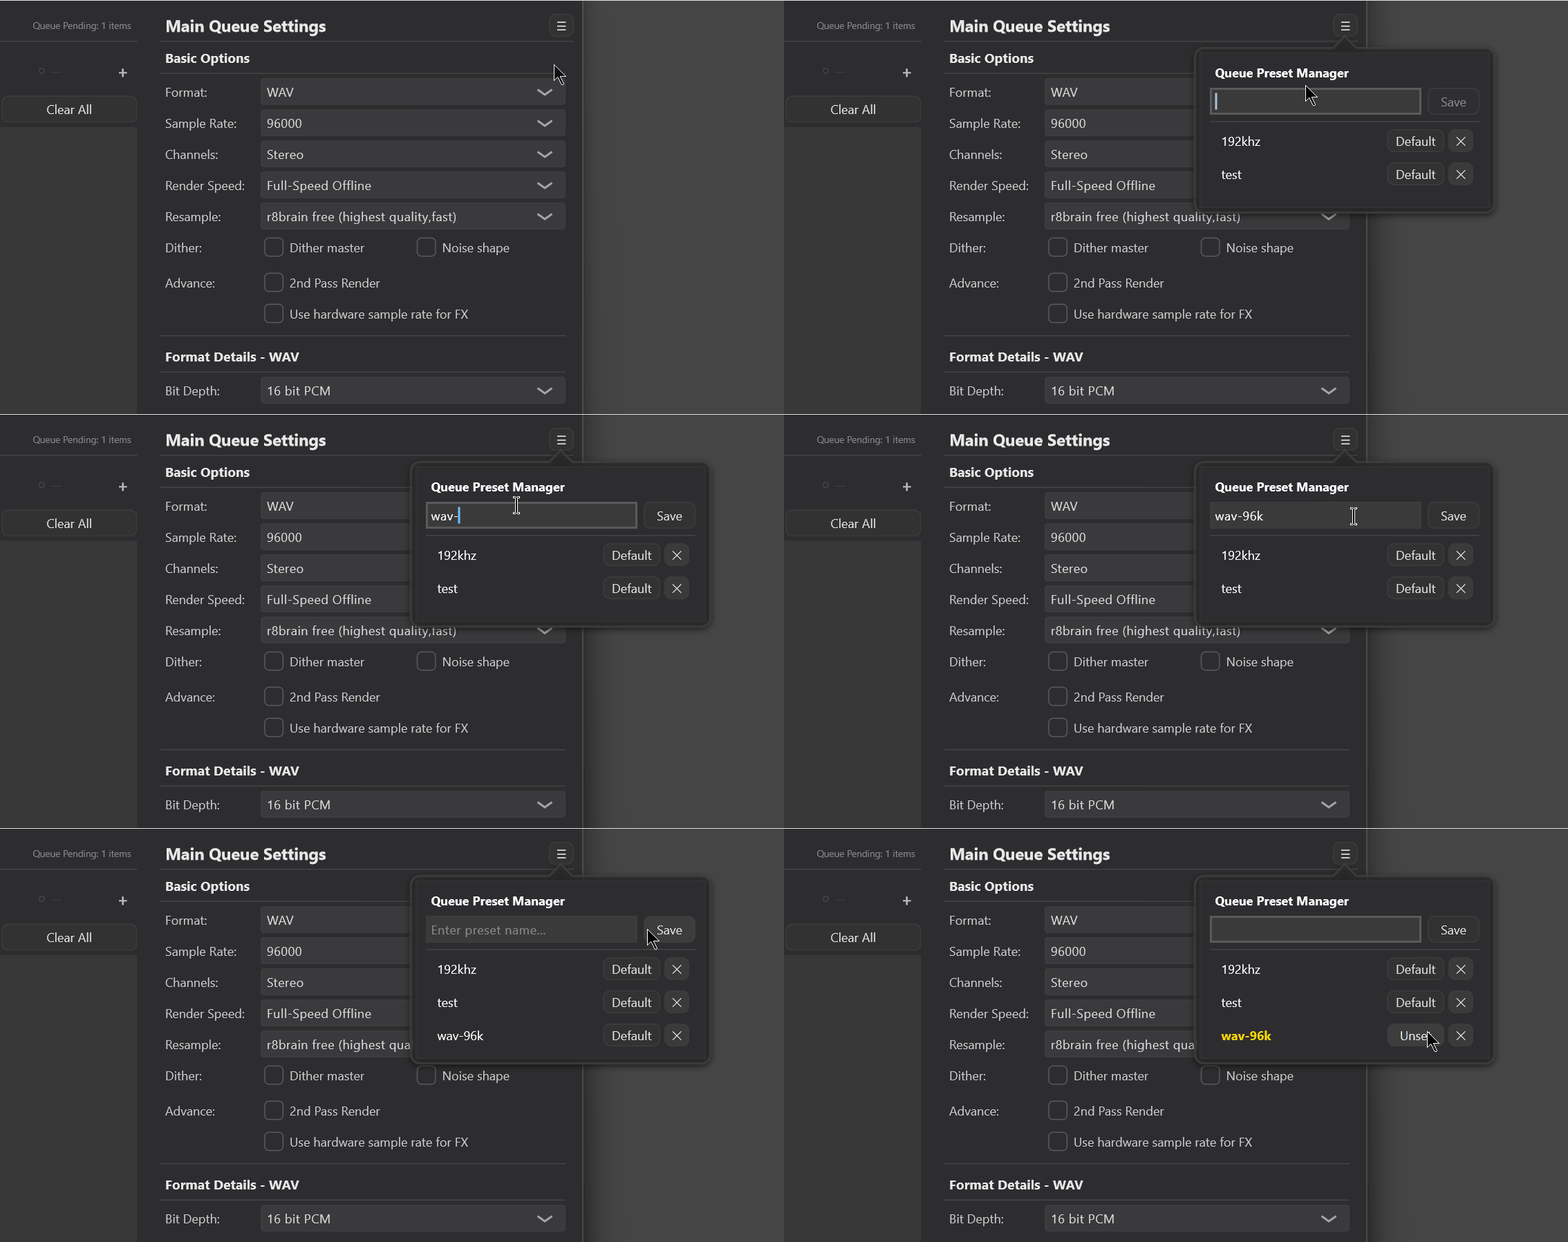
| Operation | How |
|---|---|
| Save preset | Type a name in Enter preset name... → click Save |
| Apply preset | Click a preset row; the configuration is applied to the current queue immediately |
| Set default | Click Default on a row (click Unset to remove). A default preset is automatically applied to new queues |
| Delete preset | Click the ✕ at the end of a row |
When there are no presets, the list shows No presets saved yet.
9. Bottom: Output & Naming + rendering
9.1 Output path
- Output Path input box + Browse button. Clicking Browse opens a quick picker:
⌂ Current Project Folder (Same as .RPP)— use the folder where the project file is located⧉ Open System Dialog...— open the system folder picker- Below that, recently used paths (or
No recent pathsif none)
9.2 Naming pattern and wildcards
- Naming Pattern input box (default
$region) determines the output file name. - Click Wildcards to open a panel listing available tokens by category (Region / Item / Time / Project info, etc.); click one to insert it into the naming box.
- The panel also lets you choose a separator (
Separator:→None /_/-) and ↺ Reset to Default to restore the default pattern for the current Source Type.
Example:
$region→ output file name is each region's name;$project_$region→ project name + underscore + region name.
9.3 START RENDER
The large button at the bottom triggers rendering:
| Situation | Button text | Render scope |
|---|---|---|
| No entry selected | START RENDER 🔵 | All enabled queues, fully rendered |
| Entry/entries selected | RENDER SELECTED / RENDER SELECTED (N) 🟠 | Only the selected entries |
Extra tips:
- Press
Enter— same as clicking START RENDER. - Hold
Shiftand click the button (orShift+Enter) — even if entries are selected, forces rendering of all enabled queues (the button tooltip also notes this). - Before rendering starts, focus is handed back to REAPER, and REAPER's own render progress window shows the progress.
9.4 Two switches
| Switch | Function |
|---|---|
| Auto hide window | Automatically hide the Render Queue window when rendering finishes (on by default) |
| Import back | Import the rendered files back into the project after rendering |
The status text on the far right (Ready / Selected: ... / Ready - N tasks pending) shows the current state and pending count in real time.
9.5 Render settings menu (▼ to the right of the button)
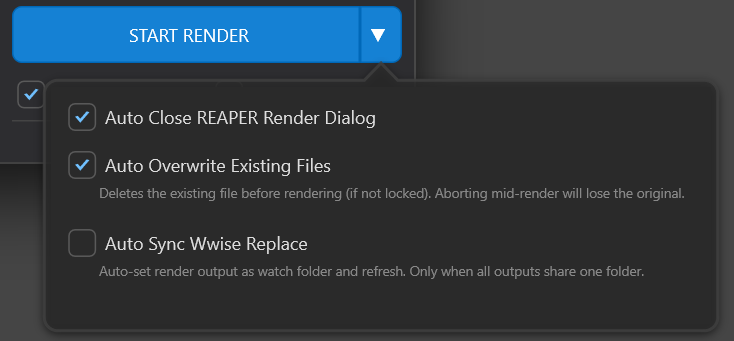
The small triangle ▼ to the right of START RENDER opens global switches:
| Switch | Description |
|---|---|
| Auto Close REAPER Render Dialog | Automatically close REAPER's render dialog when rendering finishes |
| Auto Overwrite Existing Files | If the output file already exists, delete the old file before rendering. ⚠️ Aborting a render after this is enabled will lose the original file. |
| Auto Sync Wwise Replace (Windows only) | After rendering, automatically set the output folder as Wwise Replace's watch folder and refresh (only works when all outputs are in the same folder) |
When Auto Overwrite is enabled, the tool checks whether the target files can be deleted before rendering; if any file is locked by another program, rendering is aborted and you are told which file — close the program that has it open and try again.
10. Stem export (Region Matrix)
Set Source Type to Via Master, fast - Region Matrix (green) and the tool switches into stem mode: instead of one file per region, you decide which tracks each region is split into, and every region × track pair becomes its own file.
This is REAPER's native Region Render Matrix, wrapped in a drag-and-drop interface — and driven via master, fast, so each stem still goes through the master chain and REAPER renders the stems in parallel in a single pass.
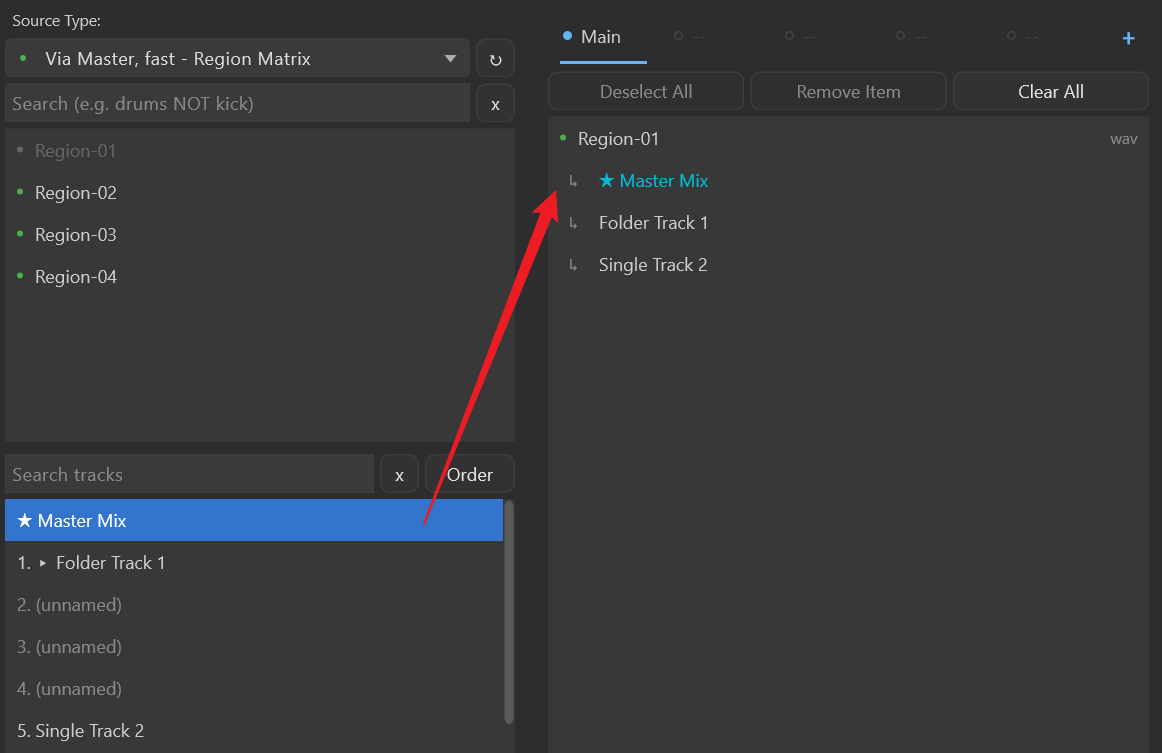
10.1 What changes in the interface
| Column | In stem mode |
|---|---|
| Left: Asset Browser | Splits into two lists: regions on top, tracks at the bottom (with their own search box and sort button). The Deselect All and Add to Queue buttons are gone — this mode is drag-only. |
| Middle: Render Queue | Regions are parent rows; each linked track appears as an indented child row marked ↳. The empty-queue hint becomes Drag regions here, then drag tracks onto them. |
| Right: Config | Unchanged, but settings belong to the region row. Track child rows carry no settings of their own. |
The track list toolbar:
Search tracks— filter the track list by name.- Sort button — click to cycle three modes:
Order(project track order) →Name(alphabetical) →Folder(folders first). ★ Master Mixis pinned to the top of the track list and is never filtered out. Linking it renders the full mix of that region, exactly likeMaster Mix - Regions.
10.2 The two-step workflow
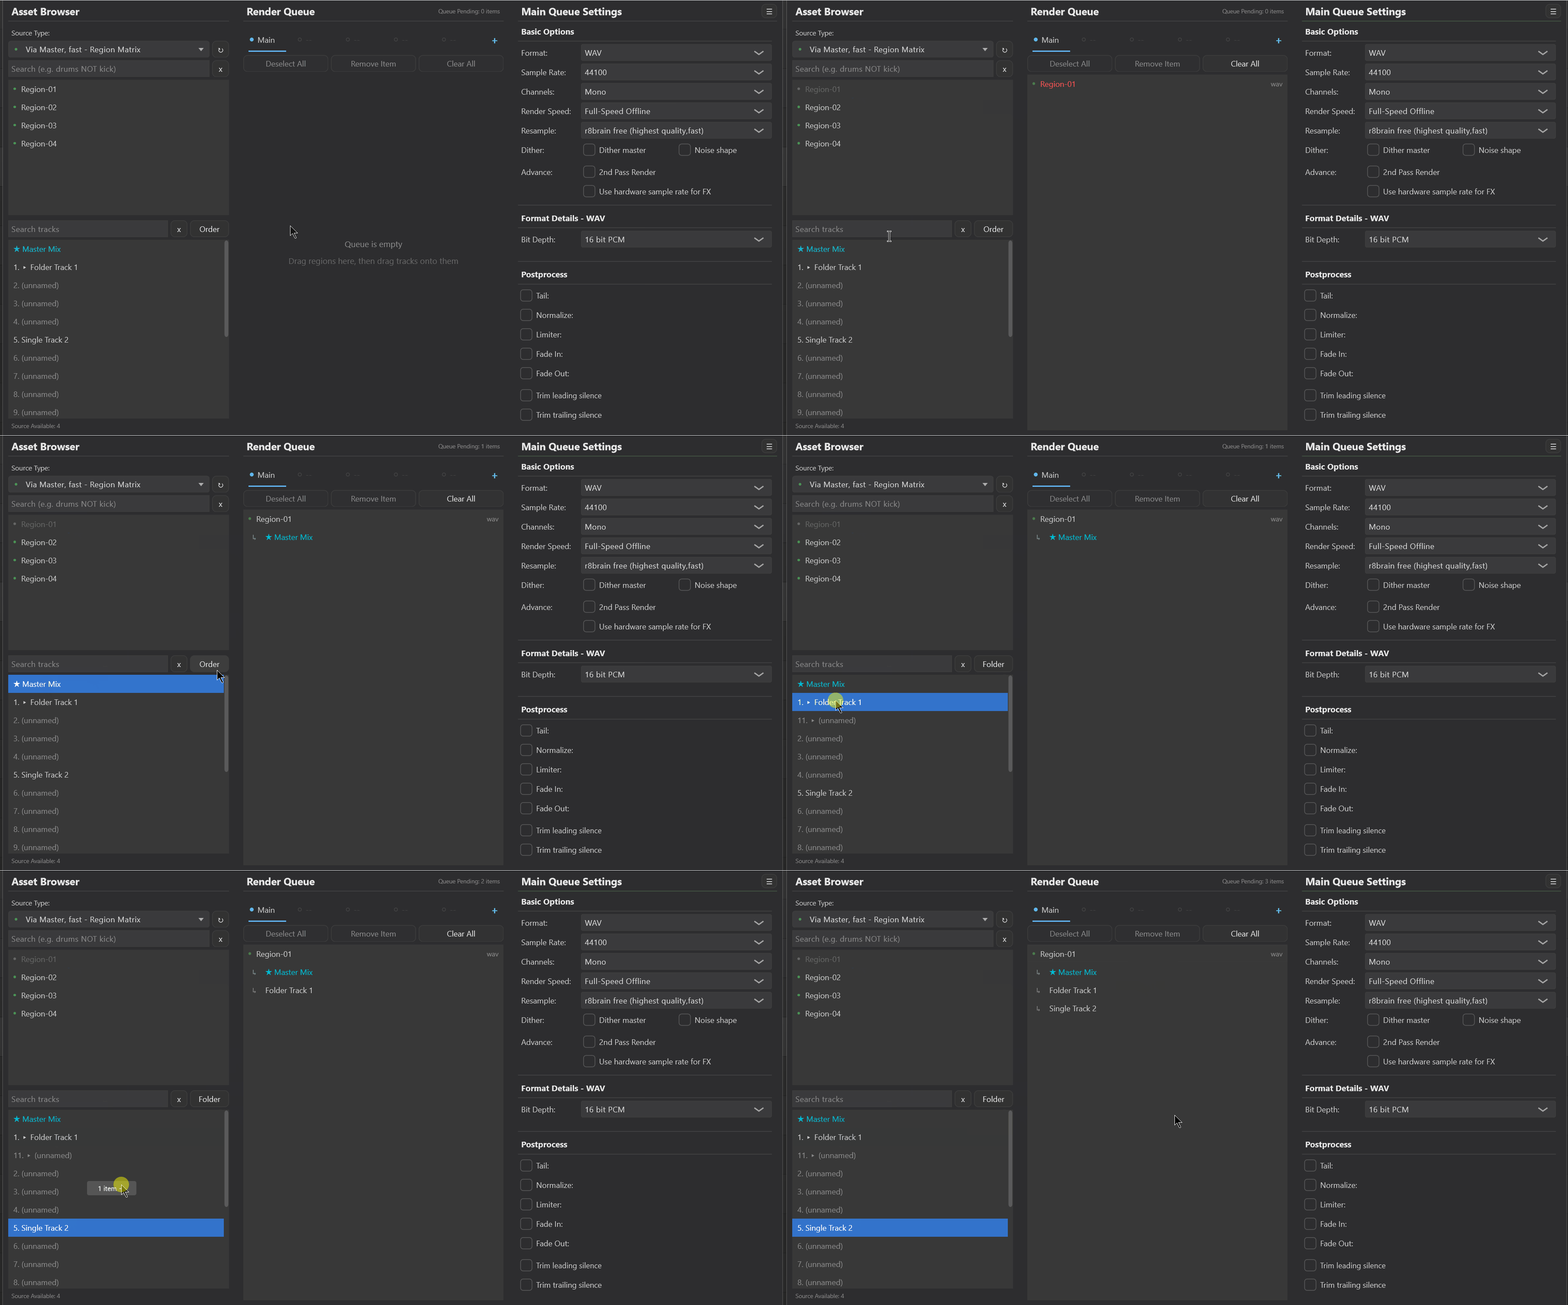
1. Drag regions from the upper-left list into the middle queue     → parent rows
2. Drag tracks from the lower-left list onto a region row          → child rows (= stems)
Rules worth knowing:
| Situation | Behavior |
|---|---|
| Multi-select tracks and drag | All of them are linked to the target region in one drop |
| Drop onto a child row | Counts as dropping onto its parent region — you never have to aim for the exact parent row |
| Drop on empty queue space | Nothing happens; the status bar says Drop tracks onto a region item |
| Dropping tracks with no region queued yet | Nothing happens; the status bar says Drag a region into the queue first |
| Linking the same track to the same region twice | Rejected — the existing child row flashes so you can see it is already there |
| The same track on several regions | Perfectly fine and expected; tracks are meant to be reused across regions |
Child rows are always displayed in project track order, with ★ Master Mix first, regardless of the order you dropped them in.
10.3 Warnings shown in the queue
| Appearance | Meaning | What to do |
|---|---|---|
| A region row in red | That region has no tracks linked yet, so it would produce nothing. It is silently skipped at render time. | Drag at least one track onto it, or remove it from the queue |
A child row in red ending in (missing) | The linked track was deleted or renamed away in the project. The link is kept, not auto-deleted, so you can repair the project instead of rebuilding the queue. It is skipped at render time. | Restore the track, or delete that child row |
A child row showing (unnamed) | The track has no name. REAPER will number the resulting files _01, _02, … automatically | Name your tracks if you care about the file names |
Links are stored by track GUID, so renaming a track keeps the link intact; the queue simply shows the new name.
10.4 Naming and file count
- The default naming pattern for this mode is
$track— the file is named after the track that produced it. Use↺ Reset to Defaultin the Wildcards panel to get it back. $trackis available in the Wildcards panel; for the★ Master Mixlink it resolves toMaster.- Combine wildcards when one flat folder is not enough, for example
$region_$track.
Watch out for name collisions. With a bare
$track, two different regions split to the same track produce the same file name. REAPER's own numbering saves you within a single render batch (Gun_01.wav,Gun_02.wav), but the result is hard to read. Add$regionto the pattern when you are exporting stems for more than one region at a time.
The bottom counter reflects this: in stem mode Queue Pending: N items and Ready - N tasks pending count links, not regions — one region with four stems counts as four.
10.5 What it does to REAPER's own matrix
When rendering starts, the tool clears REAPER's native Region Render Matrix completely and writes its own links into it. Anything you had ticked by hand in REAPER's matrix window is discarded, and it is not restored afterwards — the queue is the single source of truth, consistent with how the other Source Types treat REAPER's render settings.
10.6 Settings and Override in stem mode
Format, sample rate, and post-processing are picked per region, exactly as in §7.1: select a region row, tick Override Queue Settings, and all of that region's stems use the override. There is no per-stem configuration — every stem of a region shares the region's settings, which is what you want anyway when the stems are meant to be layered back together.
11. Typical workflows
Workflow A: render all regions in the project as separate WAV files
1. Draw regions around each sound in the project
2. Left column Source Type = "Master Mix - Regions" → list shows all regions
3. Click [Add All to Queue] to add them all
4. Right column: Format = WAV, Sample Rate = 48000, Channels as needed
5. Naming box = $region, output = [Current Project Folder]
6. START RENDER (or press Enter)
Workflow B: produce two formats from the same batch
1. Queue 1: add assets, configure WAV 48 kHz (for the engine)
2. Click [+] to create Queue 2, add the same assets, configure OGG (for preview)
3. Keep both tab dots enabled
4. Do not select any entry, then START RENDER → both configurations render in one pass
Workflow C: same configuration for the whole batch, but one entry needs special treatment
1. All entries follow the default (for example, normalize to -23 LUFS)
2. Single-click the special entry → check □ Override Queue Settings (turns green)
3. Change only that entry to -16 LUFS / add a fade-out
4. START RENDER → that entry uses its own settings, the rest use the queue settings
Workflow D: save a common configuration for reuse
1. Set format / sample rate / post-processing to your usual values
2. Click ☰→ type a name → Save
3. Click that preset's Default to make it the default
4. From now on, every [+] new queue automatically loads this configuration
Workflow E: export stems for a batch of regions
1. Left column Source Type = "Via Master, fast - Region Matrix"
2. Drag the regions you want into the middle queue
3. Multi-select the tracks that make up a stem set (Foley / Weapons / Music...)
   and drag them onto the first region row
4. Repeat for the other regions (the same track can be reused freely)
5. Naming box = $region_$track  ← avoids name collisions across regions
6. Check that no row is red, then START RENDER
Workflow F: fast video export with the GPU
1. One-time setup: install FFmpeg (shared) + update the graphics driver
   (the (?) link in the format panel opens the full guide)
2. Right column Format = MP4 (FFmpeg HW)
3. GPU = your card (set once, remembered for every project on this machine)
4. Video = H.264 (or H.265 for smaller files), QP 22-30
5. Audio = AAC 256 kbps, or a PCM option if you want lossless audio in the video
6. START RENDER
12. Troubleshooting
| Symptom | Cause | Fix |
|---|---|---|
| Left-column list is empty | No assets of the current Source Type exist; or project has no regions / no items selected | Switch Source Type; or create regions / select items in the project first, then click ⟳ |
Add button shows Requires New Queue and is grayed out | Selected asset type differs from the type locked by the current queue | Click [+] to create a new queue, then add that type of asset |
Add button shows Already Added | Selected assets are already all in the current queue | Normal; nothing to do |
Clicking ⟳ does not auto-update | More than 150 assets; auto-refresh disabled | Click ⟳ manually each time |
| START RENDER is grayed out and unclickable | No renderable entries, or all queues are disabled | Add assets to the queue; check that tab dots are enabled |
| Right-column config cannot be changed | Multiple entries selected (multi-select disables config), or single entry selected but Override not checked | Deselect to edit queue config, or check Override on a single entry |
| Rendering aborts with a "file in use" message | Auto Overwrite enabled, but the target file is locked by another program | Close the program using that file (player / engine), then render |
| Window disappears after rendering | Auto hide window is on (default behavior) | Uncheck it if you prefer the window to stay open |
| Worried about losing config changes | (Not possible) configuration is saved automatically with the project | Closing, reopening, or switching projects preserves the settings |
| Stem mode: a region row is red and produces no file | No tracks are linked to it | Drag one or more tracks onto that region row |
Stem mode: a child row is red and says (missing) | The linked track no longer exists in the project | Restore the track, or remove that child row |
| Stem mode: dragging tracks does nothing | Dropped on empty space, or no region is queued yet | Read the status bar hint; drop directly onto a region row |
Stem mode: stem files come out numbered _01, _02 | Bare $track pattern, several regions splitting to the same track | Use $region_$track (or another combination) as the naming pattern |
| Stem mode: my hand-made ticks in REAPER's Region Render Matrix are gone | Expected — rendering clears the native matrix and writes the queue's links instead | Manage the links in the queue, not in REAPER's matrix window |
| MP4 (FFmpeg HW) is missing from the Format list | macOS (Windows only), or an older REAPER | Use REAPER 7.66+ on Windows; on macOS use MP4 (H.264/AAC) |
| MP4 (FFmpeg HW) renders nothing, or is no faster than software | FFmpeg not installed / not on PATH, or an outdated graphics driver | Follow the setup guide behind the (?) link, then verify decoding as described there |
| The GPU choice does not follow the project to another machine | By design — GPU is a per-machine preference, not project data | Pick the GPU once on each machine |