
Pro Scan
1. Overview
Pro Scan is Mantrika Tools’ project navigation and track control window. It gathers every Track and Item in a REAPER project into a single searchable list, so you do not have to scroll through the Track Control Panel (TCP) line by line to find things. With it you can:
- Jump to any track or item with one click.
- Filter by name or FX to isolate the parts of the project you care about.
- Show Only a selected set of tracks, temporarily slimming the project down to just what you need.
- Control Mute / Solo / FX bypass / Volume / Pan directly inside the window, without switching back to the TCP or Mixer.
Typical use cases:
- A project has 200 tracks and you need “every track whose name contains Vocal and has ReaEQ on it.”
- You want to focus on one folder’s contents for editing, then restore the full project view afterward.
- Lower the volume of several selected tracks by 3 dB in one go.
- In a Mirror workflow, see only the Mirror items in the project.
2. Opening Pro Scan
Menu entry:
Extensions → Mantrika Tools → Pro scanOr search in the Action List:
| Action Name | Purpose |
|---|---|
mantrika : Synergy - Pro Scan | Open / close the Pro Scan window |
3. Interface Overview
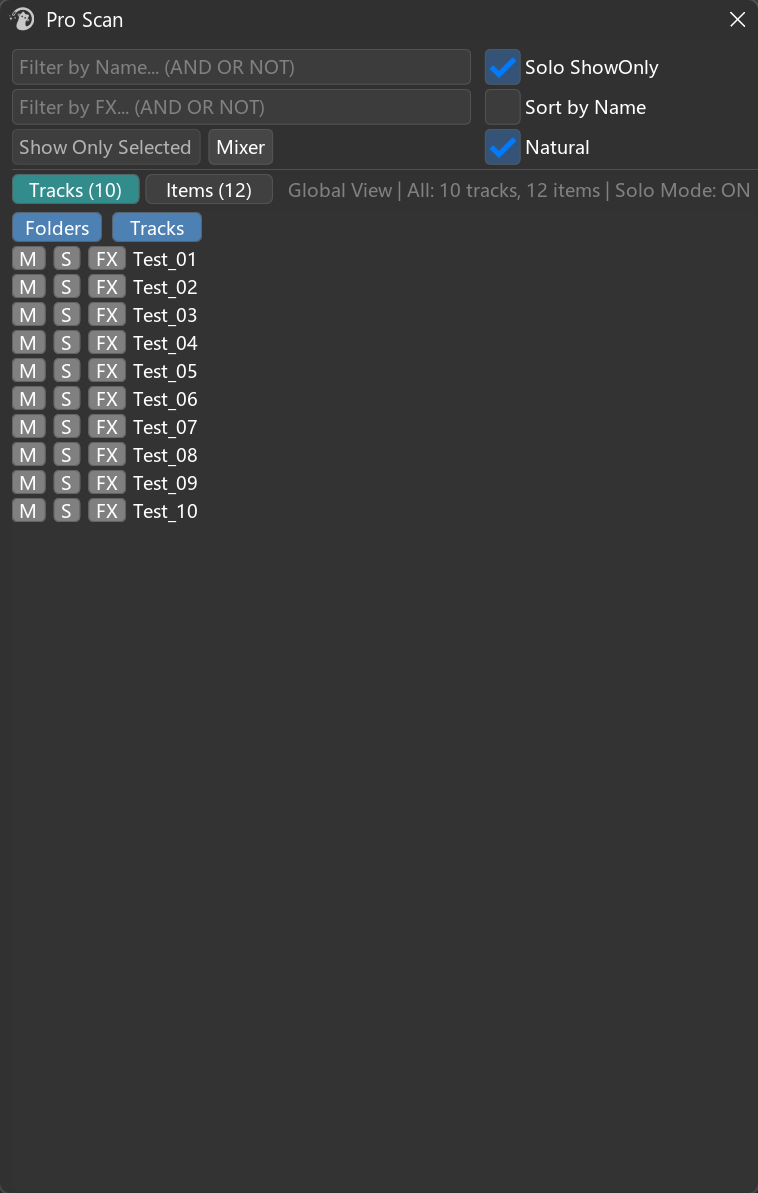
Four main areas:
| Area | Contents |
|---|---|
| Top 3-row toolbar | Name filter / FX filter / action buttons and toggles |
| Status bar | Current REAPER selection count, filter/total stats, Solo & ShowOnly status |
| Tab row | Tracks Tab / Items Tab (numbers = currently visible count) |
| Main list area | Contents of the active tab; Tracks Tab supports nested folder display |
4. Toolbar (Top 3 Rows)
4.1 Name Filter

Filters objects by name in real time. Tracks Tab and Items Tab share the same filter — typing Vocal affects both the track list and the item list.
Supported syntax (same as REAPER’s search box):
| Syntax | Meaning | Example |
|---|---|---|
word1 word2 | AND (both must appear) | kick drum |
word1 OR word2 | OR (either may appear) | vocal OR vox |
NOT word | Exclude | drum NOT kick |
"exact phrase" | Exact phrase | "lead vox" |
^word | Starts with word | ^FX_ |
word$ | Ends with word | .wav$ |
(a OR b) c | Grouping | (kick OR snare) bus |
💡 Leave the filter box empty = show all objects. Leading/trailing whitespace is ignored automatically.
4.2 FX Filter

Filters objects by the names of FX loaded on the track / item. Two special uses:
- Type
*(Shift+8) — shows all objects that have any FX loaded (ignoring FX names). - Type a specific name (supports the same AND/OR/NOT syntax as §4.1) — shows only objects carrying that FX.
Name Filter and FX Filter can be combined — for example, Name = Vocal and FX = ReaEQ gives you “tracks whose names contain Vocal and that have ReaEQ loaded.”
4.3 Action Buttons and Toggles
| Control | Behavior |
|---|---|
| Show Only Selected | Show Only the tracks currently selected inside Pro Scan (see §6). |
| Show All | Exit Show Only and restore full track visibility (only visible while ShowOnly is active). |
| Mixer / Normal | Toggle the Tracks Tab render mode between M/S/FX buttons and volume fader + pan knob. |
| ☑ Solo ShowOnly | When enabled, Show Only automatically Solos the shown tracks; the original Solo state is restored when ShowOnly ends. |
| ☑ Sort by Name | Sort the list alphabetically with natural number handling (Track2 comes before Track10). When off, project order is used. |
| ☑ Natural | When no filter is active, mix top-level folders and top-level standalone tracks together in project order instead of splitting them into two sections (see §5.8). |
All toggle states are saved automatically; Pro Scan will restore them the next time you open it.
5. Tracks Tab
The Tracks Tab is Pro Scan’s main stage. It shows every visible track, supports full folder nesting, Mute / Solo / FX control, Mixer mode, and batch volume adjustments.
5.1 Track Row Structure
Normal Mode (Default)
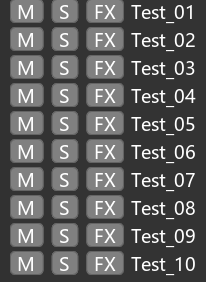
 M  S  FX   Track Name
 │  │  │
 │  │  └─ FX Chain button / FX bypass control (click behavior in §5.5)
 │  └─ Solo toggle
 └─ Mute toggle
Button color meanings:
| Color | M/S Meaning | FX Meaning |
|---|---|---|
| Gray | Not muted / not soloed | No FX |
| Yellow | Muted / soloed | FX present but all bypassed |
| Green | — | FX present and at least one enabled |
Mixer Mode

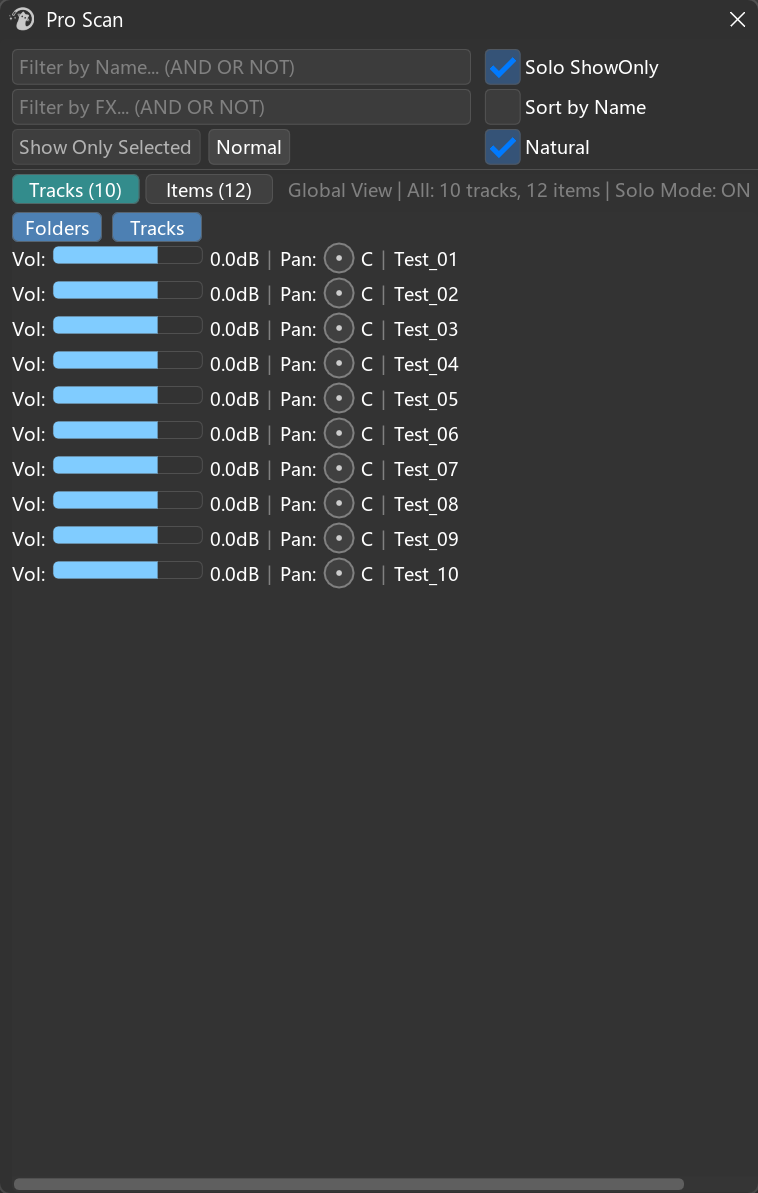
Switch with the toolbar Mixer / Normal button. In Mixer mode the list becomes wider and a horizontal scrollbar appears at the bottom.
5.2 Selection Interaction (Mouse)
| Operation | Behavior |
|---|---|
| Left-click track name | Select that track and jump to it in REAPER (SetOnlyTrackSelected and scroll vertically to it). If the track is inside a collapsed parent folder (including nested folders), Pro Scan automatically expands those parent folders first so the scroll can reach it. |
| Ctrl + left-click | Add/remove from the Pro Scan selection only (does not jump immediately). |
| Shift + left-click | Range selection (anchors from the previous Ctrl/click position). |
| Right-click track name | Make this track the only selection and Show Only it (right-click the same row again = Show All). |
Pro Scan’s selection is linked to REAPER jumps: clicking a row makes REAPER select only that row. Ctrl/Shift multi-selection affects only Pro Scan’s internal state and does not immediately change the REAPER selection.
5.3 Folder Display
Folder parent tracks have an expand/collapse button, ▶ / ▼:
Expand/collapse click behavior:
| Operation | Behavior |
|---|---|
| Left-click | Toggle the current folder’s expanded/collapsed state |
| Ctrl + left-click | Toggle all folders expanded/collapsed at once |
| Double-click folder name | Also toggles expand/collapse |
💡 Folder expand/collapse state is synced to REAPER’s TCP — collapsing a folder in Pro Scan collapses it in REAPER’s main window too.
The M / S / FX buttons on folders behave the same as on normal tracks, and Ctrl+clicking the FX button toggles bypass for every FX on the folder parent track at once.
Right-clicking a folder Show Onlys the whole folder (parent track + all child tracks).
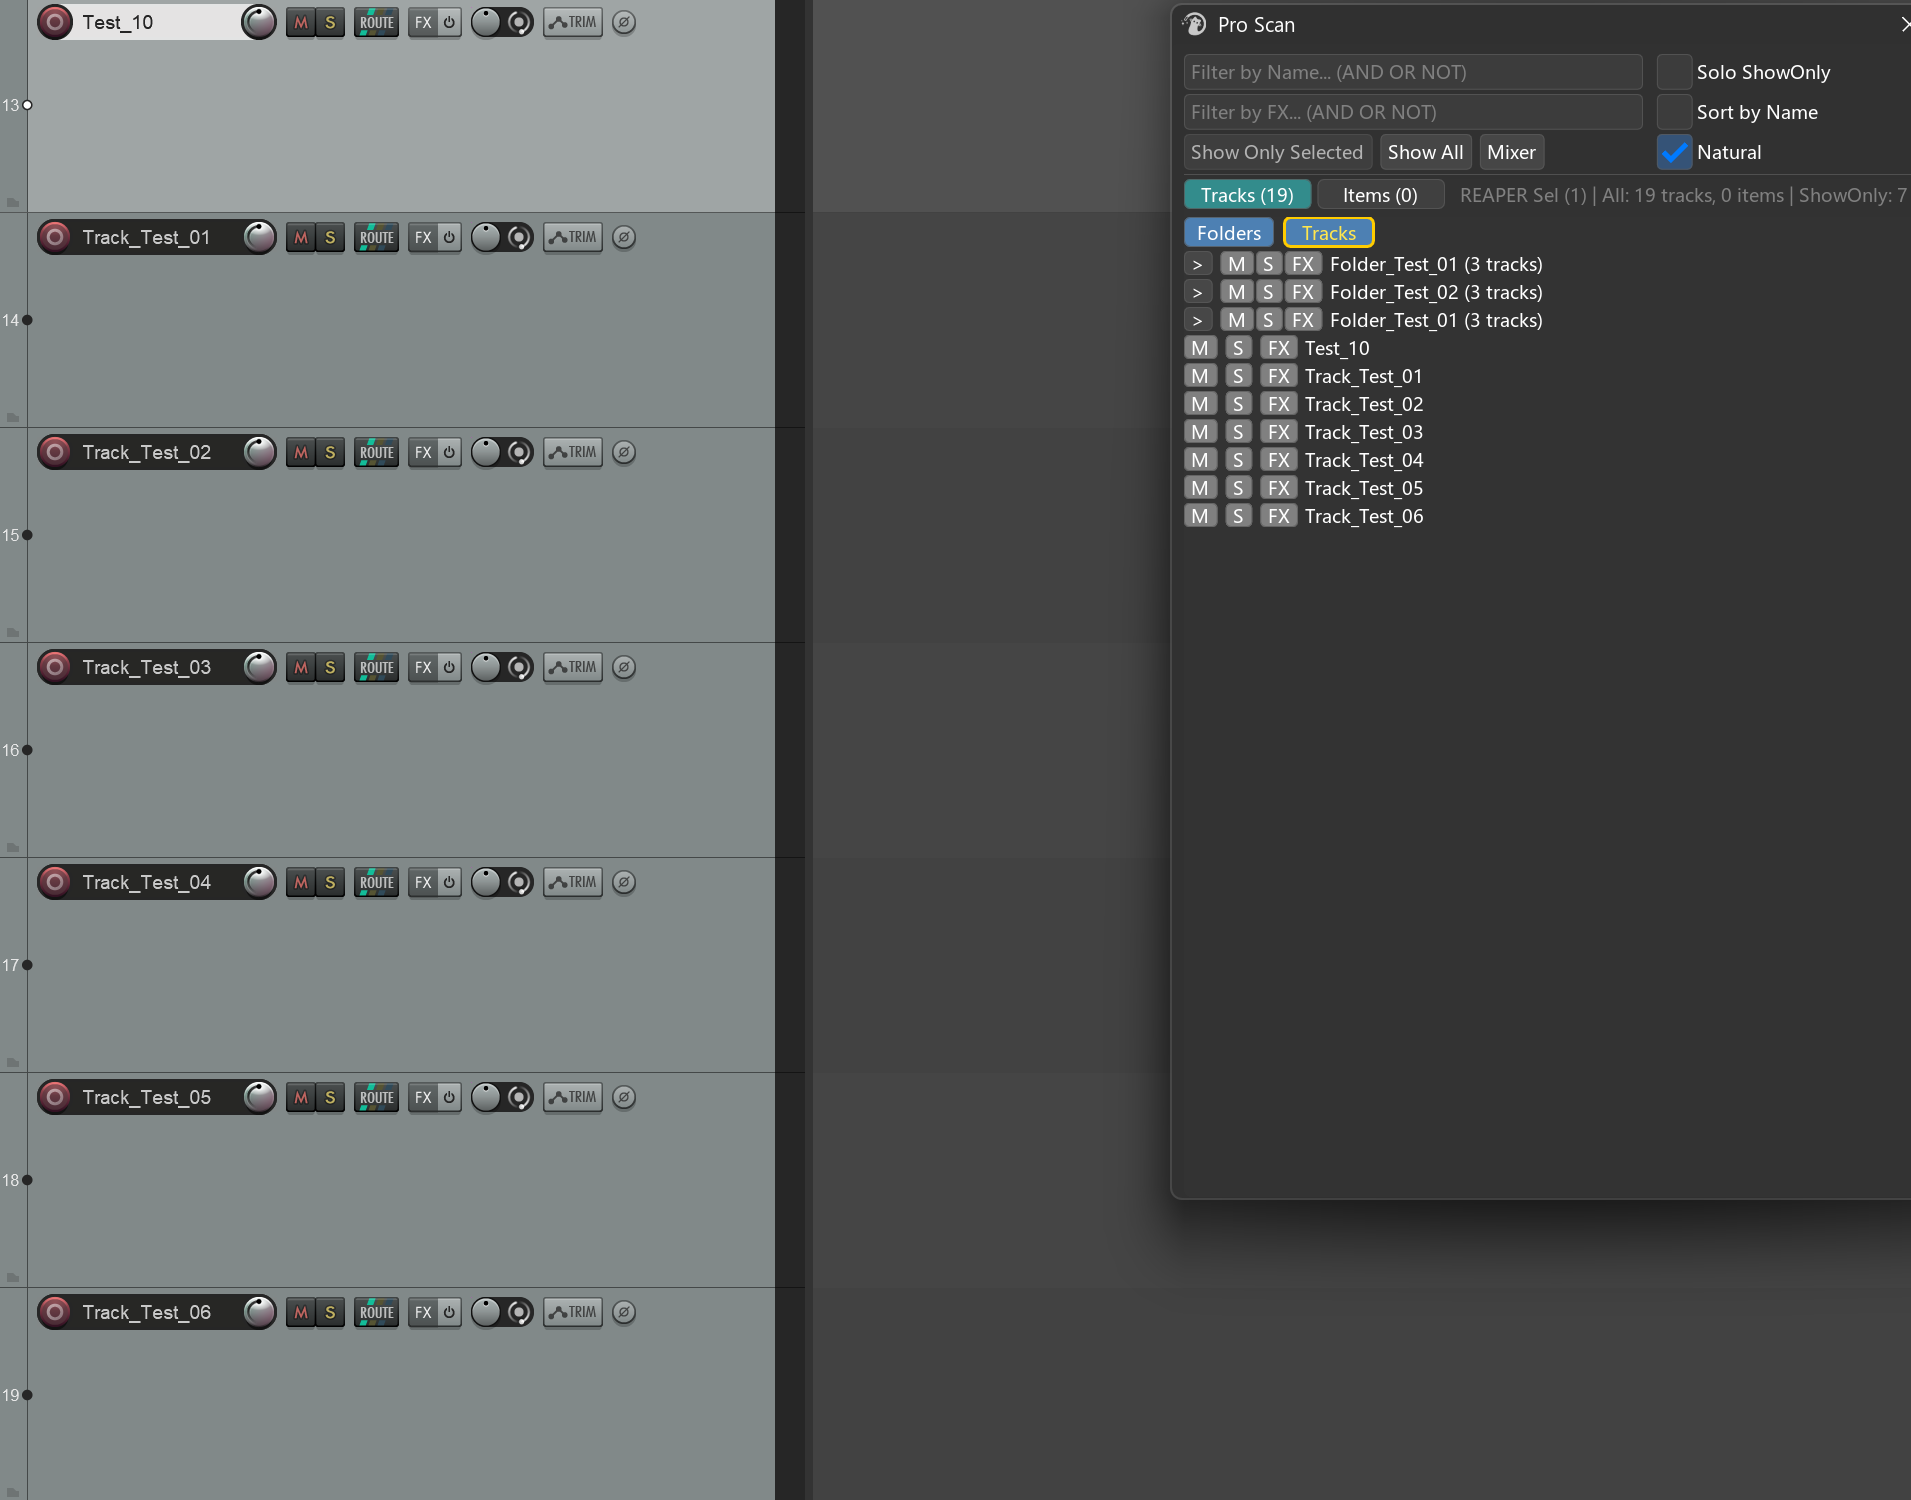
5.4 Group Toggles: Folders / Tracks Buttons
When no filter is active (both Name and FX filters empty), two independent buttons appear above the list:

| Operation | Behavior |
|---|---|
| Left-click Folders | Show/hide the entire folder section — when off, no folders (with their children) appear in the Pro Scan list; click again to restore. |
| Left-click Tracks | Show/hide the entire standalone-track section — when off, every track that is not inside a folder disappears; click again to restore. |
| Right-click Folders | One-click Show Only all folders (including their child tracks). |
| Right-click Tracks | One-click Show Only all standalone tracks that are not in folders. |
While ShowOnly is active, these buttons show a gold border + pale yellow text so you know which mode you are in. Right-click the same button again to Show All.
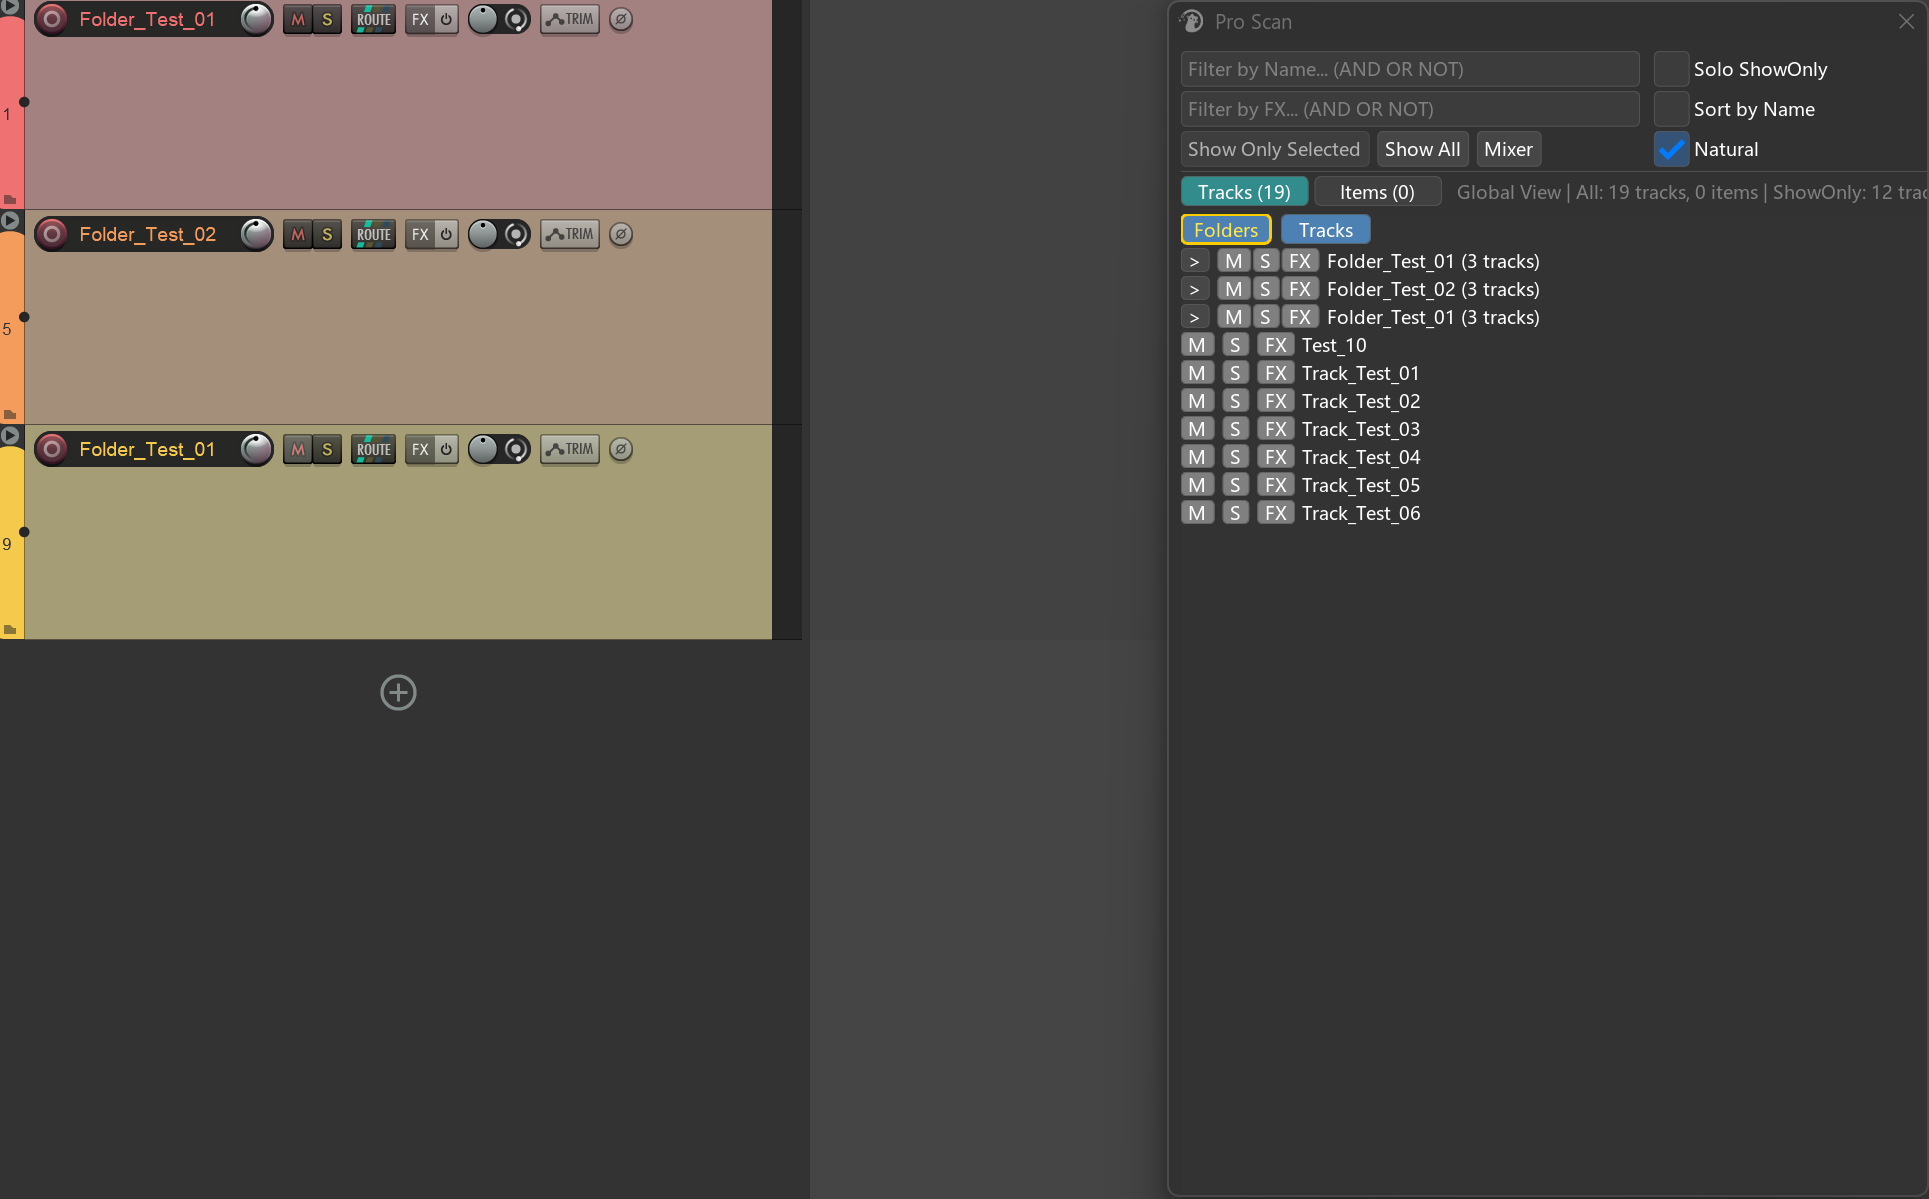
5.5 Advanced FX Button Usage
The FX button in Normal mode has two click behaviors:
| Operation | Behavior |
|---|---|
| Left-click | Open / close the track’s FX Chain window. |
| Ctrl + left-click | Batch-toggle bypass for every FX on that track (the button turns green/yellow to show the current state). |
Use this for quick A/B comparisons of “FX on vs FX off.”
5.6 Mixer Mode: Volume and Pan
In Mixer mode each track row becomes a mini mixer strip.
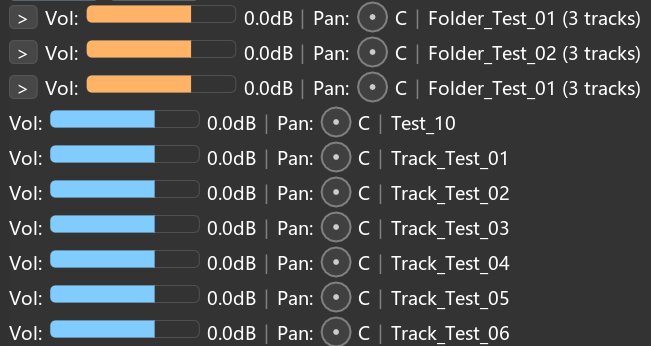
Volume fader (horizontal blue fill):
| Operation | Behavior |
|---|---|
| Left-drag | Adjust volume |
| Shift + drag | Fine adjustment (sensitivity ÷10) |
| Ctrl + click | Pop up an input box to type a dB value directly |
| Double-click | Reset to 0 dB |
Pan knob (circular):
| Operation | Behavior |
|---|---|
| Left-drag vertically (up = larger, down = smaller) | Adjust pan |
| Shift + drag | Fine adjustment (sensitivity ÷2) |
| Ctrl + click | Pop up an input box to type a percentage (-100 ~ +100) |
| Double-click | Reset to center (C) |
Batch adjustment with multiple selection:
When several tracks are selected in Pro Scan and you drag the Volume or Pan of one of them, the whole selection moves together, and:
- In drag mode, all selected tracks keep their existing relative offsets; they are not forced to the same value.
- In double-click mode, all selected tracks jump to the target value (for example, all to 0 dB).
5.7 Sort Mode

The toolbar Sort by Name checkbox controls the list order:
- Off (default) — REAPER project track order (
IP_TRACKNUMBER). - On — Natural name sort (numbers are compared numerically, so
Track2 < Track10).
Sorting affects top-level tracks, children inside folders, and the order between folders.
5.8 Natural Sort

The toolbar Natural checkbox (Tracks Tab only, no filter active):
- Off — list is split into two sections:
Foldersfirst, thenTracks outside folders:. - On — top-level folders and top-level standalone tracks are mixed together in project order (or by name when Sort by Name is on).
Use this when folders and loose tracks are interleaved in your project; Natural mode makes Pro Scan’s list look the same as the TCP.
6. Show Only: Temporary Focus
Show Only is Pro Scan’s core workflow — temporarily isolate a set of tracks, hide everything else, then restore with one click.
6.1 Five Ways to Trigger Show Only
| Trigger | Scope |
|---|---|
| Right-click a single track | Show only that track |
| Right-click a folder | Show the folder parent + all child tracks |
| Select multiple rows and click Show Only Selected | Show all currently selected Pro Scan tracks |
| Right-click the Folders button | Show all folders (with child tracks) |
| Right-click the Tracks button | Show all standalone tracks not in folders |

6.2 Three Ways to Exit Show Only
| Operation | Behavior |
|---|---|
| Click Show All | Restore full visibility + restore the Arrange view + jump back to the track you were on before ShowOnly |
| Right-click the same track again | (Single-track trigger only) Same as Show All |
| Right-click the same folder again | Same as Show All |

After exiting, Pro Scan automatically jumps back to where you were before entering ShowOnly.
6.3 Solo ShowOnly (Optional Boost)
When the toolbar ☑ Solo ShowOnly checkbox is on:

- Entering Show Only saves the current Solo state, then Solos the tracks being shown.
- Exiting Show Only clears the Solos it added and restores the original Solo state.
This is ideal for the “I only want to hear these few tracks” monitoring scenario — it goes a step beyond Show Only by making sure you only hear the visible tracks too.
⚠️ Each new ShowOnly overwrites the previously saved Solo snapshot. Treat Solo ShowOnly as a temporary monitoring tool: enable → use → disable.
7. Items Tab
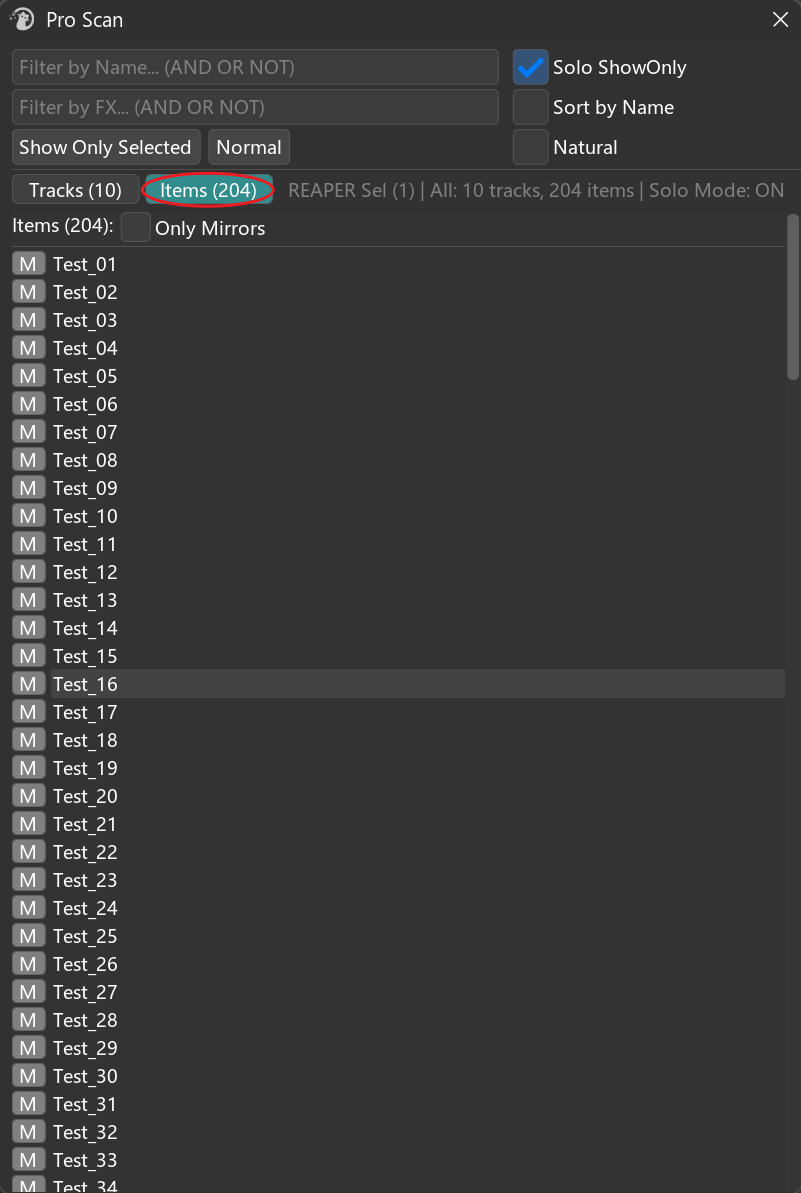
The Items Tab is a flat list of every item in the project. It is simpler than the Tracks Tab:
7.1 Row Structure
| Element | Purpose |
|---|---|
| M button | Toggle the item’s Mute state (yellow = muted, gray = normal) |
| Item name | Click to jump; Ctrl/Shift multi-select (same behavior as Tracks Tab) |
7.2 Only Mirrors Toggle
When ☑ Only Mirrors is on:
- The list shows only Mirror-type items (Mantrika’s own item type).
- The tab title changes to
Mirrors (N):.
💡 Use case: when doing layout or alignment with the Mirror system, this pulls every Mirror in the project into one list at a glance.
7.3 Jump to Item
Clicking an item name will:
- Select that item in REAPER (deselecting everything else).
- Select the item's parent track (if the track is hidden inside a collapsed parent folder, the parent folder is expanded first).
- Move the edit cursor to the item’s start.
8. Status Bar
REAPER Sel (3) | Filtered: 24 tracks, 102 items | Solo Mode: ON (Active: 5 tracks) | ShowOnly: 5 tracksSegments:
| Segment | Meaning |
|---|---|
| REAPER Sel (N) / Global View | REAPER currently has N tracks selected; shows Global View when zero |
| All / Filtered | Visible track count + item count; shows Filtered: when a filter is active, All: otherwise |
| Solo Mode: ON | Only shown when ☑ Solo ShowOnly is enabled; Active: N = how many Solos were added by ShowOnly |
| ShowOnly: N | Only shown while ShowOnly is active; N = number of currently displayed tracks |
9. Auto-Refresh
Pro Scan does not need a manual Refresh:
- REAPER selection changes — Pro Scan selection and list refresh automatically.
- Project state changes — deleted tracks/items are detected and cleaned up.
- Filter input changes — lists update in real time as you type.
- Mute / Solo / Pan / Volume edits — changes made inside Pro Scan take effect immediately.
10. Typical Workflows
Workflow A: Quickly Find and Focus a Track
Goal: The project has 200 tracks; jump to the “Lead Vocal” track.
1. Type Lead Vocal in the Name Filter
2. The list filters down to a few results
3. Click the target track
 → REAPER selects it and scrolls to it
 → If it is inside a collapsed folder (including nested folders), parent folders expand first
Workflow B: Temporarily View Only the Drum Bus
Goal: Edit drums without being distracted by other tracks.
1. Find the “Drum Bus” folder in the list
2. Right-click the folder name
 → Only Drum Bus + all child tracks are shown
 → Arrange view zooms to the drum content
3. When done, right-click “Drum Bus” again (or click Show All)
 → All tracks and the Arrange view are restored
Workflow C: Find Every Vocal Track with ReaEQ
Goal: Batch-check vocal EQ settings.
1. Name Filter: Vox OR Vocal
2. FX Filter: ReaEQ
 → List filters to every track whose name contains Vox/Vocal and has ReaEQ loaded
3. Click any row → jump to that track
4. Left-click the FX button → open the FX Chain window directly
Workflow D: Batch Lower 3 dB
Goal: Select 8 guitar tracks and lower them together by 3 dB while keeping their relative volume differences.
1. Switch to Mixer Mode
2. Name Filter: Guitar
3. Ctrl-click or Shift-click to select the 8 guitar tracks in the list
4. Drag any one Volume fader left by 3 dB
 → All 8 tracks drop by 3 dB (relative differences preserved)
Workflow E: A/B FX On vs Off
Goal: Quickly compare a bus with a long FX chain against all FX bypassed.
1. Click the target track in the list to select and jump to it
2. Ctrl-click that track’s FX button
 → All FX on that track are bypassed at once (button turns yellow)
3. Listen to section A
4. Ctrl-click the same FX button again
 → All FX return to their previous state (button turns green)
5. Listen to section B
Workflow F: View Only Mirrors
Goal: Check the placement of every Mirror in the project.
1. Switch to Items Tab
2. Check ☑ Only Mirrors
 → List shows only Mirror items
3. Click any row
 → Jump to its position
Workflow G: Solo + ShowOnly Combined
Goal: Hear and see only one group while checking it.
1. Check ☑ Solo ShowOnly in the toolbar
2. Right-click the target folder
 → The folder is shown and those tracks are automatically Soloed
3. Listen and watch
4. Click Show All (or right-click the folder again)
 → Visibility and Solo state are restored; view jumps back to the previous track
5. (If you no longer need Solo linking) uncheck ☑ Solo ShowOnly
11. Notes
11.1 ShowOnly Exit Jumps Back to the Pre-ShowOnly Track
It does not jump to “the track you were looking at right before Show All.” It jumps to the track that had focus when you entered ShowOnly. This is intentional — it keeps you from losing your place after scrolling around inside ShowOnly.
11.2 Solo ShowOnly Overwrites Your Previous Solo Snapshot
Each new ShowOnly first clears the Solos it previously added and saves the current real Solo state. If you manually Solo other tracks while Solo ShowOnly is active, those manual Solos will be treated as the “original state” and restored on the next ShowOnly.
11.3 Multi-Select in Tracks Tab Does Not Affect REAPER Selection
Ctrl/Shift multi-select only affects Pro Scan’s internal state — it tells Show Only Selected and batch Mixer adjustments which tracks to operate on. To sync a multi-selection to REAPER, click one of the selected rows (this switches REAPER to a single selection).
11.4 Drag vs Double-Click Behave Differently in Mixer Mode
- Drag → multi-selection uses deltas (relative offsets preserved).
- Double-click → multi-selection uses absolute values (all reset to the target).
If you want every selected track’s volume to land exactly on -6 dB, dragging cannot do that; use Ctrl+click to type the value, or double-click to reset to 0 dB first and then adjust.
11.5 Folder Expand State Is Driven by REAPER
Pro Scan folder collapses are synced to REAPER’s TCP and vice versa. If you manually collapse a folder in REAPER’s main window, Pro Scan will display it collapsed on the next refresh.
Exception: when you click to jump to a track / item inside a collapsed folder, ProScan automatically expands its parent folder(s) as needed to make the target visible. This expansion syncs to REAPER’s TCP and creates an Undo point; already-expanded folders are unaffected.
11.6 FX Filter * Is a Special Keyword
* (Shift+8) in the FX filter is not a wildcard — it is a special keyword meaning “show every object that has any FX.” To filter by FX name, just type the name (no wildcard needed).
11.7 Items Tab Has No Folder Concept
The Items Tab is a flat list and ignores the folder hierarchy of the parent tracks. To view items by folder, switch to the Tracks Tab and expand the folder to see its child tracks.
12. Troubleshooting
| Symptom | Likely Cause | Fix |
|---|---|---|
| List is empty | Filter is too strict | Clear the Name / FX filters |
| List is empty | Project really has no tracks/items | Check REAPER |
| Clicking a track does not jump | Ctrl/Shift is being held | Click without modifiers, or click the row once more |
| FX button does not respond | FX operation is in progress (re-entrant protection) | Wait a few hundred milliseconds and try again |
| Solo remains after exiting Solo ShowOnly | You manually Soloed other tracks during ShowOnly; those were saved as the original state | Manually clear the extra Solos |
| Mixer fader slides too fast | Default sensitivity is high for your DPI | Hold Shift for fine mode (volume ÷10, pan ÷2) |
| Mixer fader will not move | Value is already at a boundary (-150 dB or +12 dB) | Boundaries reached; cannot go further |
| Multi-select drag moves only one track | The track you are dragging was not included in the multi-selection | Make sure the dragged track is part of the selection |
| FX buttons are all gray | No tracks in the project have FX loaded | Normal display |
| Right-clicking Folders does nothing | Project has no folder tracks | Normal behavior |
| Right-clicking Tracks does nothing | Every track in the project is inside a folder | Normal behavior |
| Only Mirrors is blank | Project has no Mirror items | Normal |
| Show Only Selected button is gray | Pro Scan has no tracks selected | Select at least one track in the list first |